Logging in through external identity providers#
Setting up login via external identity providers has the following steps:
Make settings under “Identity Providers” in the Blitz Identity Provider Management Console.
Perform settings on the Identity Provider side.
Enable the ability to log in through this identity provider under “Authentications” (see Logging in via external identification services).
Use the Identity Providers section of the Management Console for configuration. The initial screen shows the configured providers and allows you to select the desired Identity Provider type for customization.
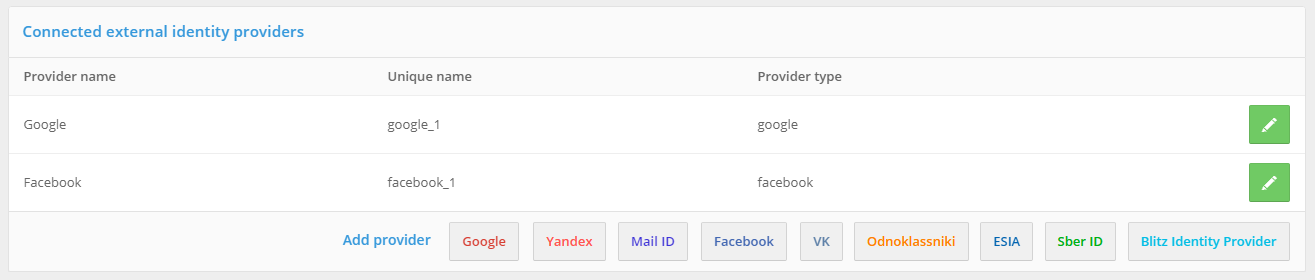
View of the Identity Provider Setup screen
Configuring an Identity Provider consists of the following steps:
Specifies the vendor ID and vendor name.
Specifying vendor connection settings (described in this section for each identity provider).
Specifies the binding settings for the external Identity Provider account and the Blitz Identity Provider account. These settings are not vendor-type specific.
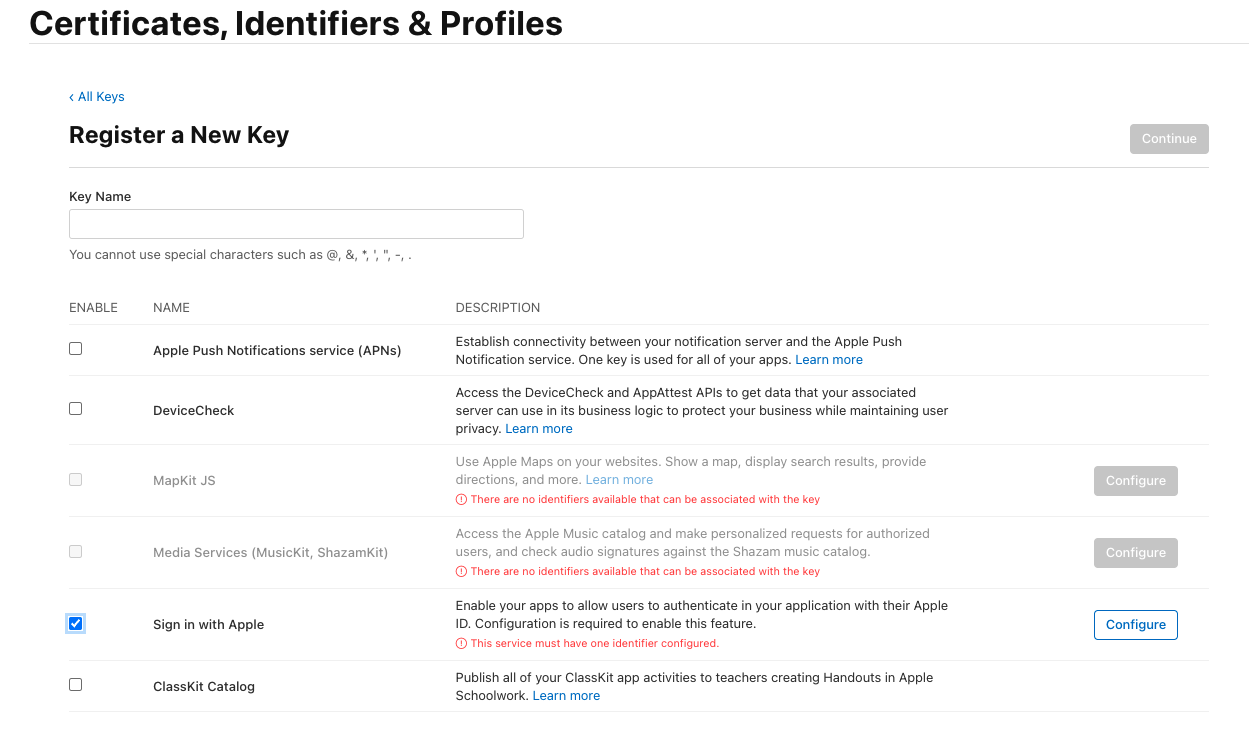
Logging in via Apple ID#
To configure logging in via Apple ID, go to “Apple Developer Account” (note, the company must have a valid Apple Developer ID subscription) to the “Certificates, Identifiers & Profiles” section, where you perform the following operations:
In the “Certificates, Identifiers & Profiles” window, select the “App IDs” filter in the upper right corner. Use the “+” button next to “Identifiers” to create a new “App ID”:
select the
Apptype;set “Description”. It will be displayed to the user in the Apple ID login confirmation window;
in “Bundle ID” set an identifier of the form
com.company.loginbased on the domain used in Blitz Identity Provider;in “Capabilities” check “Sign In with Apple”, click the
Editbutton next to it, and check that “Enable as a primary App ID” is selected;you will be prompted to complete the configuration - all this is described in the following paragraphs. For now you should press “Register”.

Displaying a list of App IDs#
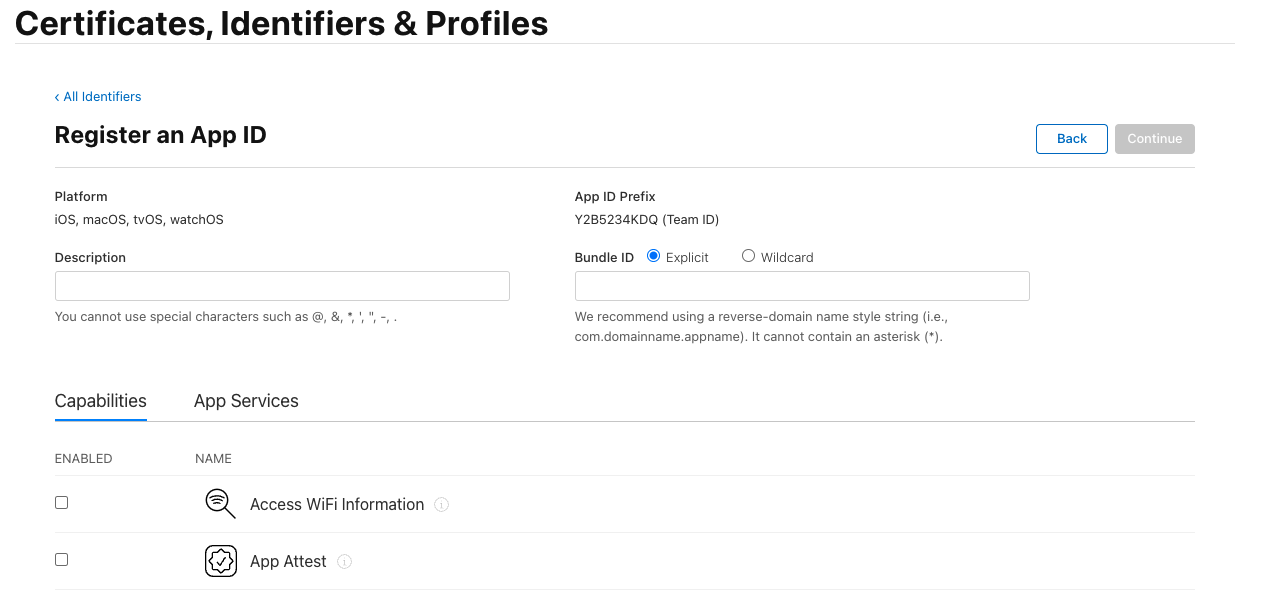
Registering a new App ID#
In the “Certificates, Identifiers & Profiles” window, select the “Services App IDs” filter in the upper right corner. Use the “+” button next to “Identifiers” to create a new “Services App ID”:
set “Description”. It will be displayed to the user in the Apple ID login confirmation window;
set “Identifier”. It is recommended to set it as
com.company.loginbased on the domain used in Blitz Identity Provider. Later the createdIdentifiermust be entered in the Blitz Identity Provider settings asclient_idin the “Service ID” setting;press ”Register”;
select the created “Service ID”. In its settings, check the “ENABLED” checkbox and click “Configure”;
in the opened window, check that the “Primary App ID” contains the previously created “App ID”;
in “Domains and Subdomains” list the domains used by Blitz Identity Provider, separated by commas;
in “Return URLs” list the
URLsof the return, separated by commas and specifyinghttps. You must specifyURLs, samples of which Blitz Identity Provider shows in the Apple ID connection settings, for example:
https://login.company.com/blitz/login/externalIdps/callback/apple/apple_1/false
https://login.company.com/blitz/profile/social/externalIdps/callbackPopup/apple/apple_1
confirm the settings by pressing “Confirm”, “Done”, “Continue”, “Save” in successive screens;
In the “Keys” menu, create a key for “Sign In with Apple”. This can only be done once, so it is recommended to save the created key somewhere. In Blitz Identity Provider this key is not currently used and will not be needed, but it should be created and saved for the future.
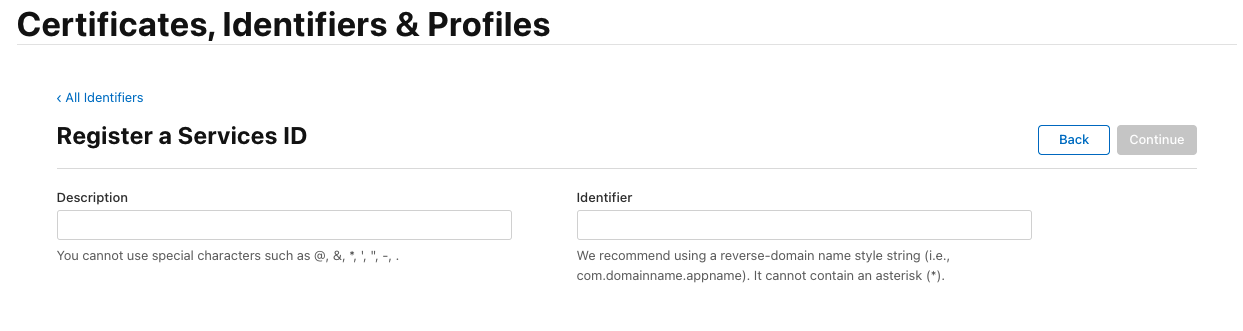
Registering a new Services App ID#
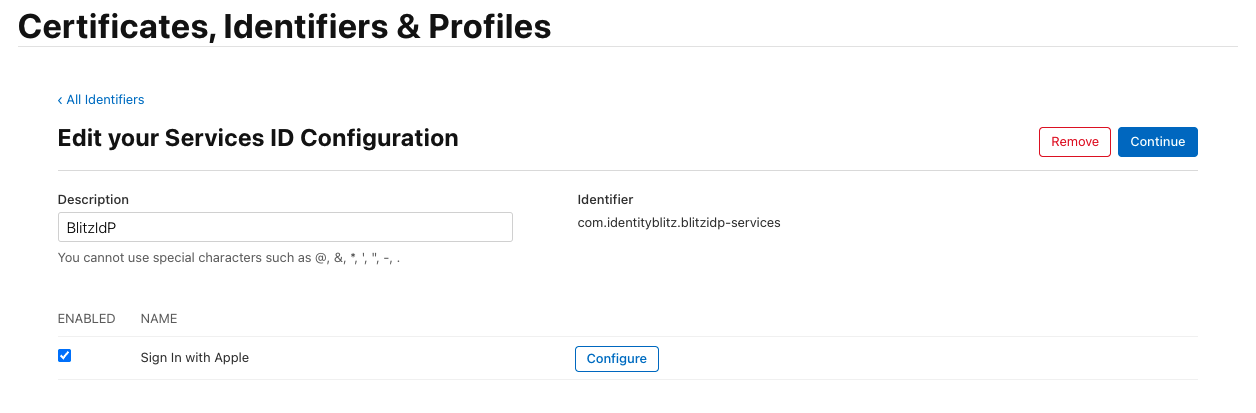
Editing the Services App ID configuration#

Registering domains and authorized return addresses for Services App IDs#
Key registration#
Once you have completed the settings in the Apple Developer Account, you need to:
Go to the Blitz Identity Provider Admin console and add a provider that is of
Appletype.Fill in the Identity Provider settings:
Vendor Identifier;
Vendor Name;
The client identifier (
Service ID) obtained in the Apple Developer Account.
Customize binding rules.
In the ”Authentication” section of the Management Console, enable the use of the Apple Identity Provider authentication method.
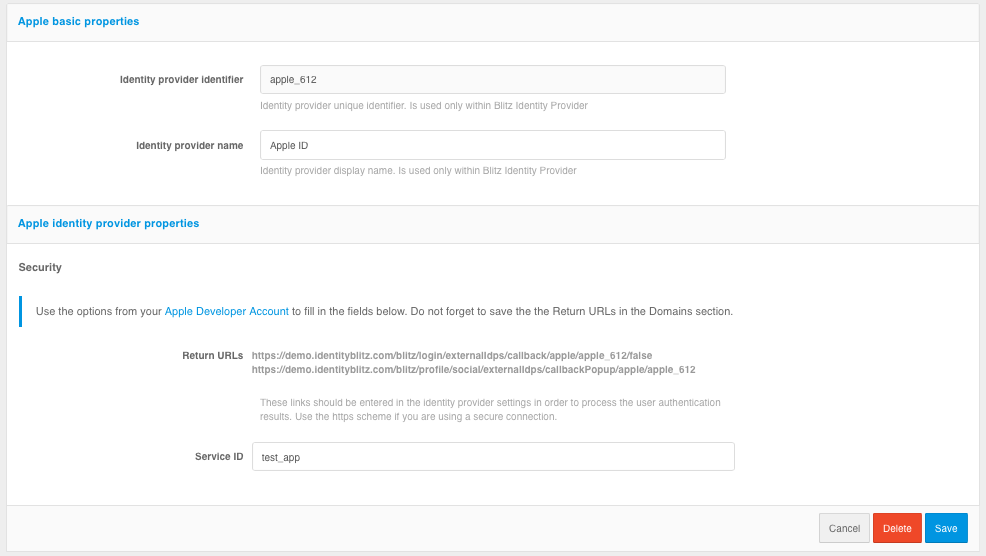
Setting up an Apple ID provider
Logging in via Google#
To configure a Google login, you need to follow the steps below:
Go to Google API Manager, in which you perform the following operations:
go to “Credentials”;
create a project and create new credentials of the “OAuth Client ID” type;
type of new client identifier (e.g., web application) and give it a name;
do not set any restrictions, they will be specified later;
Google will generate the client ID and secret, it will be needed later in the Blitz Identity Provider admin console.
in “Allowed redirect URIs” list the
URLreturn comma separated withhttps. You must specifyURLs, samples of which Blitz Identity Provider shows in the Google connection settings, e.g.:
https://login.company.com/blitz/login/externalIdps/callback/google/google_1/false
https://login.company.com/blitz/profile/social/externalIdps/callbackPopup/google/google_1
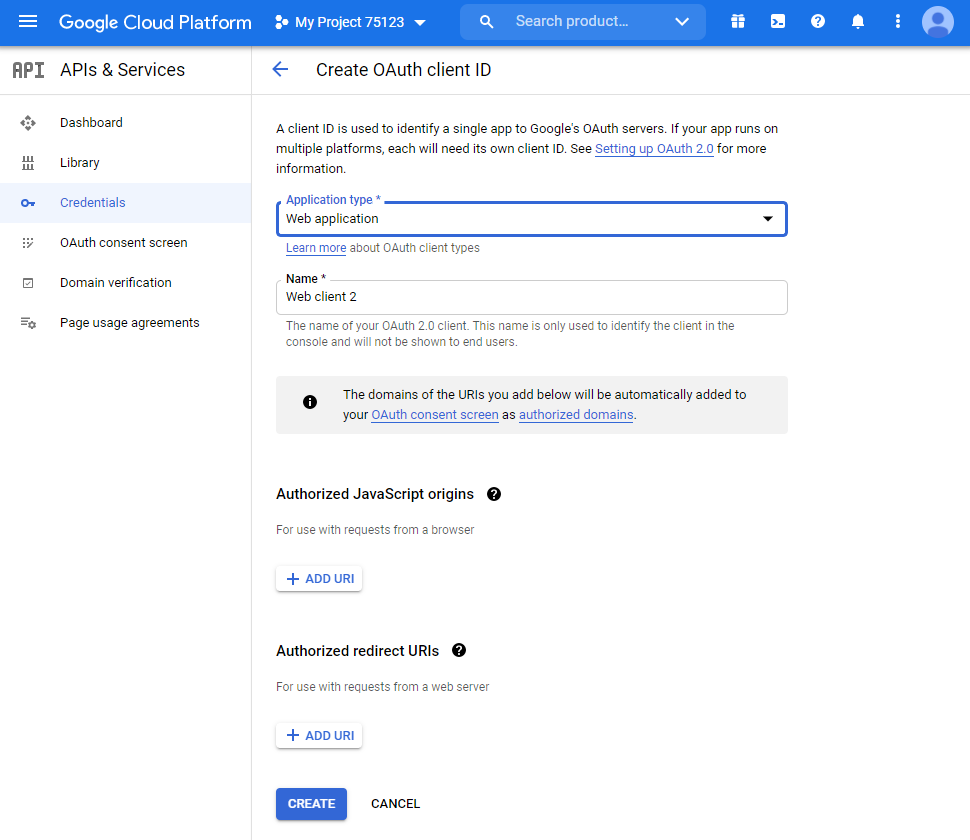
Settings in Google API Manager
Go to the Blitz Identity Provider Admin console and add a provider that is of
Googletype.Fill in the Identity Provider settings:
Vendor Identifier;
Vendor Name;
The client identifier (
Client ID) obtained from Google API Manager;The client secret (
Client secret) obtained from Google API Manager;Requested scopes (
scope) provided in Google.
Customize binding rules.
In the ”Authentication” section of the Management Console, enable the use of the Google Identity Provider authentication method.
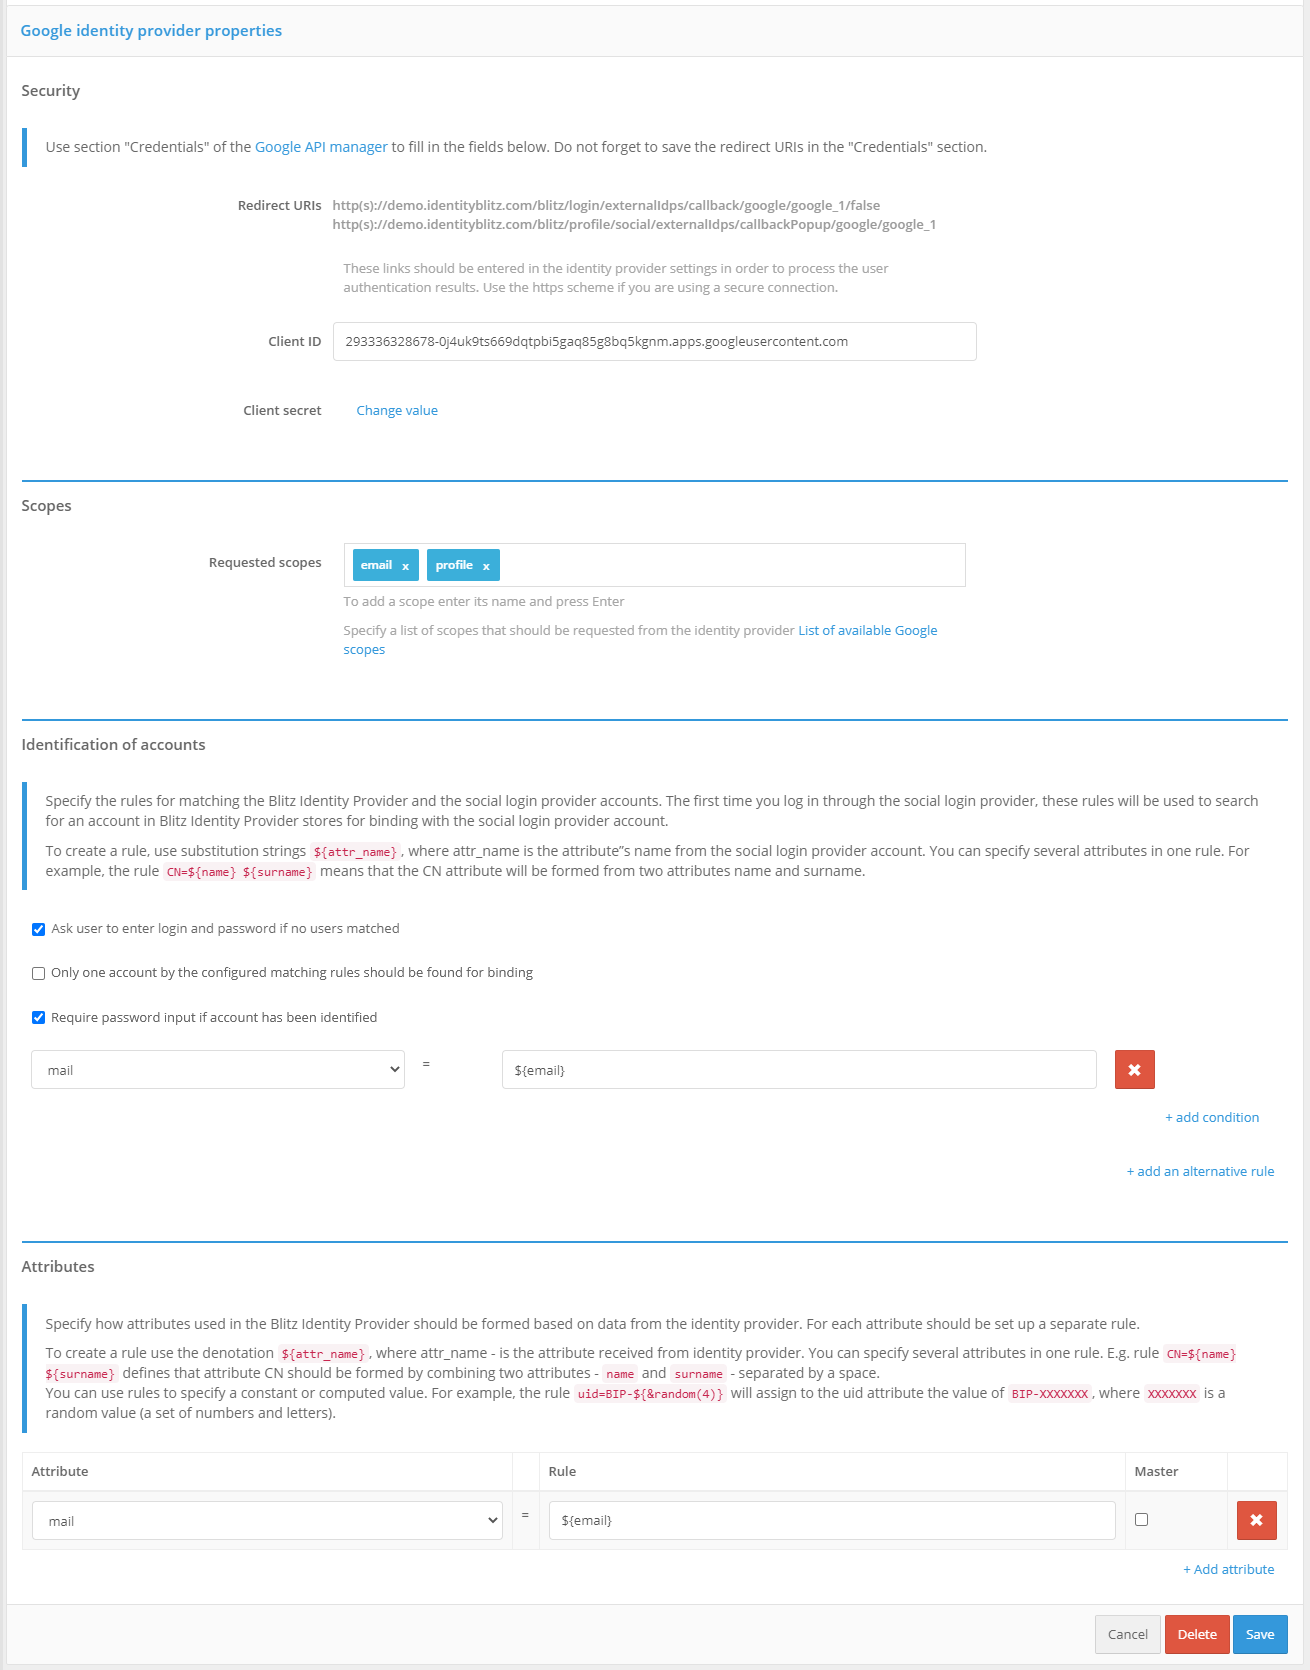
Google Identity Provider Settings
Logging in via Facebook#
To configure login via Facebook you need to follow the steps below:
Go to the Facebook for developers console , in which you make the following settings:
add a new application by specifying its name, e-mail address for communication, and application category;
create an application identifier;
go to the application settings, section “General”. In this section, specify the “Application domains” parameter (the parameter must correspond to the domain where Blitz Identity Provider is installed) and add a site with a similar URL.
go to “Verify Application” and activate the item “Make Application «…» available to everyone”.

Settings in the Facebook Developer Console
Go to the Blitz Identity Provider Admin console and add a provider that has the type
Facebook.Fill in the Identity Provider settings:
Vendor Identifier;
Vendor Name;
The application identifier (
App ID) obtained from the Facebook for developers console;Application Secret (
App Secret) obtained from Facebook’s developer console;Requested scopes (
scope) provided in Facebook;Requested attributes provided by Facebook; it is acceptable to specify only those attributes provided by the selected permissions.
Customize binding rules.
In the “Authentication” section of the Management Console, enable the use of the Facebook Identity Provider authentication method.
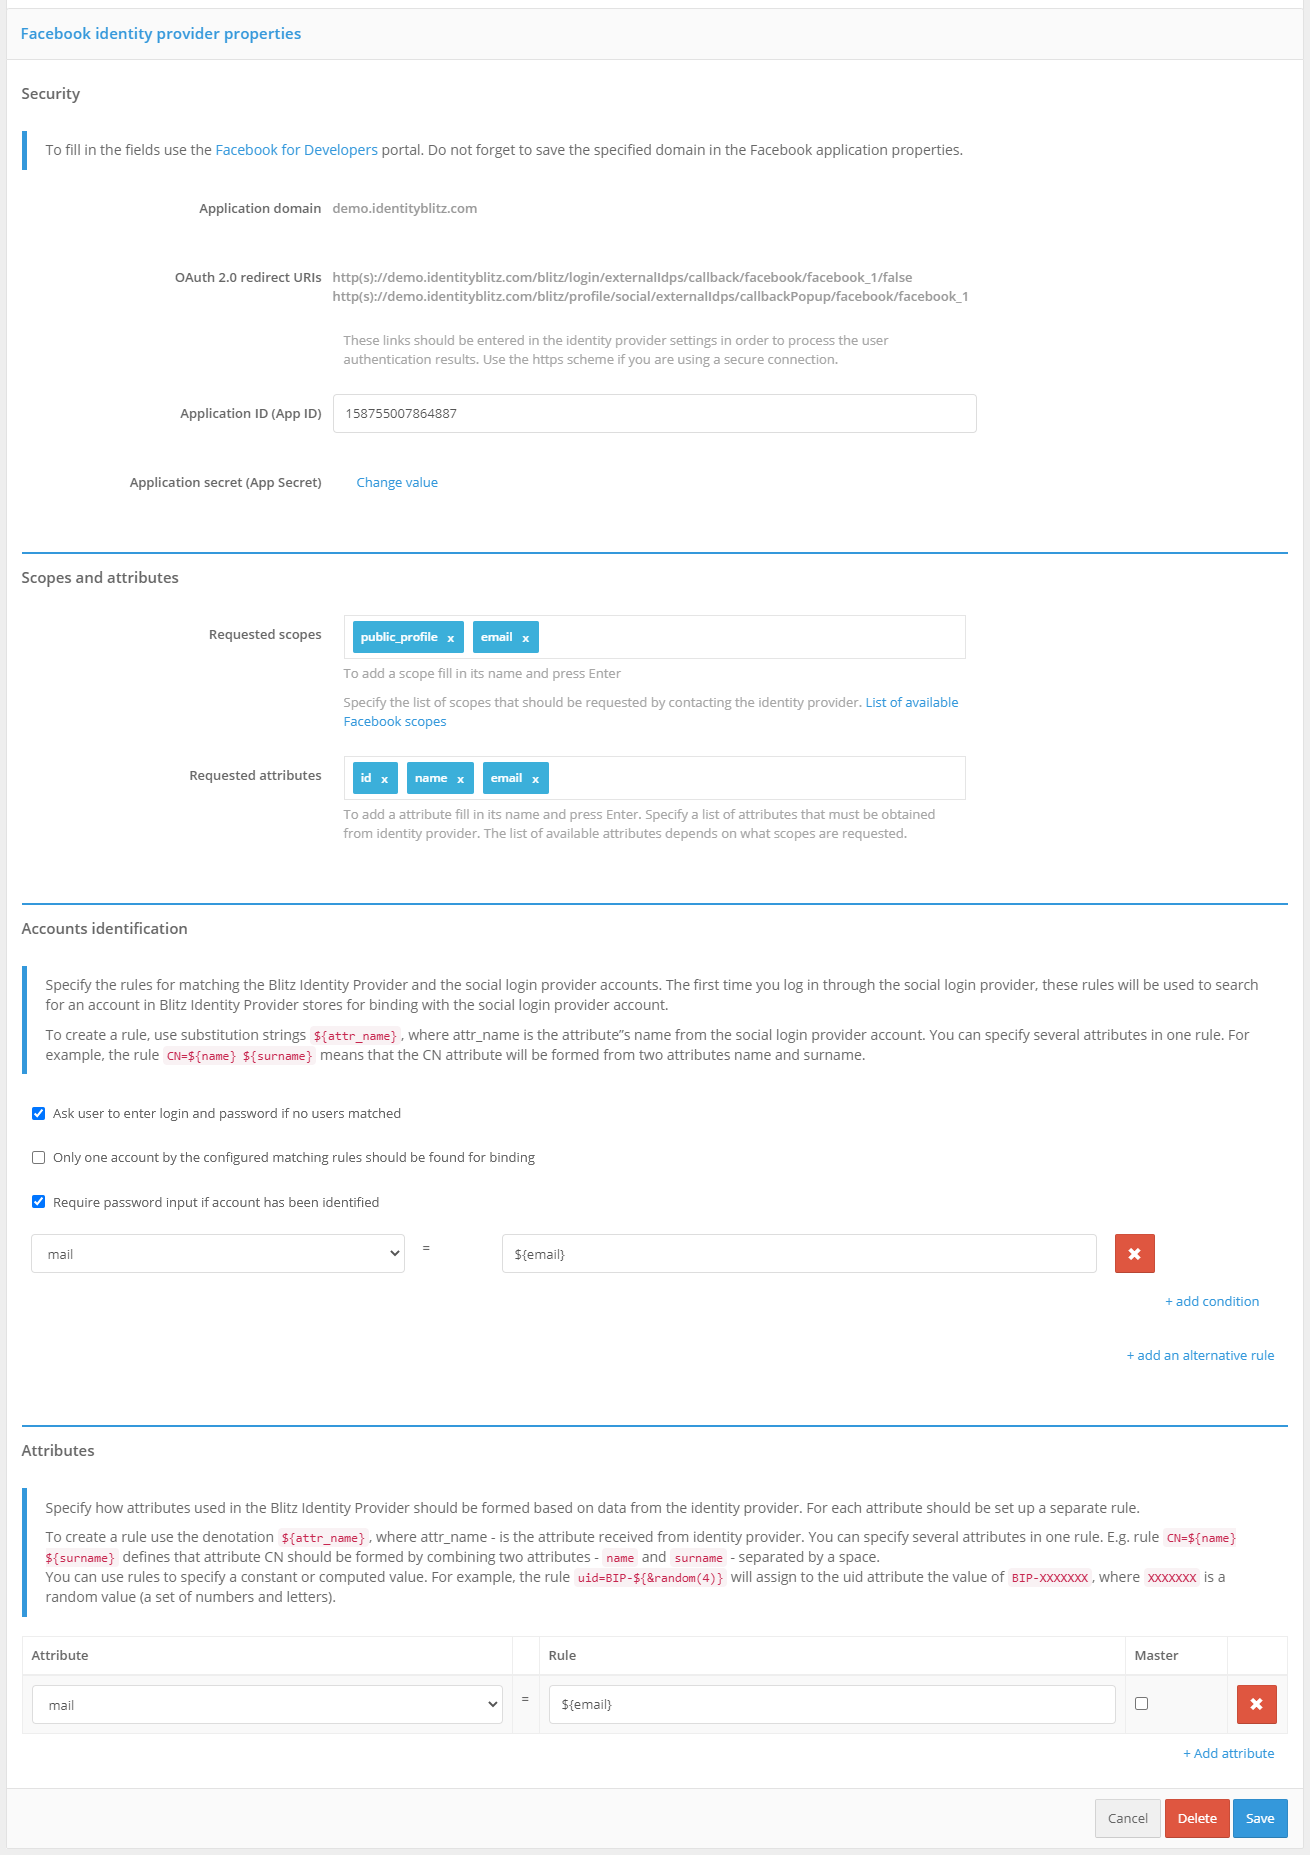
Facebook Identity Provider Settings
Logging in via another Blitz Identity Provider installation#
To configure login through an account of another Blitz Identity Provider (for example, one installed in another organization, hereafter referred to as a “trusted Blitz Identity Provider “) or other identity provider that supports OIDC, follow these steps:
Open the Admin console of the trusted Blitz Identity Provider (or have the administrator of another Blitz Identity Provider do so) and perform the following operations:
go to “Appendices”;
click on the “Add an application” button;
specify the application ID, name, and domain of the application;
save the application and proceed to customizing it;
select the OAuth 2.0 connection protocol;
specify a secret (
client_secret), or leave the pre-populated option;specify the prefix of the return link, which is the URL of the main Blitz Identity Provider to be logged in to;
configure the necessary scopes in the “OAuth 2.0” section.
Go to the Blitz Identity Provider Admin console and add a provider that has the Blitz Identity Provider type.
Fill in the Identity Provider settings:
Vendor Identifier;
Vendor Name;
The External Provider URI is the domain on which the trusted Blitz Identity Provider is installed;
The identifier (
client_id) specified in the trusted Blitz Identity Provider settings;The secret (
client_secret) specified in the trusted Blitz Identity Provider settings;Requested scopes, these scopes must be defined in the OAuth 2.0 section of the trusted Blitz Identity Provider;
Identifier - an attribute of the trusted Blitz Identity Provider that will be used as the user ID (ensures account uniqueness even if the attribute responsible for the username is changed);
Customize binding rules.
In the ”Authentication” section of the Management Console, enable the use of the Blitz Identity Provider authentication method.
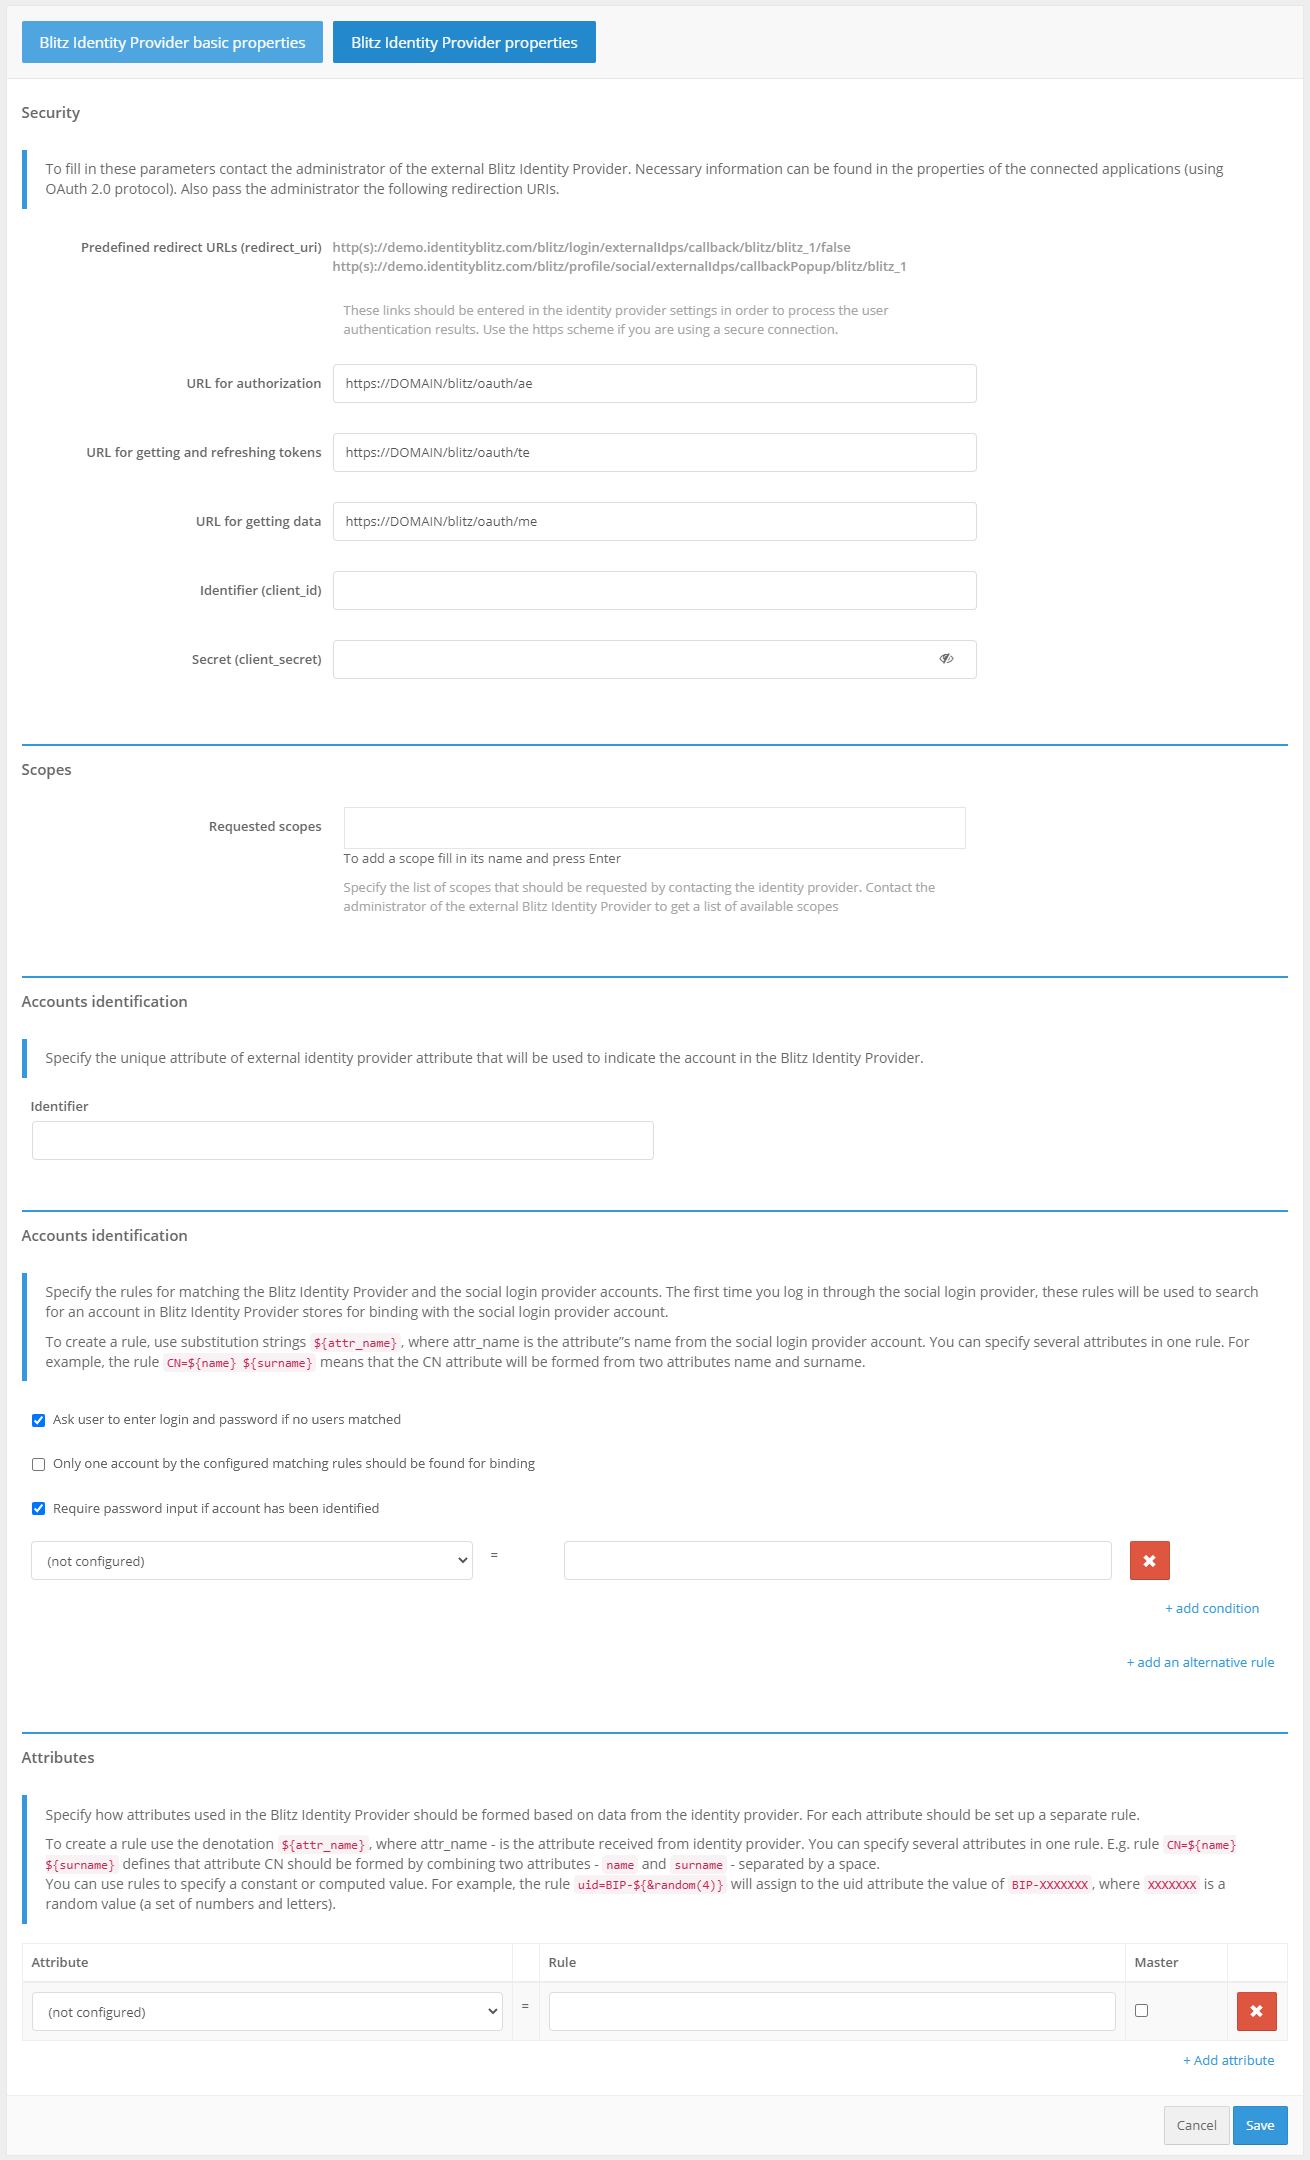
Settings for connecting to an external Blitz Identity Provider
Account linking settings#
Each Identity Provider’s settings include a section called ”Account linking”. You can use the settings in this section to define:
rules for linking an external account to an account in Blitz Identity Provider;
rules for matching attributes of an external account and an account in Blitz Identity Provider.
Two setting modes are provided:
Basic configuration - the configuration is performed using the Rule Builder. This mode is suitable for typical account linking and attribute mapping scenarios.
Advanced customization - account linking rules and attribute matching rules are defined using a Java programming language linking procedure. This mode provides maximum configuration flexibility and is suitable for highly specialized account linking and attribute matching scenarios.
Linking an external account to an account in Blitz Identity Provider occurs in the following scenarios:
The first time you log in using an external account, if it is not already linked to any account in Blitz Identity Provider.
When binding in User profile.
The following settings are provided in the Basic Setup mode:
Option “Allow one Identity Provider account to be bound to many Blitz Identity Provider accounts”:
option selected - Blitz Identity Provider will allow an external account to be linked to multiple accounts in Blitz Identity Provider. When a user logs in with such an external account, they will be shown a selection of multiple linked accounts during the login process.
option not selected - Blitz Identity Provider will not allow an external account to be linked to a Blitz Identity Provider account if that external account is already linked to another Blitz Identity Provider account.
Option “Prompt the user to enter login and password for binding if the account has not been identified”:
option selected - the user will be prompted to authenticate and authenticate using an alternative method to bind an external account if the configured rules fail to find an account in the Blitz Identity Provider.
option not selected - Blitz Identity Provider will not allow logins for users for whom no accounts could be mapped. If a logon process for external accounts is configured, the logon process will automatically start.
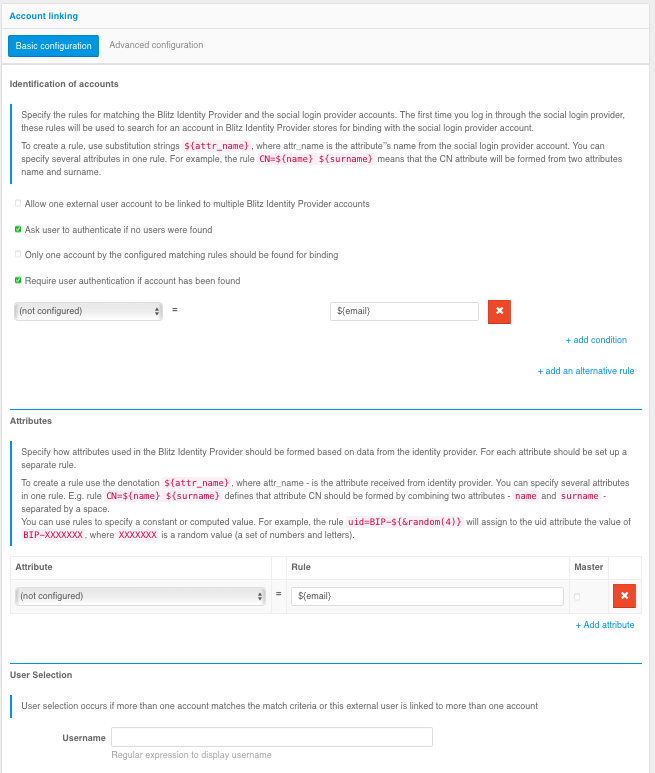
Basic configuration of binding rules
Option “Only one account must be found for linking according to the specified matching rules”:
option selected - if more than one account is found according to the matching rules, an error message will be displayed to the user.
option not selected - if more than one account is found according to the matching rules, there will be an option to continue the linking process.
Option “Require password entry if the account has been identified”:
option selected - the user will need to authenticate to link their account to an external vendor account.
option not selected - the account will be automatically linked to an external vendor account.
Customizing Account Identity Rules - You can create rules to match identity attributes from an external account to identity attributes in Blitz Identity Provider. To create identity rules, you must use
${attr_name}substitution strings, whereattr_nameis the name of the attribute received from the external identity provider. You can specify multiple attributes in a single rule. For example, the ruleemail=${default_email-}means that theemailattribute in the Blitz Identity Provider will map to thedefault_emailattribute of the external account, provided that thedefault_emailattribute is not empty. Multiple conditions can be specified (using the “+ add condition “ link to be met simultaneously and alternate rules can be added using the “+ add an alternative rule” link).Block “Attributes” with rules for saving attributes. For example, the
email=${default_email}rule means that an attribute namedemailin the Blitz Identity Provider will be populated with the value from thedefault_emailattribute of the external account (for users who have used that identity provider). If the attribute has a “Master” checkbox checked, the attribute will be populated or updated each time the user logs in through the external Identity Provider. If the “Master” checkbox is unchecked, it will be populated only on the first logon that results in a credential bind.The “User’s Choice” block defines the rules for displaying the Blitz Identity Provider account found by the configured matching rules to the user. The “User Name” setting defines the information displayed on the top line of the user card (the line intended to display the account name). For example,
${family_name- } ${given_name-}specifies that the user’s last name and first name (if filled in) will be shown on the top line. The “User ID” setting determines the information displayed on the bottom line of the user card (the line intended to display the account ID). You can use value masking when customizing. For example, the${phone_number&maskInMiddle(3,3)}rule will display the middle numbers of a phone number as*.
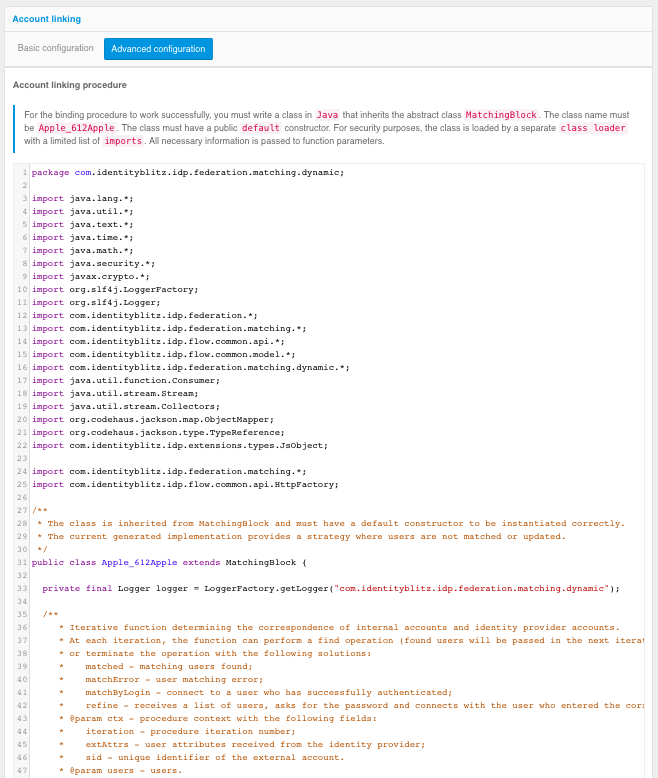
Advanced configuration of binding rules