Customizing user services#
Blitz Identity Provider provides web applications, with its help users can perform a number of transactions on their own:
Web application “User profile”. Allows you to perform a number of operations with your account, e.g. view/change your data, customize authentication methods, view recent events, change your password. If enabled, it is available at
https://{hostname}/blitz/profile.Web application “User registration”. If enabled, you can switch from the login page to the self-registration form (link “Don’t have an account? Register”).
Web application “Access recovery”. Allows a user to change their account password after passing the checks. If enabled, users will be able to navigate from the login page (“Forgot your password?” link) to the Restore Access form.
Configure these services in the “Self-service” section of the admin console.
Attention
The administrator of the admin console must personally check if JS-scripts placed on the login page are correct and make sure that content of the registration page and user profile is free of vulnerabilities.
General settings#
You can enable or disable the corresponding applications (services) on the main page of the “Self service” section using the switch ( ). Please note that the switch only affects the display of links (e.g. “Forgot your password?”), while the availability of the service itself depends on whether the corresponding application has been installed by the administrator:
 blitz-idp - web application “Personal account”, blitz-registration - web application “User registration”, blitz-recovery - web application “Access recovery”.
The main page also allows you to configure the parameters that apply to all the self-services:
confirmation code parameters sent to SMS - you can change the length of the code, its expiry time, and the number of attempts;
confirmation code parameters sent by email - you can change the length of the code and its expiry time.

Self-services and their general settings
The subsections configure each self-service individually.
User registration#
“User registration” is a web application that allows a user to create his/her own account. Registration setup includes configuring the registration form, changing the service parameters and creating a registration procedure (optional).
Registration form#
The list of requested user data is defined by the HTML template. The template is a text file that is compiled using the Twirl templating engine. It is necessary to set functions in the template that allow the user to enter data about himself when registering.
Examples of functions available in the template:
@attrInput("email", msg("reg.email"), Map("placeholder" -> "mail@example.com", "error-messages" -> msg("reg.email.wrong"), "input-type" -> "mail"))- displays on the page a field for entering theemailattribute described in the system.msg("reg.email")is the name of the attribute, which is taken from the message file according to the current locale. If the input field is empty, it displays"mail@example.com"as a hint, and if the input is incorrect, it displaysmsg("reg.email.wrong")from the message file. Theinput-typeequal tomailis set for the element;@attrInput("family_name", "Last name", Map("placeholder" -> "Last name", "error-messages" -> "Error"))- displays on the page the field for entering the user’s last name into thefamily_namevariable. This variable can be further used when executing the registration procedure.@passwordsInput- displays the password and password confirmation fields on the page;@agreement- displays the link to the User agreement;@attrExpr- the function, which allows to create a computed attribute (or assign a constant value to the attribute);@submitButton- displays the “Register” button.
An example of the template for registration:
@attrInput("family_name", "Фамилия", Map("placeholder" -> "Фамилия", "error-messages" -> "Ошибка"))
@attrInput("given_name", "Имя", Map("placeholder" -> "Имя", "error-messages" -> "Ошибка"))
@attrInput("phone_number", "Номер мобильного телефона", Map("placeholder" -> "+7(999)9999999", "error-messages" -> "reg.page.mobile.req.err.msg"))
@attrInput("email", "Адрес электронной почты", Map("placeholder" -> "name@example.com", "error-messages" -> "reg.page.email.req.err.msg", "input-type" -> "mail"))
@passwordsInput
@agreement
@attrExpr("sub","BIP-${&random(4)}")
@submitButton
An example of displaying the specified template in the interface of the web-application “User registration” web-application is presented in figure:
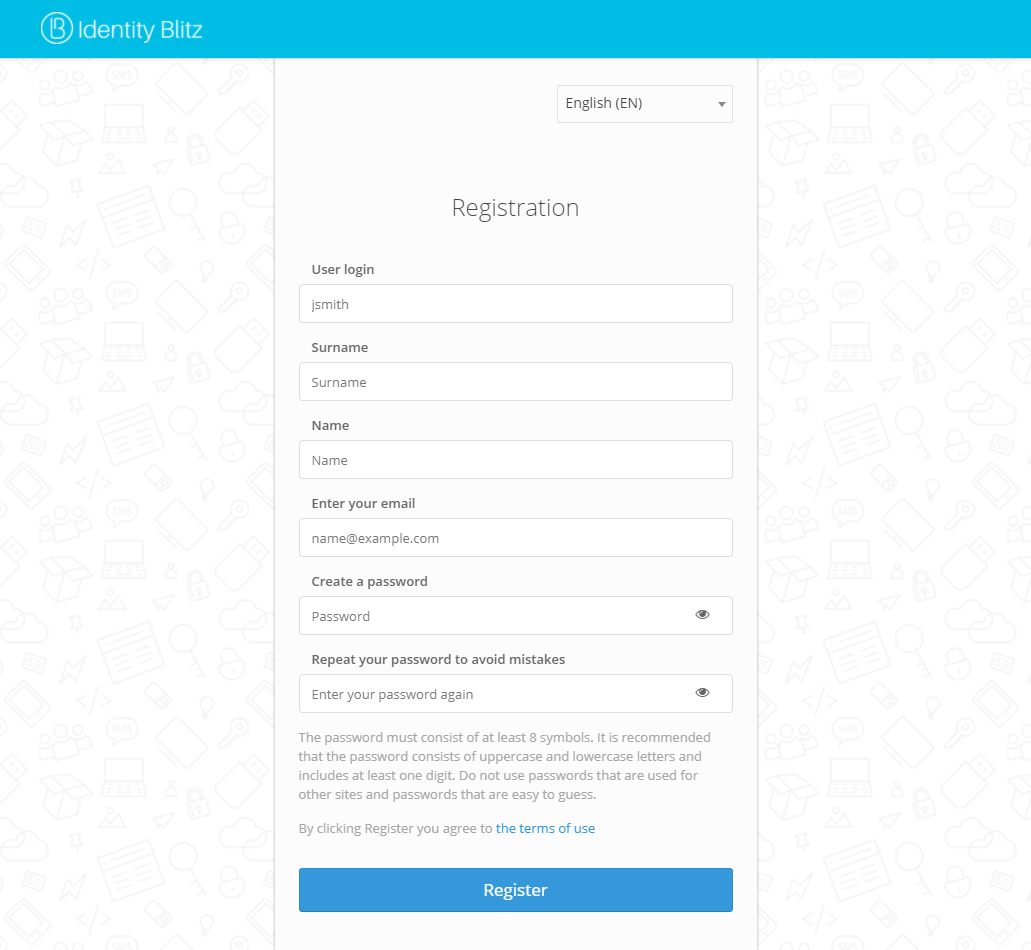
Example of displaying the registration form
To add a drop-down list to the registration form to select attribute values from the directory:
Create a
/etc/blitz-config/custom_messages/dicsdirectory on the Blitz Identity Provider server;Create a
/etc/blitz-config/custom_messages/dics/dic_namefile with the directory contents (instead ofdic_name, specify the directory name, for example,company_id). Example ofcompany_idfile for the company selection drop-down directory:
001=Тестовая компания 1
002=Тестовая компания 2
003=Тестовая компания 3
The number in the directory will be written to the attribute value. The row in the directory will be shown to the user on the registration form.
Check the owner of the
dicsdirectory and the directory files in it. The owner must beblitz:blitz.
chown -R blitz:blitz /etc/blitz-config/custom_messages/dics
In the
blitz.confconfiguration file, add thedicsblock to theblitz.prod.local.idp.messagesblock. In thenamessetting, list all directory names (a separate file with directory values must be created for each directory). For example:
"dics" : {
    "dir" : "custom_messages/dics",
    "names" : [
        "company_id"
    ]
}
Restart the
blitz-registrationapplication.In the admin console, in the registration page template, add a line with the attribute filling from the directory:
@attrInput("company", msg("Компания"), Map("dic" -> "company_id", "dic-default" -> "0", "sort" -> "key"))
Registration service settings#
The settings you can specify:
store to save the account - select one of the configured storages (section “Data sources”) for saving the account;
required for registration user attributes - attributes, the presence of which is necessary to complete the registration procedure. Mandatory user attributes do not need to be included in this list. It is possible to add several alternative rules. If the checkbox “Use conditions from registration procedure” is checked, the configured conditions are ignored and the conditions defined by the
isEnoughfunction from the registration procedure are applied.URL of the external enrollment service. If you specify this URL as a parameter, the user will be directed to this URL when he or she proceeds to the registration process (instead of the Blitz Identity Provider registration application).
The screenshot of a fragment of the registration settings page is shown in the figure below:
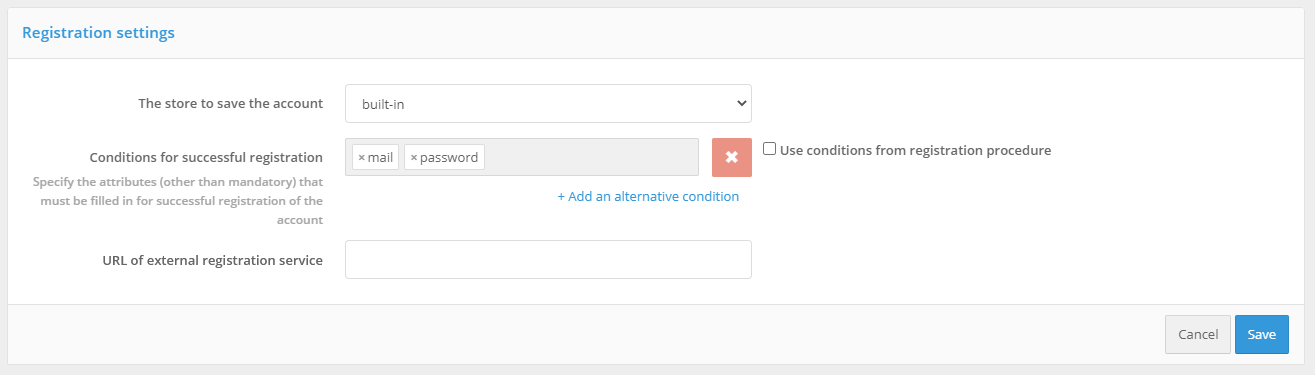
Screenshot of registration service settings
Registration procedure#
Registration procedure - Java code that implements the necessary checks after the user fills in the registration form. The following actions are possible during execution of the procedure:
additional verification of the input data;
conversion of the input data;
saving attribute values in the storage;
invoking the external REST services.
If required, convert the data entered by the user and then save them as attributes, in the registration page template you should use function @attrInput instead of @textInput.
Changing the text in the User agreement#
A link to the User agreement is located on the user registration page. The User agreement are located in the assets.zip archive located in the assets directory of the Blitz Identity Provider installation in the archived documents\user_agreement directory.
To change the User agreement, unpack the assets.zip archive, replace user_agreement_en.pdf (Russian version) and user_agreement_en.pdf (English version) with required files and archive it keeping the original structure.
It is also possible to change the reference to the User agreement. To do this, edit the line reg.page.reg.reg.action.agreement and setPswd.page.agreement (see Modifying the text messages of the web interface). This method is recommended if the User agreement are placed on an external resource, for example, as a separate web page.
User profile#
“User profile” - web-application, where user can perform the following actions:
view or edit their account data;
view recent security events (e.g. login events);
change password;
view and configure the methods of login confirmation (two-factor authentication);
view and configure the security keys;
view bound social networking accounts; bind new external accounts; unbind unnecessary accounts;
view the bound access devices, and unbind unnecessary devices;
view and revoke data access permissions issued by applications;
view security events.
Configuration of User profile includes configuring the way user attributes are displayed and change additional parameters.
Displaying user attributes#
The main page of myAlpari displays a block with account data. An example of this block is shown in the figure below.
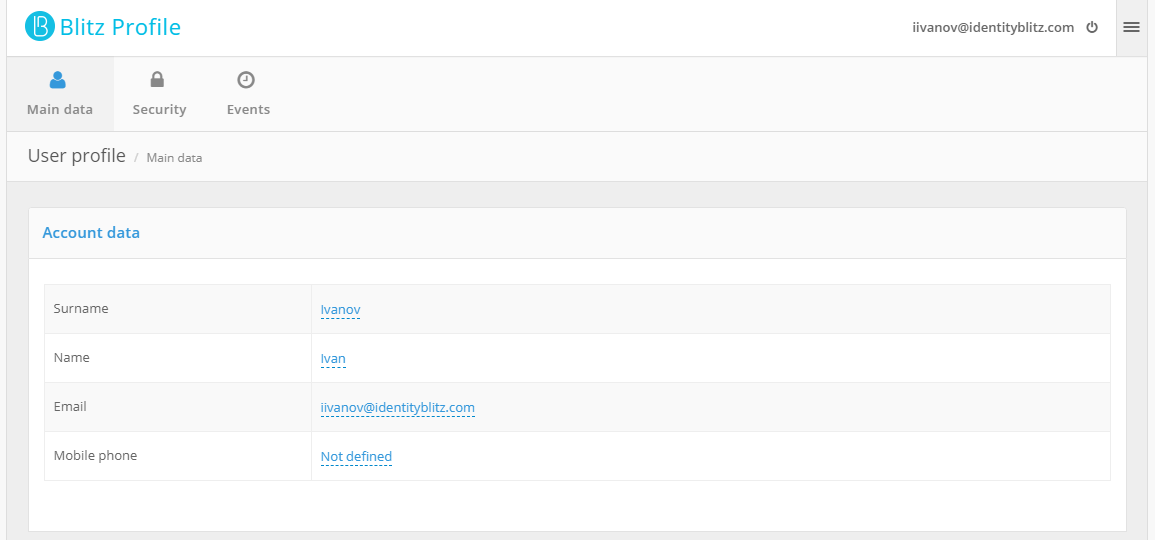
User profile: account data
The display of user data is defined by an HTML template. The template is a text file that is compiled using the Twirl templating engine. In the template it is necessary to place functions that allow the user to enter and edit data about himself/herself in the User profile.
The following functions are available in the template:
@show(attrName)- displays the attribute value;@showStrings(attrName, values)- displays the array value;@editAsText(attrName, readableName, errorMsg)- displays the value of the attribute and allows you to edit it (the errorMsg parameter is optional);@editAsBoolean(attrName, readableName)- displays the value of the logical type (true/false) of the attribute and allows you to edit it;@editAsStrings(attrName, readableName, values)- displays the value (array) of the attribute and allows you to edit it.
These functions use the following parameters:
attrNameis the name of the attribute defined in the “Data sources” section;readableName- the name of the attribute, displayed to the user in the message (can be specified as attribute’s identifier from a message file or as a text);values- values, in format “key - description”, where key is array value, the description - the readable value of the key (for example,ListMap("a" -> "value a", "c" -> "value c")), can be set as an identifier from the message file or as a text;errorMsg- error description, which is displayed in case of erroneous value input (can be set as an identifier from a message file or as text). About message files see. Modifying the text messages of the web interface. It is recommended to use message files if you need to support multilingualism.
Example of functions:
Email attribute display:
@editAsText("email", "Email")
Displaying the phone_number attribute with the ability to edit it:
@editAsText("phone_number", "Mobile phone", "Error")
Displaying the boolean info attribute with the ability to edit it:
@editAsBoolean("info", "Subscription")
Display an array of strings massiv with the ability to edit it (selection of values):
@editAsStrings("massiv", "Subscriptions", ListMap("a" -> "Promotions and bonus programs", "b" -> "Company news", "c" -> "Monthly event digest"))
An example of displaying an array of strings in the interface of the “User profile” web application is shown in the figure:

User profile: array of strings (in the display and editing mode)
Additional parameters#
The following parameters can be set as additional:
welcome template - information that is displayed in the upper right corner of myAlpari. It is allowed to use substitution strings. For example,
${family_name} ${given_name}will allow to display the surname and first name of the user;URL to follow after a successful logout from User profile;
period of audit events displayed to users (in calendar months from the current date);
template for displaying geodata in events (see Configuring the use of the geodatabase). The template can be composed of the following elements containing country, region, city and coordinate information:
${ip_ctr}, ${ip_st}, ${ip_ct}, ${ip_lng}, ${ip_lat}, ${ip_rad}functions available to users, i.e. functions that can be activated by the user from the User profile. It is possible to enable or disable the following functions:
password change;
security key management;
view and binding of social networks;
view of access devices;
view and revoke permissions;
view events;
HOTP generators binding;
TOTP generators binding;
configuring login confirmation by SMS code;
configuring push authentication;
security key binding.
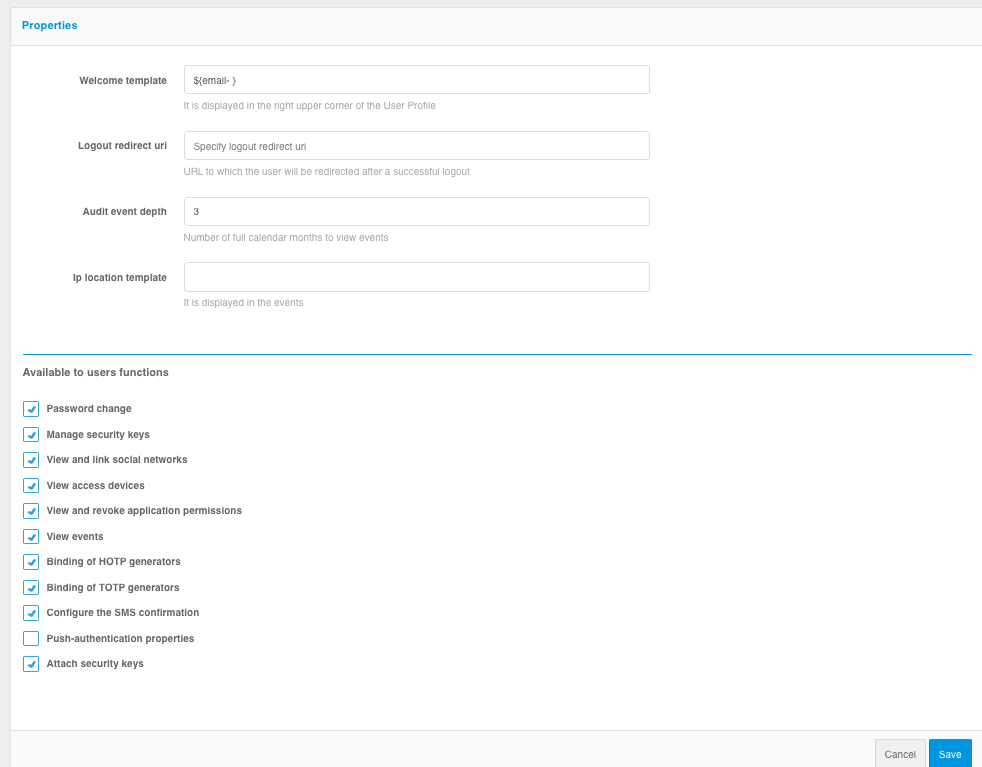
Setting up additional parameters of the User profile
Access recovery#
Configuring the access restoration service includes specifying the attributes by which the account will be searched and the contacts (email address and/or cell phone number) that will be used to restore access. Attributes with contacts must be defined in the ”Data sources” section as email address and cell phone number.
The “Verify that there are users who have permission to change password in the found account” option specifies that if the found user has a related (“parental”) account authorized to change the password for this user, a warning will be displayed when attempting to recover the password.
The “Drop inactivity lock after restoring access” option specifies that password recovery is allowed for accounts locked out due to long-term inactivity, and that the long-term inactivity lockout should be canceled after password replacement as a result of successful recovery.
The “Enable additional verification for accounts with two-factor authentication configured” option specifies that accounts with configured two-factor authentication should require additional verification from among the authentication methods specified in the “List of methods” setting. The methods you can choose from are email, SMS, and TOTP application-generated code confirmation.
With the “Attributes for verification” setting, you can define which attribute values the user must additionally enter during the password recovery process to validate account ownership. Adding such verification complicates the password reset attack via multiple brute force in the Forgot Password Recovery form. On the main page, the user will be prompted for attributes to match (e.g. last name) and recovery will only be performed if the account found has an identical attribute value.
Using the settings ”Total attempts” and ”Blocking time when attempts are exceeded, in min.” you can limit the number of attempts to request sending and unsuccessful entry of confirmation codes sent by email and SMS for the account, if exceeded, the account will be temporarily restricted from password recovery.
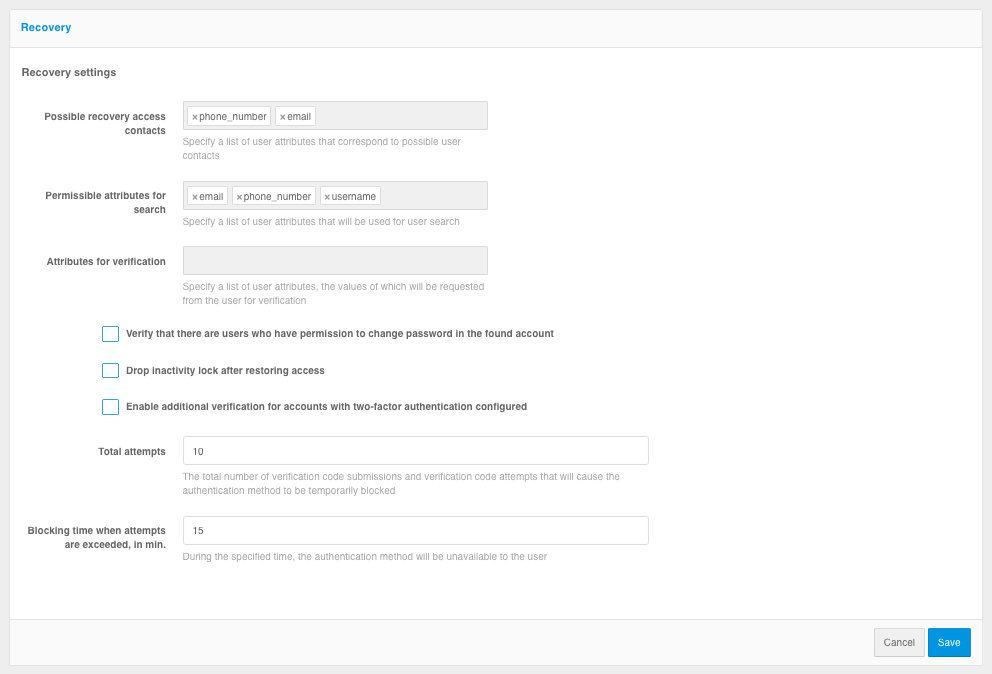
Access recovery