Authentication settings#
Authentication settings are defined in the “Authentication” section of the Admin Console.
Authentication Settings - “General properties” tab
Authentication settings are divided into tabs:
General settings - sets the general settings;
Password Policies - specifies the password policy settings;
Security Keys - sets the security key settings;
The first factor is that you can move on to configuring the authentication methods used for initial identification and authentication;
The second factor is that you can move on to customizing the authentication methods used to validate the login;
The third factor is an optional tab, it is displayed only if it is configured to have an authentication method applied additionally after passing the checks of the first and second factors.
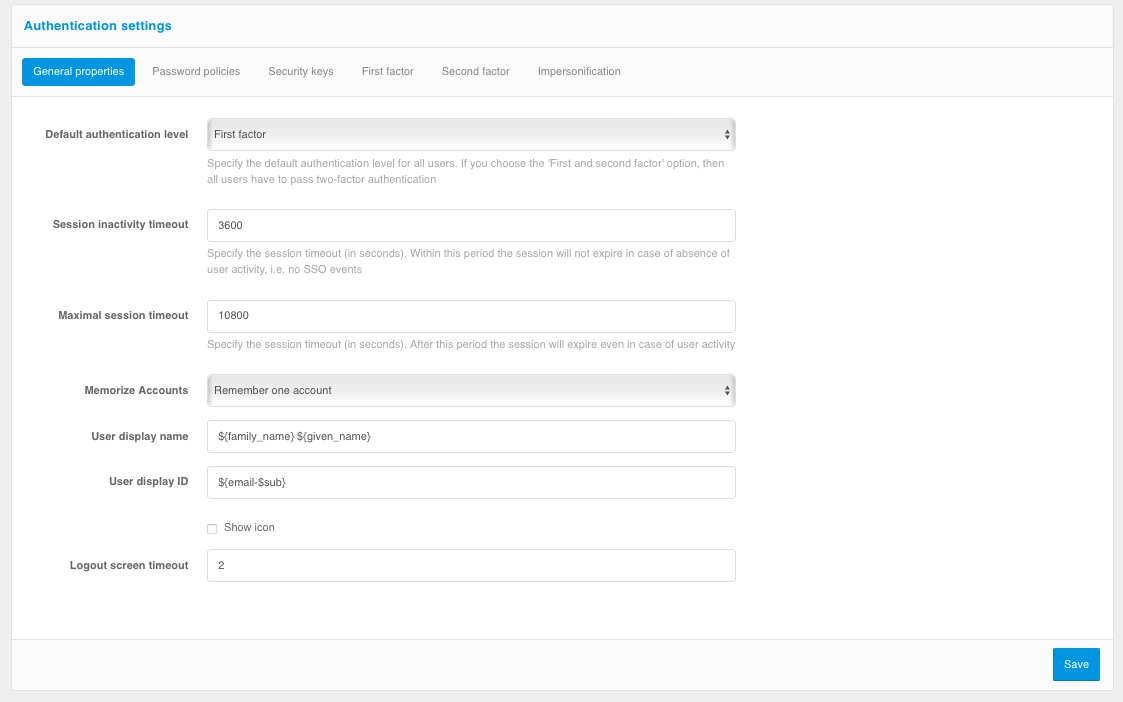
On “General settings” tab, you can set:
default authentication level - specify
First factorto require users to verify the first authentication factor only (except for users whose settings include the need to verify the second factor). SpecifyFirst and second factorto require users to verify the second authentication factor in addition to the first factor;session duration parameters:
session inactivity timeout;
maximal session timeout.
account memorization mode - specify
Remember one accountto make each login by a new account in the browser overwrite the memorized login of the previous account orRemember all accountsso that each login by a new account adds another account to the list of memorized accounts in the browser;displayed username - the username that is displayed on the login page. It is specified as a regular expression, for example:
${family_name-} ${given_name-}. This regular expression allows displaying the last name and first name of the user stored in the family_name and given_name attributes;displayed user ID - account ID, which is displayed as the second line on the login page. It is specified as a regular expression, for example:
${email-$phone_number}. This regular expression allows to display one of the contacts stored in theemailorphone_numberattributes (if both are present,emailis displayed). You can use value masking when customizing. For example, the${phone_number&maskInMiddle(3,3)}rule will display the middle numbers of a phone number as*;an indication of the need to display an avatar on the login page;
logout screen display time (in seconds) - how long the logout screen will be shown to the user before the user is automatically redirected to the application transition page after the logout.
Configuring the password policy#
Password policies are configured on the Password Policies tab of the “Authentication” section of the Management Console.
Configuring password policies
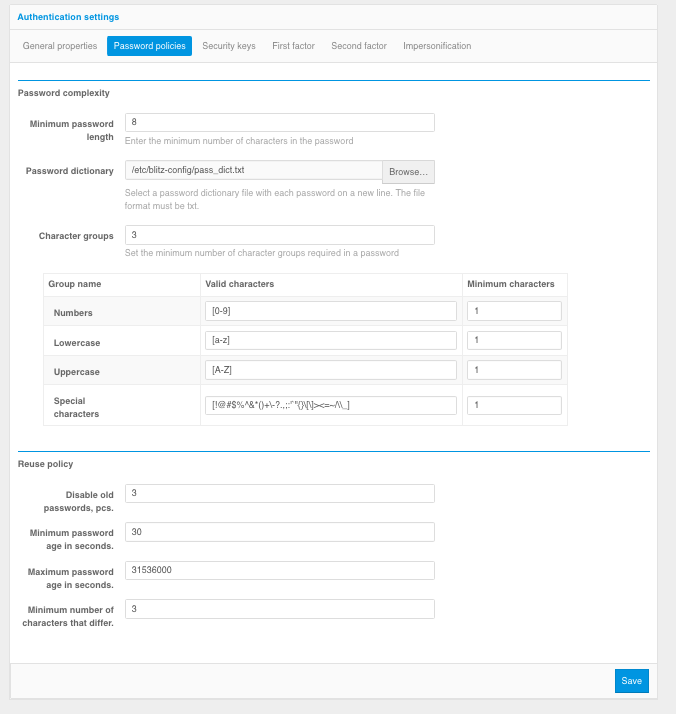
The following settings are available:
The minimum password length is the number of characters in the password (at least 8 characters is recommended);
Password dictionary - a text file containing a list of forbidden passwords is specified. Each password should be on a separate line. If large files are used, it is recommended to upload them directly to the server, and specify the path to the file in the
dicPathsetting in theblitz.prod.local.idp.password-policysettings block in theblitz.conffile.Character group - sets the minimum required number of character groups in the password. For each character group, you can set the settings in the character group table:
Valid characters - a regular expression is used to specify the set of characters of a group. For example, you can expand the allowed characters of numbers by changing the regular expression to the following -
[0-9٠-٩], you can expand the allowed character sets of letters -[a-za-я]and[A-ZA-Я], add or remove the allowed special characters -[[!@#$%^&*()+-??,;:'`"{}[]><=~/\_]’’.Minimum characters - how many minimum characters from the group must be used in the password that the group is considered to be involved in the password.
Prohibit using old passwords - the setting specifies how many old passwords should be memorized to prevent entering a password from the history of used passwords when setting a new password.
Minimum password lifetime - the minimum password lifetime, in seconds; until this time has elapsed, the user will not be allowed to set a new password. If this check should not be performed, the setting should be set to an empty value.
Maximum password lifetime - the maximum lifetime of the password, in seconds; once this time expires, the user will be prompted to set a new password. If this check should not be performed, the setting should be set to an empty value.
Minimum number of different characters - how many changed characters should be in the new password compared to the previous one (for cases when the user changes the current password to a new one). If this check should not be performed, the setting should be set to an empty value.
Configuring security keys#
Blitz Identity Provider allows you to use security keys (WebAuthn, Passkey, FIDO2, U2F) for identification and authentication.
Security keys are configured on the Security Keys tab of the “Authentication” section of the Management Console.

Configuring security keys
The following settings are available:
Authentication system name - it is necessary to set the name of the authentication system or application name suitable for displaying to users.
Authentication system domain - must match the domain used by the authentication system or be a superior domain. Security keys will be issued to this domain.
Signature algorithms - it is recommended to specify ES256 and RS256 algorithms as a minimum to work with Passkey, Windows Hello and most common hardware FIDO2 and U2F security keys.
Limit Allowed Authentication Means - If “Not Selected” is selected, authentication means are not limited. If you select Portable, only hardware security keys (USB, Bluetooth, or NFC) will work. If you select “Built-in Platform”, only security keys built into devices (Windows Hello, Touch ID on MacBooks, Touch ID and Face ID on cell phones, and using your phone as a Bluetooth-enabled authentication tool) will work.
Key Verification Mode - When “Browser detection” is selected, the user will be shown all security keys available on their device for the authentication system domain. When “Server Discovery” is selected, the user will be prompted for a login, and then only those keys that are available on the device and linked to the user’s account on the server will be shown.
Wait Time - Specifies the time in milliseconds that the authentication system will wait for the browser to respond to a request to access the security key.
Displayed user name - specifies the wildcard pattern according to which the name of the memorized user is displayed on the Security Key login page in the authentication system (relevant when using the “Server detection” mode).
Displayed Account ID - Specifies a wildcard string pattern that displays the name of the security key to the user on the device.
Normal Authentication Counter Shift - a setting that specifies that the authentication server will compare the authentication count on the device with the authentication count of the same key on the server and, if it differs by more than the number specified in the counter, will disallow the use of the security key (key cloning protection).
The Blitz Identity Provider Authentication server is configured as standard to trust all known root and intermediate certificates of the TPM modules, FIDO, as well as the current Apple and Google certificates required to verify the signature of FIDO2 and U2F attestation objects. If it is necessary to adjust the allowed attestation certificates, it is necessary to make settings according to Configuring trusted certificates of FIDO2 and U2F security key providers.
After configuring the security keys, you must configure authentication methods using the security keys (see Login with security keys (WebAuthn, Passkey, FIDO2) and Login confirmation with security keys (WebAuthn, Passkey, FIDO2, U2F)).
Configuring available authentication methods#
Authentication methods are grouped to either the first or the second factor (the second factor is used to “strengthen” the first factor, e.g. the user needs to enter a special code generated by the mobile application in addition to the password). To enable an authentication method, it must first be configured.
The first factor and second factor methods available for customization are given on the “first factor” and “second factor” tabs. The set of methods may differ depending on the type of license used. To go to the method settings, click the “Go to method configuration” button (for initial method configuration) or the “Go to settings” link (to adjust the current settings).
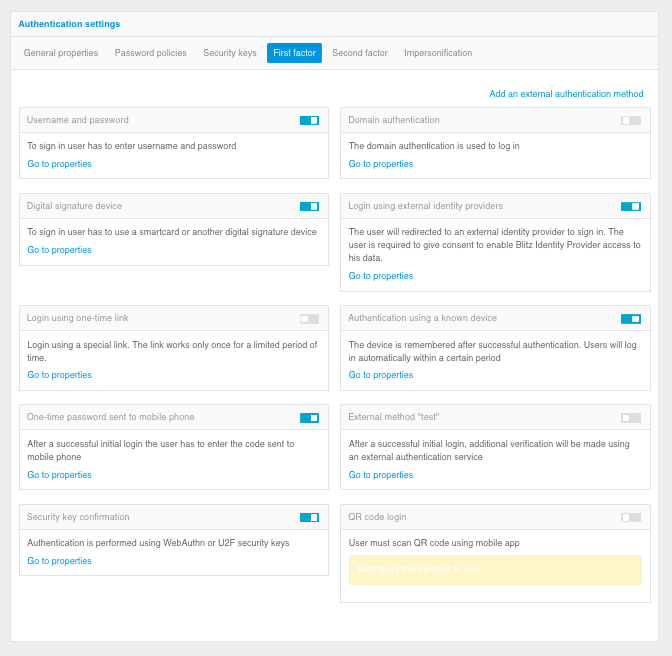
Authentication setup - “First factor” tab
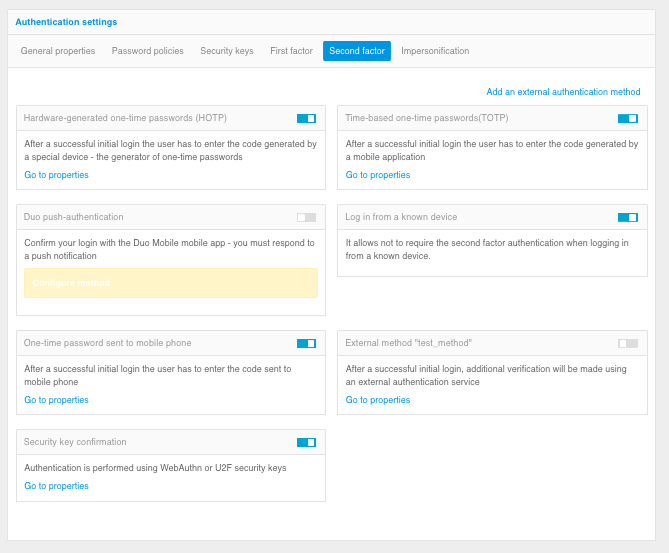
Authentication setup - “Second factor” tab
Refer to the following sections for guidelines on how to configure each method. To enable or disable an authentication method, set the switch to the desired position.
Logging in using login and password#
To use the username and password login, the following matching rules must be specified - to determine how the given username relates to the users in the data store.
To create a rule, a wildcard string is used: ${login} is the string entered by the user in the “login” field. As a result, for example, the rule email=${login} means that the string entered by the user will be compared to the email attribute in the data store;
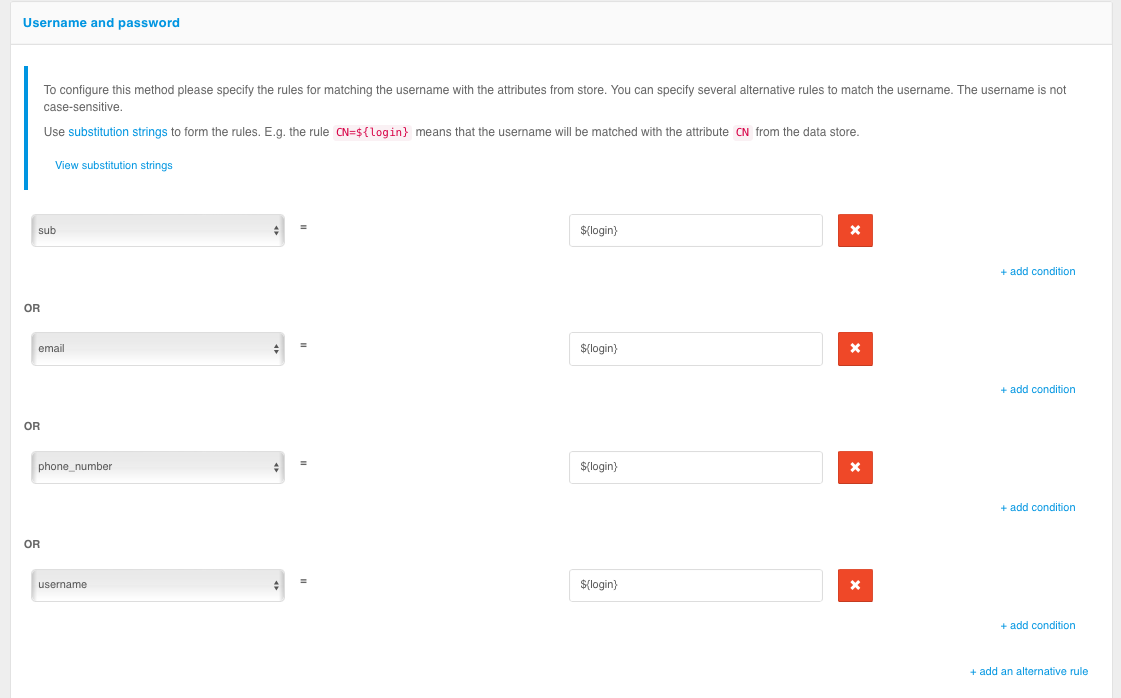
Configuring login by login and password
In the login settings, it is possible to enable password policy matching (see The blitz.conf configuration file). The password entered by the user will be checked against the password policy at login time. If the password does not meet the policy requirements, the user can set a new password or skip this step.
To configure password validation against the password policy at login, you must:
select the “Always check the user’s current password against the password policy” option or enter the name of some header in the “Check if HTTP header is present” field (in this case, if the HTTP request contains the specified header with the
truevalue, the current user password will be checked against the password policy);specify the number of failed attempts for temporary blocking. After the specified number of failed attempts, the user will be temporarily blocked from using this authentication method;
duration of the temporary blocking (in minutes).
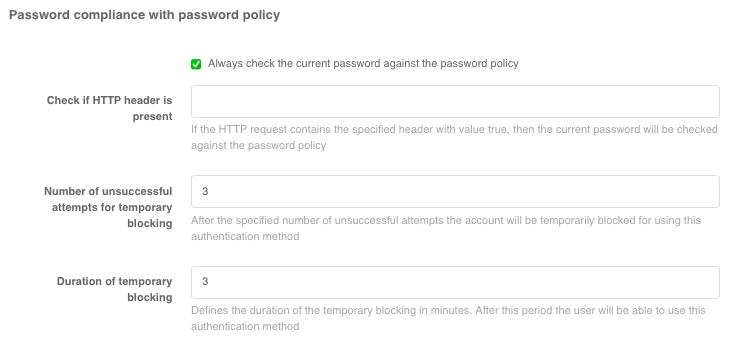
Configuring password validation against the password policy at login
You can control the password protection in the login settings. When the protection is enabled, the password verification is slowed down. After entering the password, the user will wait for the verification for the specified period “Delay time” (in seconds).
Administrator can select the following protection modes in the “Protection” setting:
Automatic mode at system and user level- protection will be enabled for all users if the percentage of unsuccessful authentications exceeds theEnable system protection at threshold', and disabled if the percentage of unsuccessful authentications falls below theDisable system protection at threshold;Automatic mode at user level- the protection will be triggered for users for whom the number of unsuccessful password checks exceeds the number specified by theEnable system protection at thresholdsetting;Authentication delay for all users- protection will be enabled for all users;Disabled- the protection will be disabled.
“System protection activation threshold” and “System Protection Disable Threshold “ parameters are set in percentages corresponding to the percentage of unsuccessful authentications in the total number of authentication attempts.
An example of how to configure password protection is shown below.
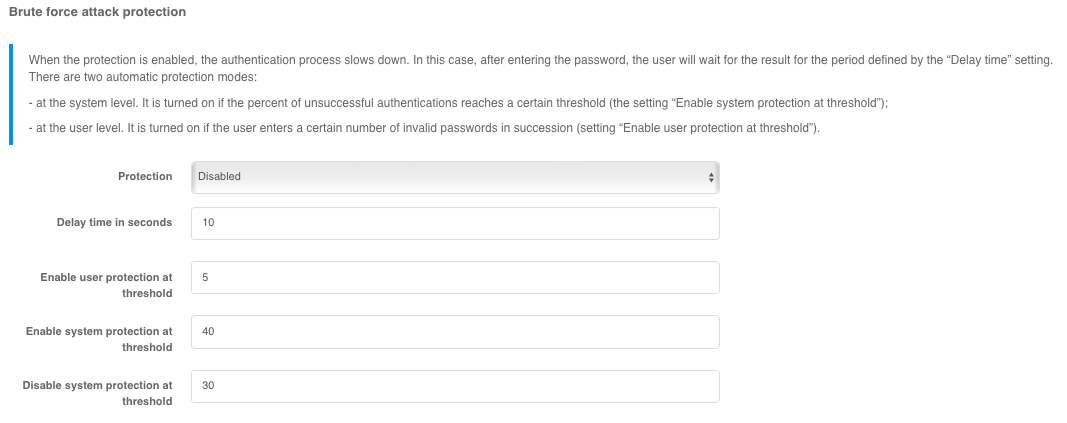
Configuring password protection
To complicate automatic password mining, you can enable the “Proof of work performance” setting in the Blitz Identity Provider. Then each time a user logs in with a username and password, the user’s browser will have to perform a computationally complex task. If you fail to provide a solution, provide an incorrect solution, or provide a solution at the wrong time, the Blitz Identity Provider will return an error. As a result, it will be impossible to know if the username and password are correct.
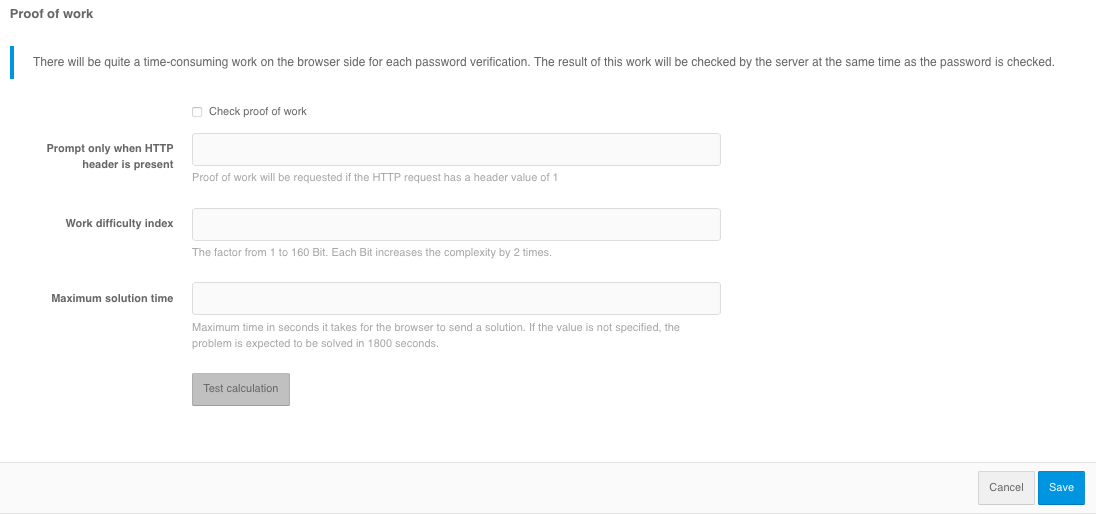
Configuring browser proof of work execution
The following can be configured in the “Proof of work performance” settings block:
enable the “Request proof of completion of work” setting.
if necessary, set the “Request only if HTTP header is present” setting - this is useful if you want to allow autotests to log in by password without having to pass the check. In this case, on the web server it is necessary to set the header from this setting for user requests, and not to set the header for requests coming from autotests.
set “Work complexity index” - the coefficient value from 1 to 160 bits is set. Each bit increases the complexity by 2 times. The recommended value is 15 bits.
“Maximum decision time” - time in seconds, in which the browser should send the result of the work. If the value is not specified, the task is expected to be solved in 1800 seconds. The time is counted from the moment the server generates the task at the moment of displaying the login page.
After setting the setting, it is recommended to press the “Test calculation” button before saving to get a rough idea of the run time on the current unit.
In the “Rules for selecting an attribute repository” block you can configure the rules, when executing which the user will be searched only in the specified store. By default, users for authentication are searched in all active attribute storages. You can specify several alternative storage selection rules. This will allow authenticating some users through one repository and others through another. Substitution strings are used to create a rule.
For example, in the screenshot below, it is configured that when a login is requested by an application with the test_app identifier, the user’s login and password will be checked against the test_db repository. Login to all other applications will be performed through the main repository.
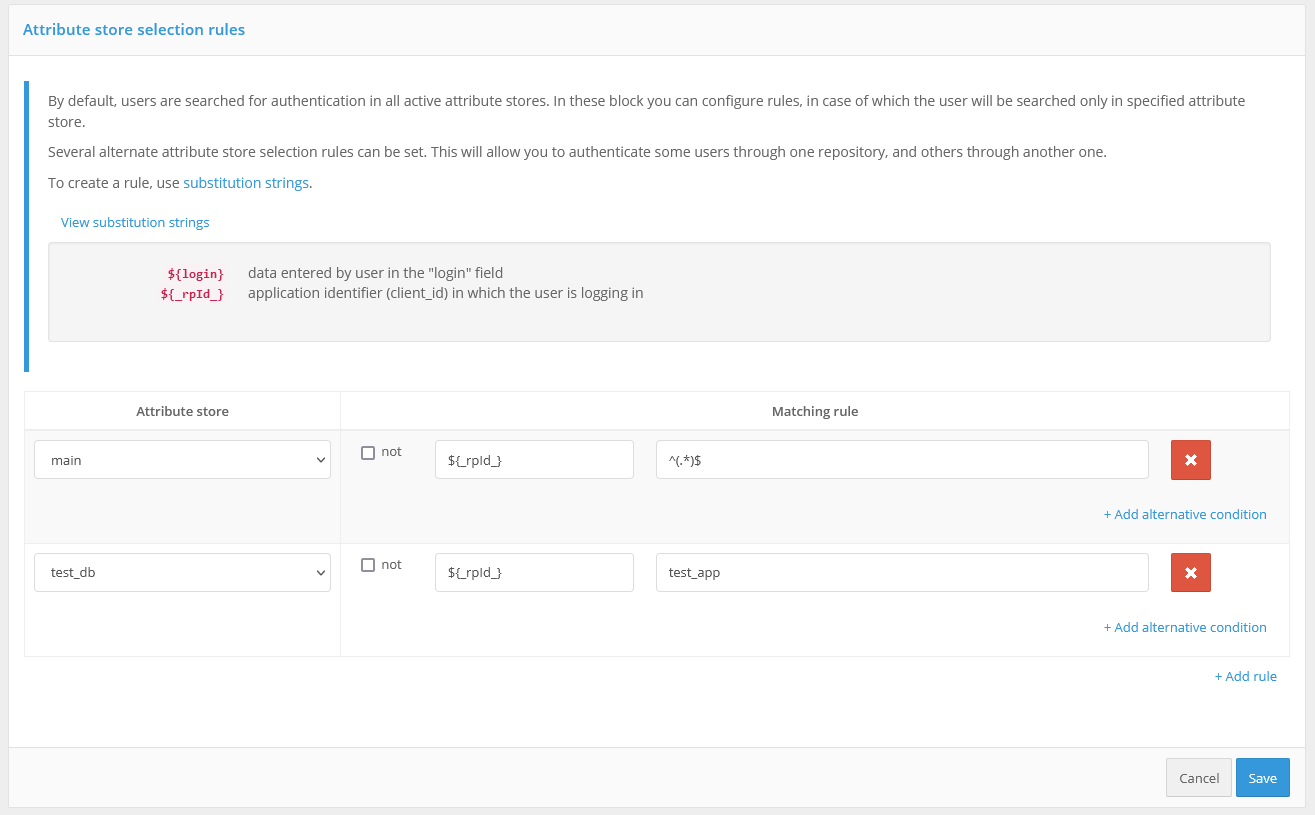
Configuring attribute storage selection rules
Login with an electronic signature tool#
Configuring the authentication method in the Admin console#
When using an electronic signature tool for authentication, you must:
in the “Certificates” settings block load certificates of certification centers confirming authenticity of electronic signature key certificates or configure interaction with an external electronic signature verification service (see Configuring the call to an external electronic signature verification service).
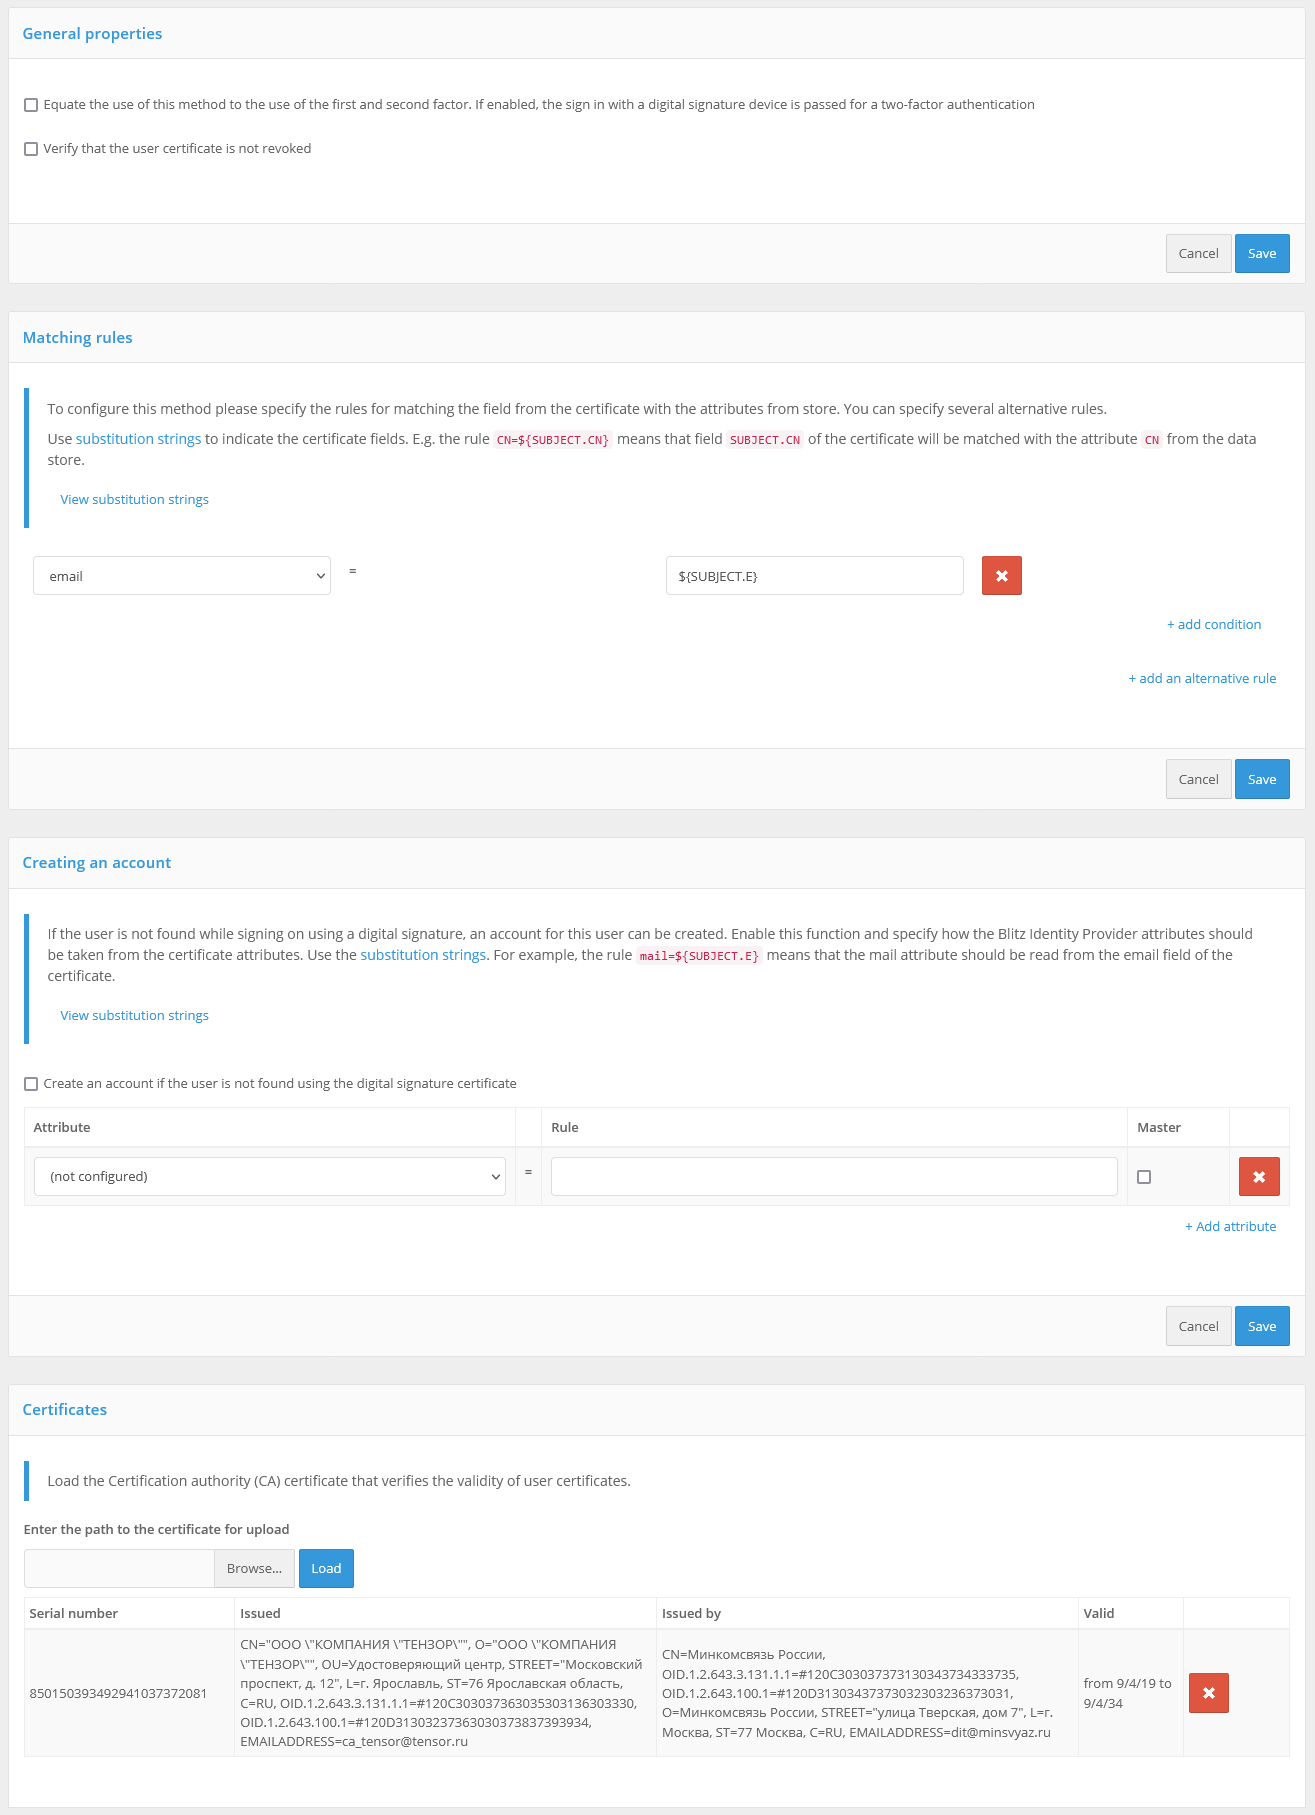
configure in the “Compliance rules” block the parameters of matching a user account in the storage by its attributes from an electronic signature certificate. Matching rules use substitution strings. For example, the
cn=${SUBJECT.CN}rule means that theSUBJECT.CNattribute of the certificate will be compared to thecnattribute in the data store. It is possible to specify multiple conditions at the same time, as well as to specify alternative rules.
When configuring electronic signature login, you can also specify:
whether this method should be used as the first and second factor. If yes, a user authenticated by electronic signature will be considered to have passed two-factor authentication (see the figure below for an example setting);
whether to check the validity of the certificate. In this case, the Blitz Identity Provider will use the revocation list distribution point (CRL) specified in the certificate to check if the certificate has been revoked. To activate this feature, check the checkbox “Verify that the user’s certificate has not been revoked”;
whether to create (register) an account at the first login by e-signature. In this case, if the user is not found by certain matching rules, the user will be prompted to register an account. To enable this feature, you should check the checkbox “Create an account if the user is not found by the electronic signature certificate” and configure the user registration rules - how to fill in the attributes in the repository from the certificate attributes. You should use substitution strings to set the rules. For example, the
email=${SUBJECT.E}rule means that theemailattribute will store the e-mail from the user’s electronic signature certificate.
Configuring Login by Electronic Signature
Using and updating the plug-in#
A special plugin - Blitz Smart Card Plugin - is used on users’ computers for correct operation of the e-signature login. When logging in by e-signature for the first time, the user will be prompted to install the plugin. After downloading the file and running it, the user should go through all the steps of the plugin installation. When logging in again from this device, the plugin will not need to be installed again.
The Blitz Identity Provider comes with a version of the plugin that allows you to work with electronic signatures as an authentication method.
If you need to update the Blitz Smart Card Plugin version, you should replace the plugin distributions - they are located in the assets directory with the Blitz Identity Provider installation, in the assets.zip archive. The structure of the archive is as follows:
plugins/sc/deb/BlitzScPlugin.deb
plugins/sc/rpm/BlitzScPlugin.rpm
plugins/sc/win/BlitzScPlugin.msi
plugins/sc/mac/BlitzScPlugin.pkg
plugins/sc/mac/BlitzScPlugin-10.14.pkg
...
You need to unzip the assets.zip archive, replace the files with the plugin distribution and zip the files back to assets.zip.
You can also adjust the settings for using the e-signature plugin (see Configuring the call of the electronic signature plug-in) if necessary.
Logging in via external identification services#
The list of available external identity services depends on the edition of Blitz Identity Provider and the options purchased.
Logging in using the following external identity providers is possible:
Apple ID provider;
Facebook’s social network identity provider;
Google identity provider;
identity provider running OpenID Connect;
SAML-based identity provider.
Connections to external identity services must be pre-configured in the Management Console under “Identity providers” (see Logging in through external identity providers).
In the settings section “Logging in via external identification services” you must select which of the configured identity providers should be used for logging in.
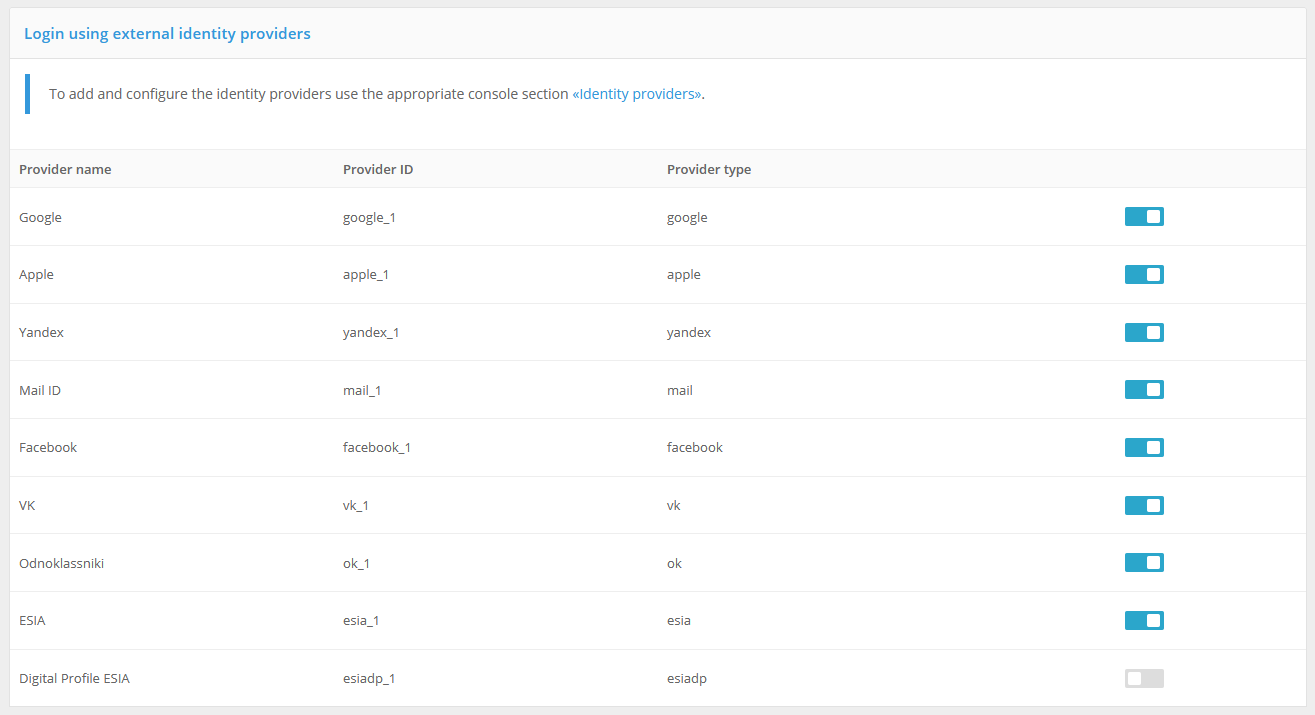
Enabling the necessary external identification services
Login with proxy authentication#
Proxy authentication (authentication by proxy server) is performed with the data sent in HTTP headers.
Important
When proxy authentication is enabled, Blitz Identity Provider only identifies the user, while authentication (as a result of certificate verification) is performed by the proxy server. Enabling this authentication method is acceptable when all users access the Blitz Identity Provider through the proxy server.
For this method to work correctly you need to specify:
required HTTP headers - list of HTTP headers that must be present to pass user proxy authentication,
HTTP header with user certificate (optional parameter) - header containing x.509 user certificate,
matching of HTTP header values and user identity data in the attribute store.
It is possible to configure mapping of attributes of the certificate passed in the HTTP header and user data to the storage.
An example of proxy authentication login settings is shown below:
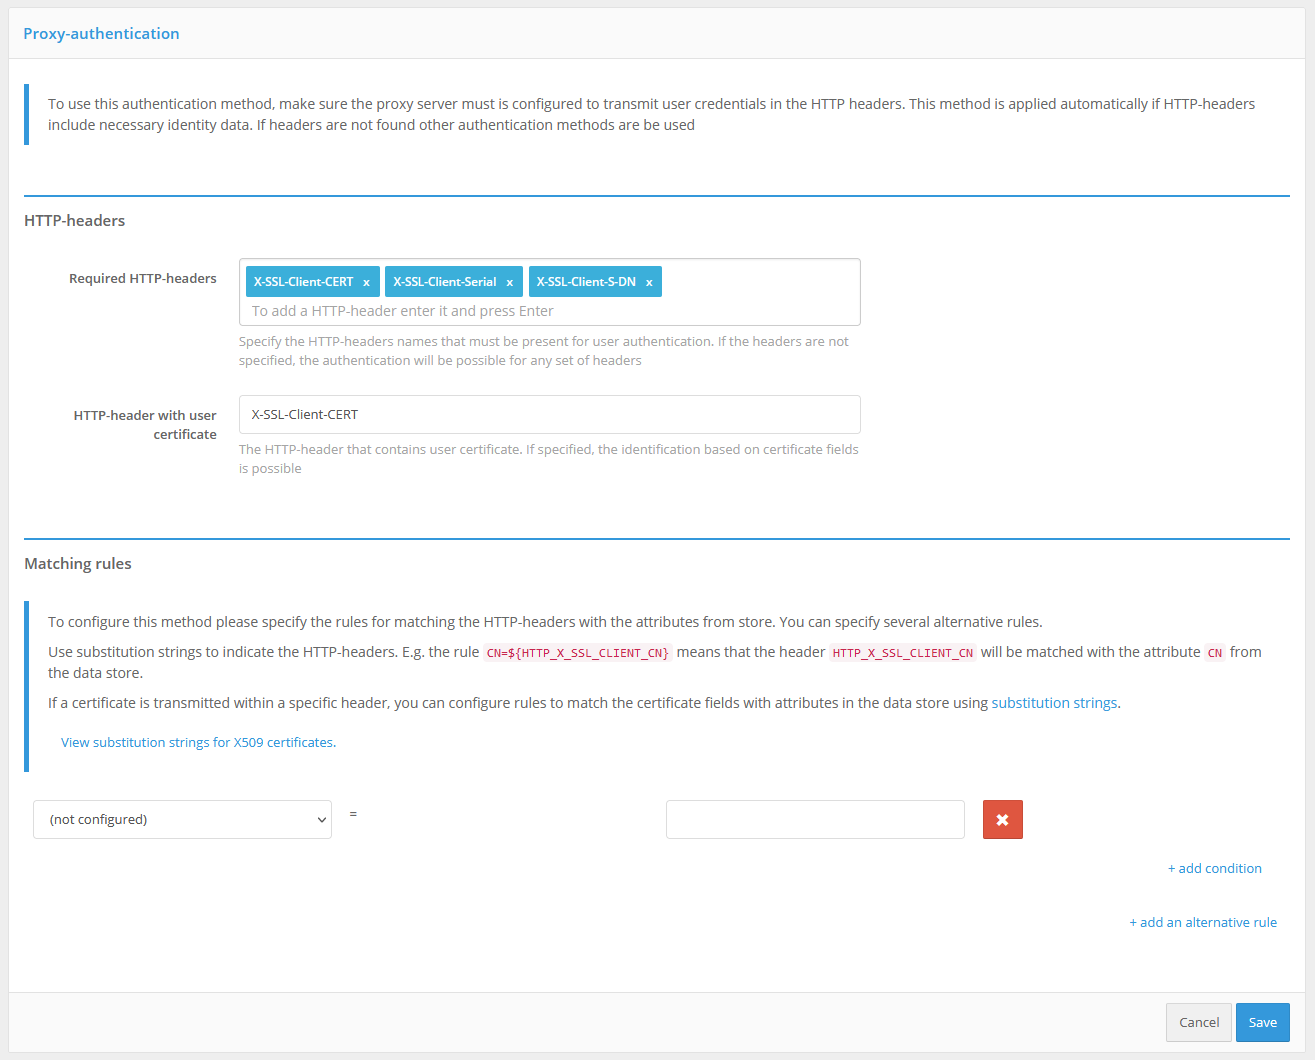
Configuring login with proxy authentication
Login using an operating system session#
The operating system session logon method allows users to avoid additional identification and authentication in Blitz Identity Provider if they have previously logged on to the organization’s network from their PC and have been identified and authenticated in the operating system (logged on to the network domain). Such users will have end-to-end identity access to all applications connected to the Blitz Identity Provider.
To login with an operating system session, the organization must have Kerberos server deployed (alone or as part of an organization’s domain controller) and the following configurations are set up(see descriptions below in subsections):
Domain controller (Kerberos server) configuration
Blitz Identity Provider admin console configuration.
Users’ browsers configuration.
Blitz Identity Provider applications launching configuration.
Web Server configurations.
Domain controller (Kerberos server) configuration#
In the domain controller you need to register an account for the Blitz Identity Provider server. For the created account, on the “Account” page in the “Account options” block of the domain controller snap-in, enable the settings “User cannot change password “ and “Password never expires”.
Also note the options “This account supports Kerberos AES 256 bit encryption “ and disable pre-authentication “Do not require Kerberos pre-authentication”.
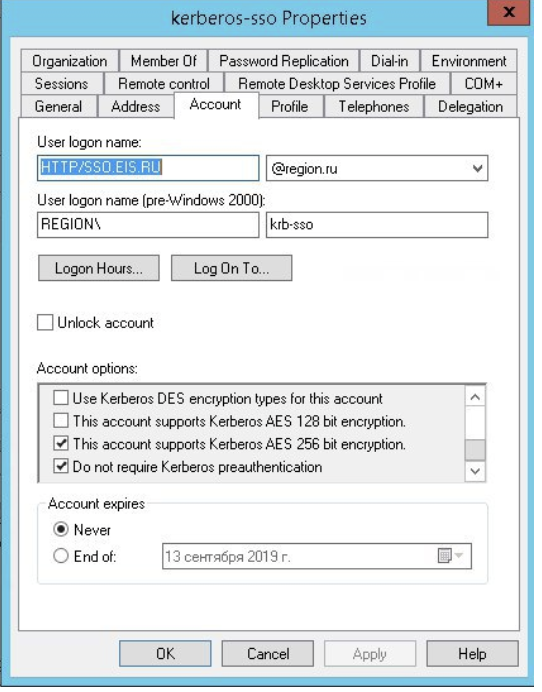
Kerberos properties
In the Group Policy Management snap-in, configure the “Configure encryption types allowed for Kerberos” policy by specifying the following possible values: RC4_HMAC_MD5, AES128_HMAC_SHA1, and AES256_HMAC_SHA1.
Example of configuration:
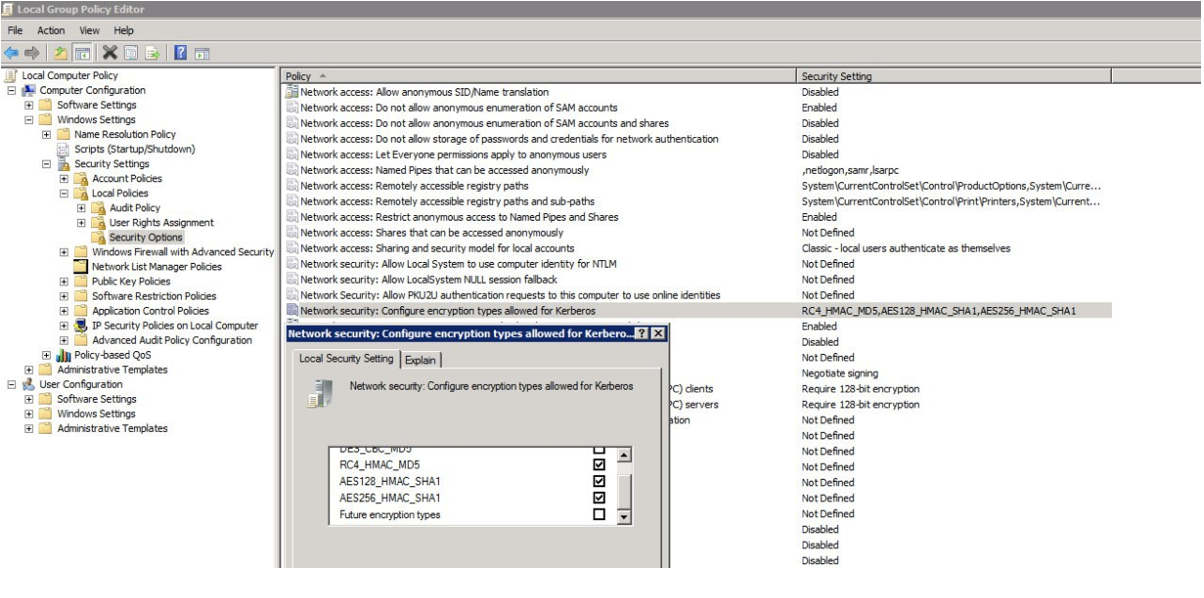
Configuring encryption policies
Next, you must create a Service Principal Name (SPN) to identify the Blitz Identity Provider server with the Kerberos server. This is accomplished using the following command:
ktpass -princ HTTP/idp.company.ru@DOMAIN.LOC -mapuser DOMAIN\blitzidpsrv -out C:\temp\spnego_spn.keytab -mapOp set -crypto ALL -ptype KRB5_NT_PRINCIPAL /pass SecretPassword
Parameters of the ktpass command:
the
mapuserparameter value is the name of the Blitz Identity Provider server account created in the domain, for example,DOMAIN\blitzidpsrv;the value of the
princparameter is the name of the SPN of the server with the Blitz Identity Provider for authentication in the Kerberos environment. This name consists of the host name of the server with Blitz Identity Provider, the uppercase Kerberos Realm name (usually the same as the domain name), and the transport protocol used (HTTP). An example of an SPN value isHTTP/idp.company.ru@DOMAIN.LOC. It is important that theHTTP/at the beginning of the SPN name be in capital letters, as in the example.parameter
mapOp- if set toadd, the new SPN will be added to the existing ones. If set toset, the SPN will be overwritten.parameter
out- specifies the path to the generated keytab file. For example,C:\temp\spnego_spn.keytab;the
/passparameter is the password value for the Blitz Identity Provider server account in the domain.the
cryptoandptypeparameters specify restrictions on the algorithms used and the type of Kerberos service generated. It is recommended to set the parameters as in the above example-crypto ALL -ptype KRB5_NT_PRINCIPAL.
The generated keytab file must be saved. It will be required for further configuration in the Blitz Identity Provider management console.
Settings in the Blitz Identity Provider Management Console#
It is necessary to go to the “Authentication” section in the management console to the settings of the login method “Logging in by operating system session”. In the opened window, load the previously generated keytab file. The SPN name will be set automatically in accordance with the uploaded file.
Based on the results of the keytab file download, information about the corresponding Kerberos service will be displayed.
If required, you can:
delete the loaded keytab file;
load more keytab files if you connected Blitz Identity Provider to more than one domain controllers.
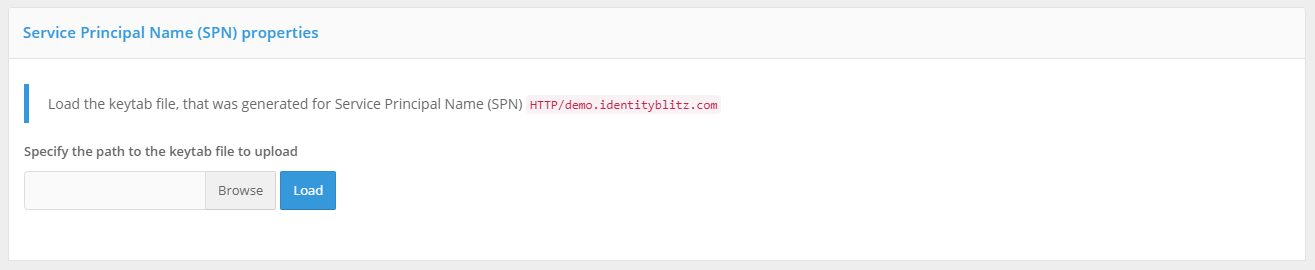
Keytab file successfully uploaded
Next, you need to define the matching parameters for the Kerberos token (TGS) and the account in Blitz Identity Provider.
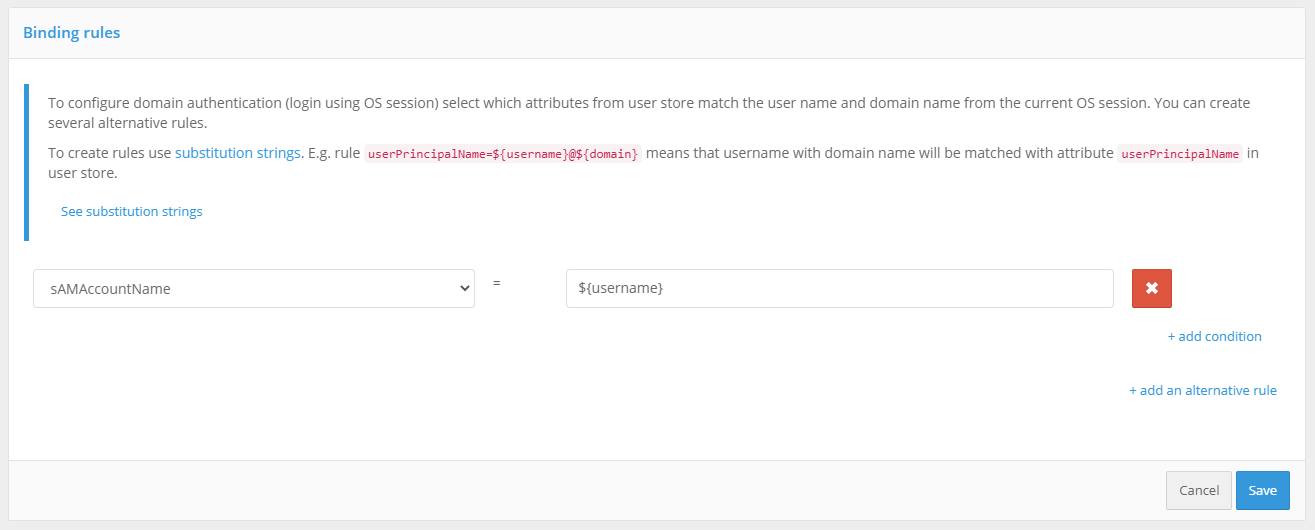
Configuring Kerberos matching between a user’s Kerberos ID and his/her storage account
For example, you can specify that the user ID (username) received from the Kerberos token must match the sAMAccountName attribute received from the LDAP directory (Microsoft Active Directory).
The next step is to set the delay parameters for the login method using an operating system session.
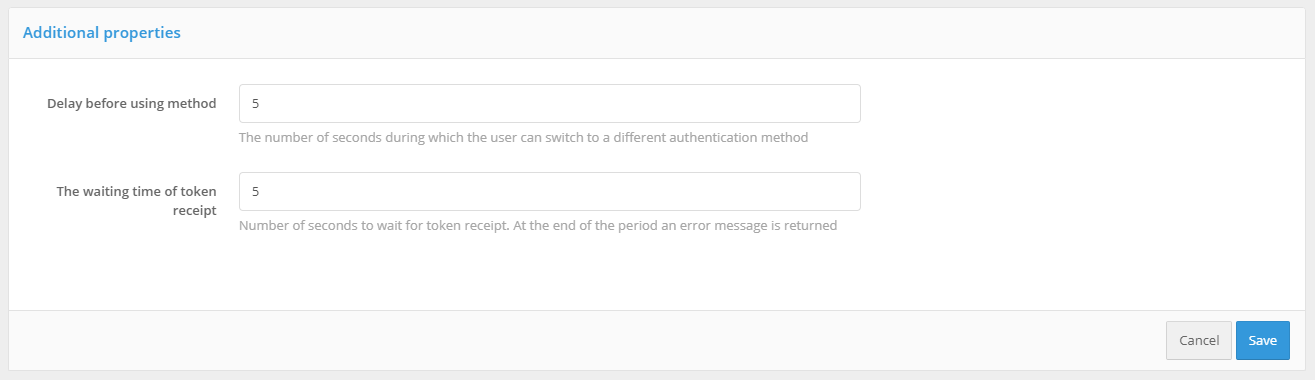
Additional settings
Blitz Identity Provider provides two possible scenarios for using the operating system session:
”Basic Scenario”. Users log in to the operating system, and thereafter must end-to-end log in to all applications connected to the Blitz Identity Provider. Providing users with the ability to log into applications under a different account is not required. In this case, you should set the “Delay time before method start” to 0 seconds. When the application is accessed, an end-to-end login will be attempted immediately through the operating system session.
”Additional scenario”. Users are not always able to log on to the operating system domain, or users in some cases need to be able to log on to applications under a different account than the one they used to log on to the domain. In this case, the “Delay time before method start” should be set so that the user has enough time to be able to cancel automatic login using an operating system session.
”Waiting of token receipt” should be set sufficient to allow the Kerberos server to respond to the Blitz Identity Provider. Usually 5 seconds is sufficient.
As in the case of login by login and password, by default the user search for authentication is performed in all active storages. In the “Rules for selecting an attribute repository” block you can configure the rules, when executed, the user search will be performed in a certain storage (see Logging in using login and password).
Users’ browsers configuration#
Depending on the browser used by the user, it may be required to additionally configure it to support Kerberos authentication.
For Windows browsers, you need to set the following settings:
open “Start → Control panel”, change the viewing option from “Category” to “Small icons”, select “Browser properties” in the opened settings;
in the new window, select “Security → Local intranet” and click “Websites”. In the window that opens, click “Additional” and add the Blitz Identity Provider site to the list of “Local intranet” sites by clicking “Add”;
in the “Properties: Internet → Security → Local intranet” window, click the “Other…” button. In the window that opens, find the “User authentication → Login” setting. Set it to “Automatic network login only in the intranet area”.
You can choose not to make the above settings for the Windows operating system and, as an alternative, to be able to log in by operating system session in the Google Chrome browser, then you can start the browser with the following startup settings:
Chrome.exe –auth-server-whitelist="idp.domain.ru" –auth-negotiate-delegatewhitelist="idp.domain.ru" –auth-schemes="digest,ntlm,negotiate"
Where as idp.domain.ru you need to specify the URL of the Blitz Identity Provider site.
You can also set the following settings in the Windows registry to run the Google Chrome browser without startup options.
Windows Registry Editor Version 5.00

[HKEY_LOCAL_MACHINE\SOFTWARE\Policies\Google]

[HKEY_LOCAL_MACHINE\SOFTWARE\Policies\Google\Chrome]
"AuthNegotiateDelegateWhitelist"="idp.domain.ru"
"AuthSchemes"="basic,digest,ntlm,negotiate"
"AuthServerWhitelist"="idp.domain.ru"
For Mozilla Firefox, you need to set the following settings (for any operating systems):
enter
about:configin the browser address bar and press “Enter”. In the next window, enternetwork.negoin the “Filters” field. Double-click on thenetwork.negotiate-auth.trusted-urisentry found and set it to the URL of the site with the Blitz Identity Provider, for example,idp.domain.ru. When specifying addresses, you can use an asterisk (*) and specify multiple URLs separated by commas, for example:`https://*.idp.domain.ru,http://*.idp.domain.ru. Close the pop-up window with the “OK” button.double-click on the
network.negotiate-auth.delegation-urisentry you found and set it to the URL of the site with the Blitz Identity Provider, for example,idp.domain.ru. When specifying addresses, you can use an asterisk (*) and specify multiple URLs separated by commas, for example:https://*.idp.domain.ru,http://*.idp.domain.ru. Close the pop-up window with the “OK “ button.open the
network.auth-sspiparameter, set its value totrue;restart the browser.
For Google Chrome in macOS and Linux, you need to run Google Chrome in a special way:
"/Applications/Google Chrome.app/Contents/MacOS/Google Chrome" --args --auth-server-whitelist="idp.domain.ru" --auth-negotiate-delegate-whitelist="idp.domain.ru"
Where as idp.domain.ru you need to specify the URL of the Blitz Identity Provider site.
No separate configuration is required for Apple Safari in macOS.
Blitz Identity Provider applications launching configuration#
Users may have problems logging in by operating system session if they use Internet Explorer browser and if their account is included in many security groups in the domain, or if the DN of the account is long enough. To avoid this situation, it is necessary to set a special JAVA parameter when launching the blitz-idp authentication service application that defines a large allowable HTTP header size. To do this, edit the /etc/default/blitz-idp file. Add a key to the JAVA_OPTS parameter:
-Dakka.http.parsing.max-header-value-length=16K
Web Server configurations#
Users may have problems logging in by operating system session if they are using the Internet Explorer browser, and if their account is included in many security groups in the domain, or if the DN of the account is long enough. To avoid this situation, you must adjust the web server settings that determine the allowable size of header buffers.
Recommended buffer values for nginx are given below:
proxy_buffer_size 16k;
proxy_buffers 4 16k;
proxy_busy_buffers_size 16k;
client_body_buffer_size 16K;
client_header_buffer_size 16k;
client_max_body_size 8m;
large_client_header_buffers 2 16k;
Debugging operating system session login problems#
If the operating system session login still does not work for users with the settings made, it is recommended to run the following command on the user’s computer at the command line:
klist
If the command successfully returns TGS credentials for the SPN configured for the Blitz Identity Provider, then you should check the correctness of the settings on the user’s browser side and in the Blitz Identity Provider. If TGS credentials for Blitz Identity Provider are missing, you can request them using the following command (you must specify the correct SPN and company domain name):
klist get HTTP/idp.company.ru@DOMAIN.LOC
If the command does not return the received TGS credentials, then we need to check if the settings on the Kerberos server are correct.
Login with confirmation codes#
You can use push notifications sent to the mobile app or SMS to verify:
first authentication factor;
of the second authentication factor (see Confirmation codes sent in SMS and push notifications).
To use the confirmation codes, you must:
configure and enable the authentication method “Confirmation by code”. You need to configure:
way to identify an account - specify a regular expression. For example, the
phone_number=${login}rule means that the value entered by the user in the login form will be matched with thephone_numberattribute;length of the confirmation code;
validation time of the confirmation code;
number of attempts to enter the confirmation code for 1 login;
total number of attempts (number of code sends and code entry attempts, after which this authentication method will be temporarily blocked for the user);
blocking time when attempts are exceeded (in minutes);
configure how to send the code:
send push notification - you should specify an attribute with a cell phone number or other user ID required by the service, for example,
${phone_number};send SMS - specify attribute with user’s cell phone number, for example,
${phone_number};
configure the Blitz Identity Provider connection to the SMS gateway and the push notification service.
Attention
If the user does not have a mobile phone number, he will not be able to use method of login verification by confirmation code sent via SMS.
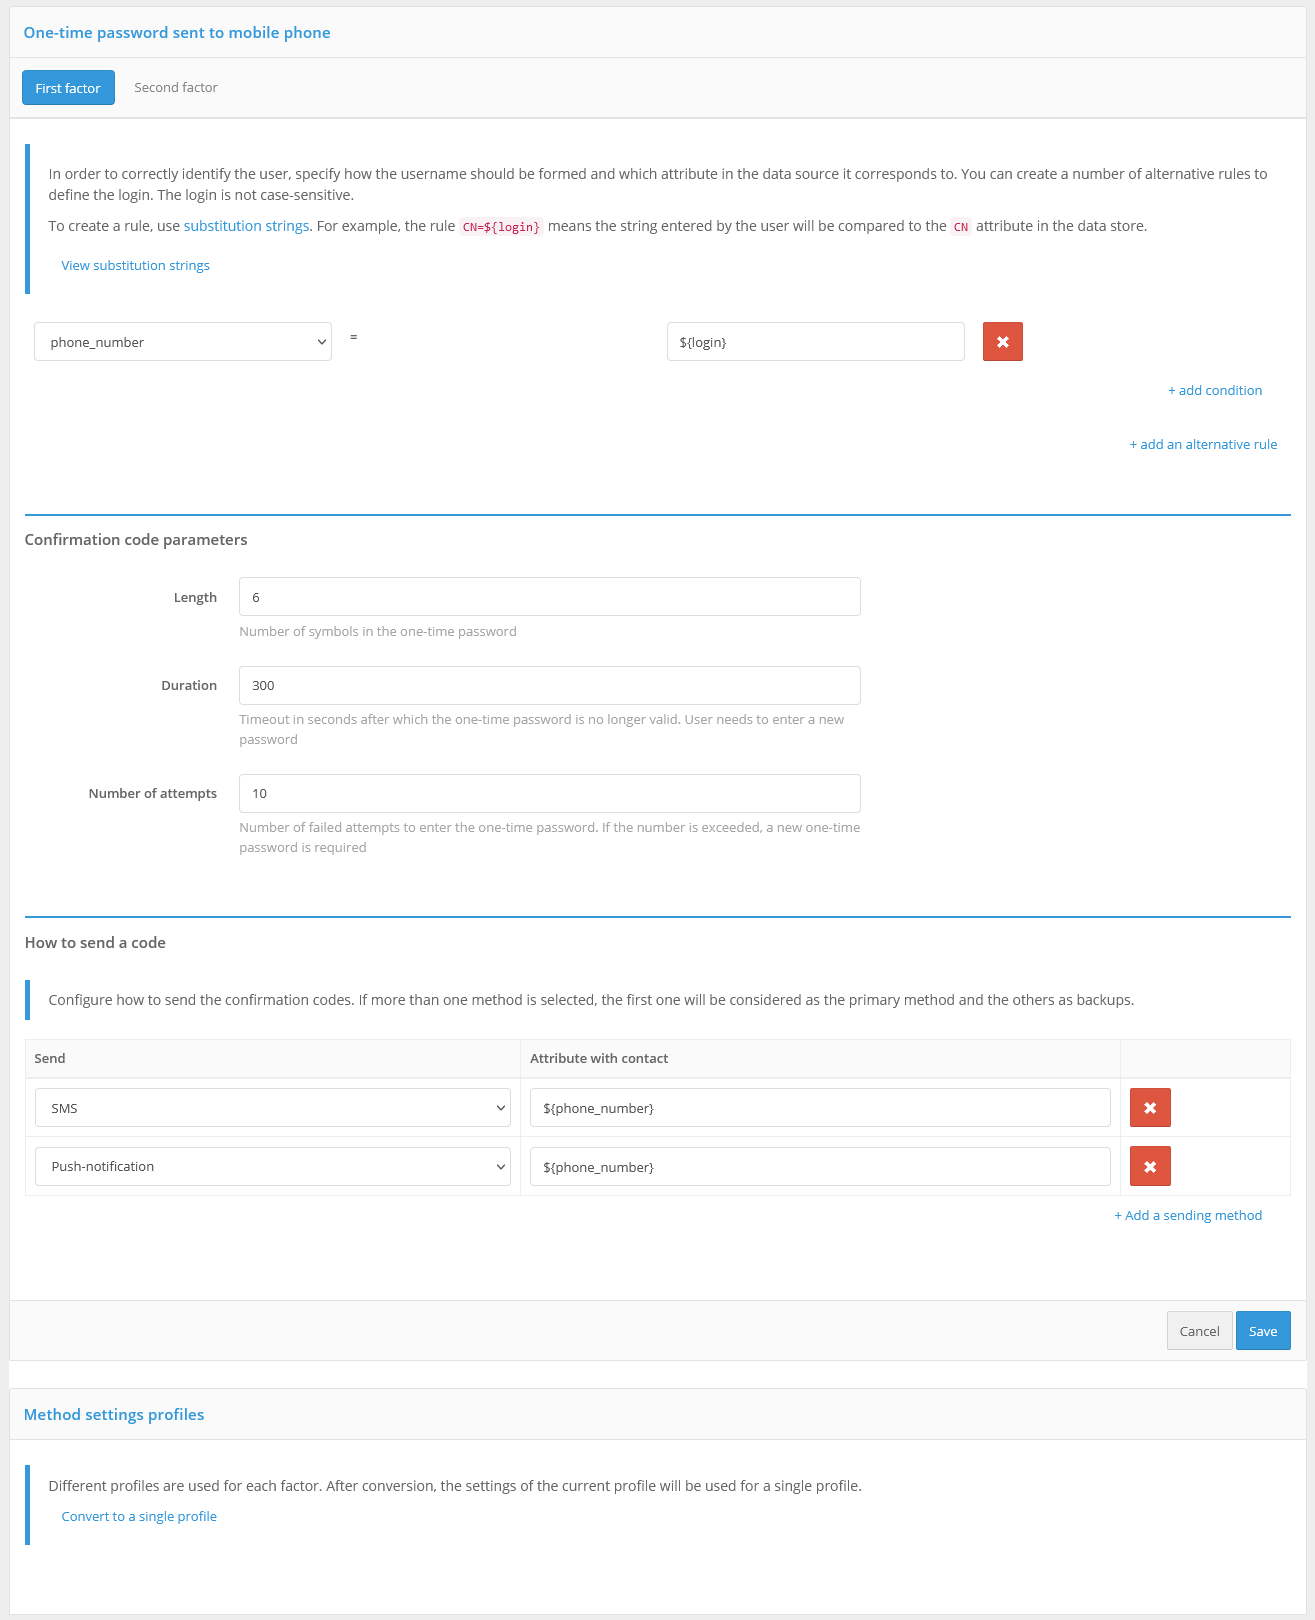
Confirmation code login settings
By default, single settings are used for confirmation codes sent for verification of the first and the second factor. To separate the settings, click on the link “Configure a profile for each factor” in the block “Method Customization Profiles”. Then the settings will be separated and it will be possible to switch between the first and the second factor.
If it is necessary to switch to unified settings, click the “Convert to a single profile” link in the “Method Customization Profiles” block.
Login from a known device#
Login from a known device allows for not requesting user identification and authentication (first factor method) if the user has, within a certain period of time, already logged in from that device and browser. In other words, the user can log in without authentication after restarting the browser.
Setting the method includes specifying the duration of device memorization. It can also be set to not require two-factor authentication when logging in from a memorized device (option “Equate the use of this method to the use of the first and second factor”). If this option is enabled, logging in from a known device will mean that the user has passed two-factor authentication.
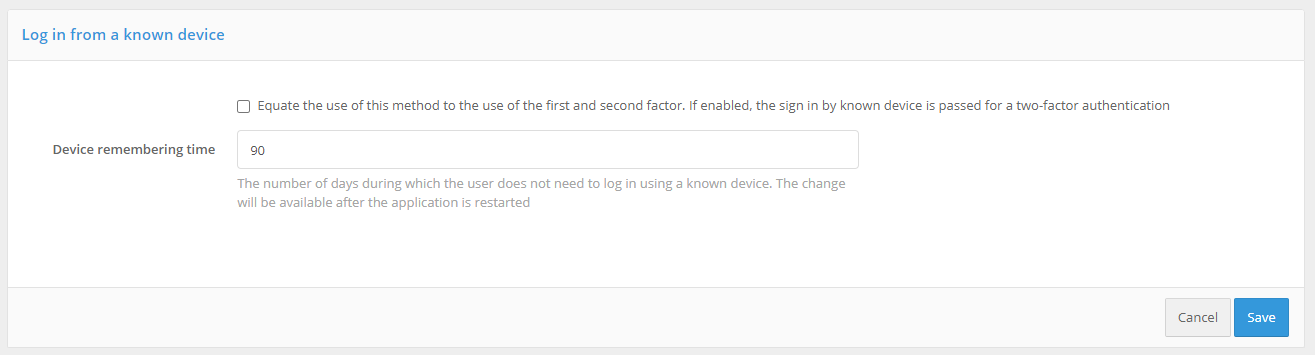
Configuring Login from a Known Device
Login by one-time link#
One-time link login is used to provide automatic login after a user has self-registered an account, recovered a forgotten password, or when using a special login mode when opening a web browser from a mobile application to which the user has previously logged in.
Method customization includes specifying the validity time of the link used for automatic login. For automatic login to work, no more than the time specified in the setting must have elapsed from the time the link is generated (after successful completion of registration or password recovery or receipt of the css parameter by the mobile application) until the user login is initiated, and that the link has not been used before.

Setting the link validity time
Login by QR code#
Blitz Identity Provider provides the option to set up a QR code login to the web application as the first authentication factor. The login process is organized as follows:
A user in a browser initiates a login to a web application. The Blitz Identity Provider displays a login page. On the login page, the user selects “Login by QR Code”.
Blitz Identity Provider displays a QR code and instructions to the user on the login page. The QR code has a limited validity period (a timer with the QR code validity period is shown to the user).
The user launches the mobile application of the company, which has built-in support for the QR code login mode, and scans the QR code with the help of this application.
The mobile app shows the user detailed login information received from the Blitz Identity Provider (the name of the app being logged into, the IP address, browser, and operating system name of the device being logged into).
The user in the mobile app decides whether to allow or deny entry.
Depending on the user’s decision on the computer, the user successfully logs into the application or the login request is denied.
Customizing the method includes specifying the following parameters:
QR code validity time - during this period the user must scan the QR code and make a decision to log in;
link that will be encoded in the QR code - indicates which application or web page should be launched in case the QR code is read by the standard “Camera” application. The encoded QR code will be passed to the link as a parameter (the link will be
QR_URL?code=b0671081-cb73-4839-8bc1-8cf020457228);logo link (optional) - this logo will be displayed in the center of the QR code.
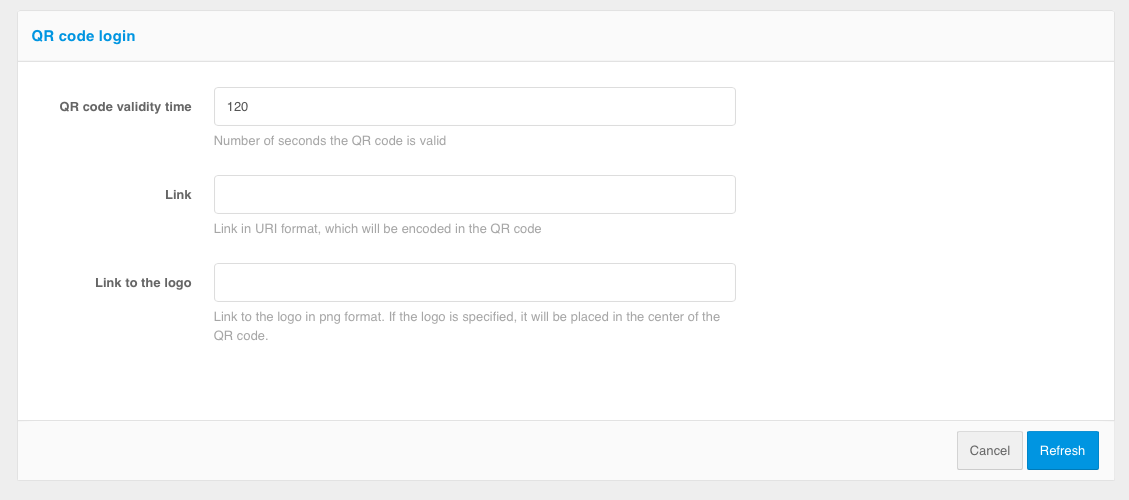
Setting up login by QR code
Login with security keys (WebAuthn, Passkey, FIDO2)#
You can use security keys (WebAuthn, Passkey, FIDO2) to log in to the Blitz Identity Provider. The WebAuthn specification is used to interact with security keys. The following key types are supported:
External keys - are hardware devices in the form of USB keys or key fobs connected to PCs, tablets and phones via USB port, Bluetooth or NFC. The keys do not require drivers or plug-ins to be installed on the device - interaction with the keys is performed through the built-in capabilities of browsers.
Built-in keys - Authentication mechanisms built into the device and operating system that support WebAuthn:
Windows Hello - you can log in using Windows PIN, fingerprint verification, or facial recognition;
Touch ID or password on your MacBook;
Touch ID or Face ID on an iOS cell phone or fingerprint verification or facial recognition in Android.
To use security keys, you must set the security key settings (see Configuring security keys) and configure the authentication method in the Management Console. The following settings must be configured in the Management Console:
Allowed attestation modes - using only
FULLandFULL_NO_ROOTmodes will increase security, but will not allow to use some keys for login, as well as Windows PIN code, because when registering such keys the attestation object comes without chipset or key manufacturer’s signature or using a self-signed key. The use ofSELFmode allows an attacker to implement a man-in-the-middle attack to spoof the key at the time of registration, in case the user’s device is controlled by the attacker.Show method only to users who have bound a security key to the account - If Blitz Identity Provider has already identified the user, it already knows if security keys are configured for the user’s account. If security keys are not configured, you can configure that the user is not shown the login method using the security key.
Equate the use of this method to the use of the first and second factor - if the option is enabled, logging in by security key will mean that the user has passed two-factor authentication.
Matching Rules - When logging in with a security key, the user is asked to enter a login. The Matching Rules setting allows you to specify the rules for searching whether an account matches the entered login. A security key login check will be requested for the found account. To create a rule, a wildcard string is used:
${login}is the string entered by the user in the “login” field. As a result, for example, the ruleemail=${login}means that the string entered by the user will be compared to theemailattribute in the data store.Attribute store selection rules - as in the case of sing in by login and password, by default the user search for authentication is performed in all active stores. In the “Attribute store selection rules” block you can configure the rules, when executed, the user will be searched in a certain store (see Logging in using login and password).
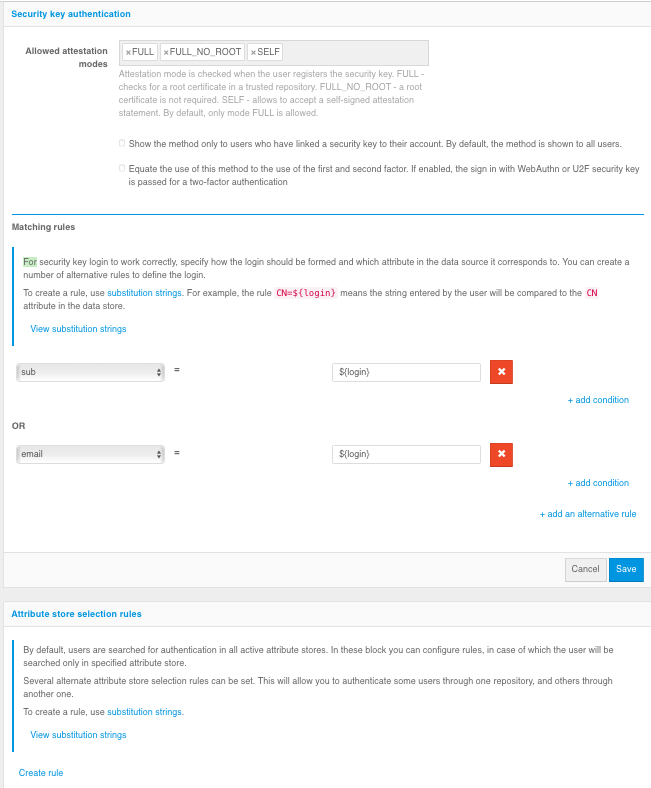
Configuring Login with Security Keys
Login confirmation with a HMAC-based one-time password (HOTP)#
Any hardware key fob compatible with the RFC4226 “HOTP: An HMAC-Based One-Time Password Algorithm” standard can be used to verify the second factor of authentication using the One-Time Secret-based Password (HOTP) authentication method.
To use HOTP, you must:
configure and enable this authentication method;
upload a HOTP device description file to the Blitz Identity Provider. The description file is provided by the HOTP device provider. To upload the description file, use the Devices menu section in the Blitz Identity Provider management console;
bind the HOTP device to the user account and issue the HOTP device to the user. Binding can be done in two ways - either the administrator binds the device by serial number to the user account in the Management Console under the “Users” menu, or the user binds the device to his/her account by himself/herself using the “My Account” web application.
HOTP authentication settings
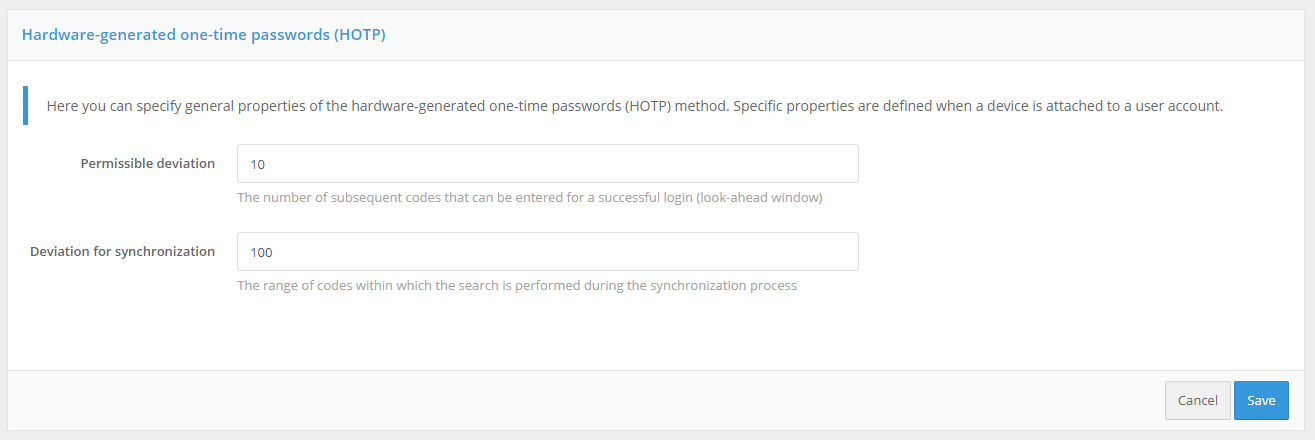
To configure the “One-time secret-based password (HOTP)” authentication method, you must set:
maximum allowable deviation during code verification - the number of subsequent codes (for example, if the user accidentally pressed the button to generate a new password and did not use it during the authentication process) at which the authentication will be successful. If the user enters the correct code, Blitz Identity Provider will automatically resynchronize with the device;
reject for synchronization - if the user repeatedly presses the code generation button on the device and does not use the code to confirm the login, the device will cease to be synchronized with the server. In this case, the next time the user logs into the Blitz Identity Provider, he or she will be prompted on the login page to go through the device reconciliation procedure. To do this, the user will enter three confirmation codes sequentially generated by the device. The Blitz Identity Provider will then check whether the code sequence entered by the user is encountered according to the “Reject for synchronization” setting and will resynchronize with the device if successful;
total number of attempts - number of attempts to enter the confirmation code, after which this confirmation method will be blocked;
blocking time when attempts are exceeded (in minutes).
Time-based one-time password login confirmation (TOTP)#
Any devices and programs compatible with the RFC6238 “TOTP: Time-Based One-Time Password Algorithm” standard may be used to verify the second factor of authentication using the Time-Based One-Time Password (TOTP) authentication method. These may include:
hardware keyfobs (one-time password generators) based on time;
mobile apps.
The most well-known applications for generating TOTP codes are Google Authenticator, Twilio Authy, FreeOTP Authenticator, Microsoft Authenticator, Yandex.Key.
In the settings for the authentication method “Time-based One-Time Password (TOTP)”, you must specify:
Allowable code validation deviation (number of previous / next codes). By default, both values are
1: a user can enter both the current validation code and the next or previous one (generated in neighboring time intervals) when logging in. Such a need may arise, for example, to compensate for possible minor unsynchronization of server time and time on TOTP-devices of users.Total number of attempts - number of attempts to enter the confirmation code, after which this confirmation method will be blocked.
Blocking time when attempts are exceeded (in minutes).
Customize the display of one-time password generators, which includes “Attribute with user name” and “Name of the single sign-on system”. These settings will be displayed in the mobile app after the user account is linked.
Links to one-time password generator applications. Links to applications that are recommended to be used by users should be specified. These links will be offered to the user in the web application “Personal cabinet”.
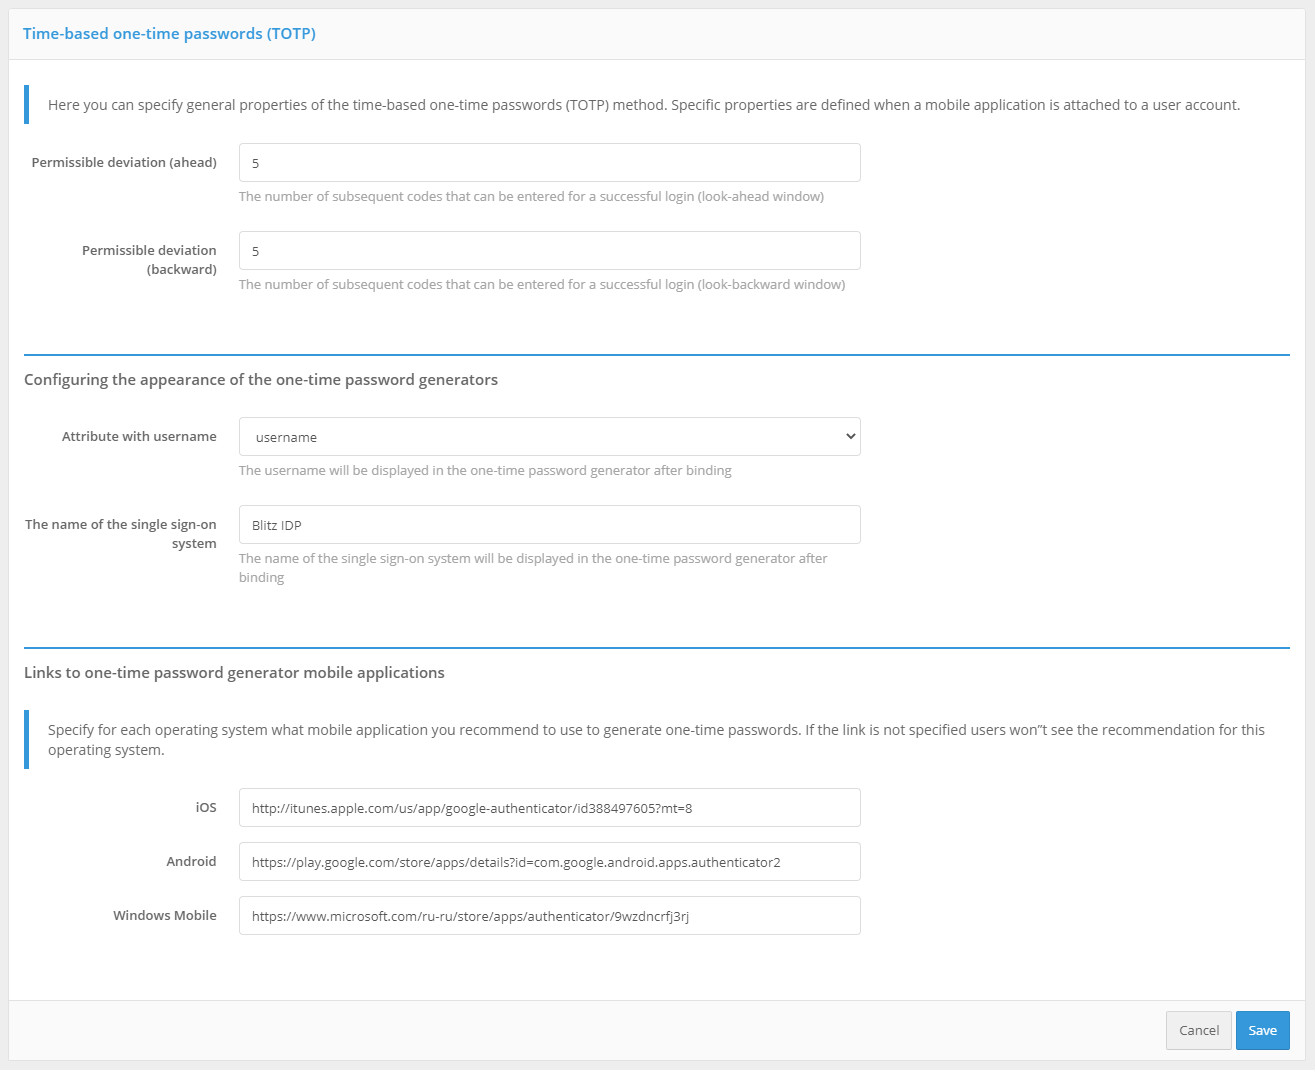
General TOTP authentication settings
Binding devices to user accounts#
Binding HOTP and TOTP devices via the Admin console differs depending on whether key fob hardware or mobile apps are used.
Binding of hardware keyfobs#
To be able to use hardware HOTP and TOTP devices as authentication tools, the administrator must first load a file with the device batch descriptions received from the device vendor in the Devices menu of the Management Console. The file contains information about the device serial number, initialization vector, and a number of other settings. Blitz Identity Provider supports uploading of common file formats (specialized XML files, CSV files) of device description files from different device manufacturers.
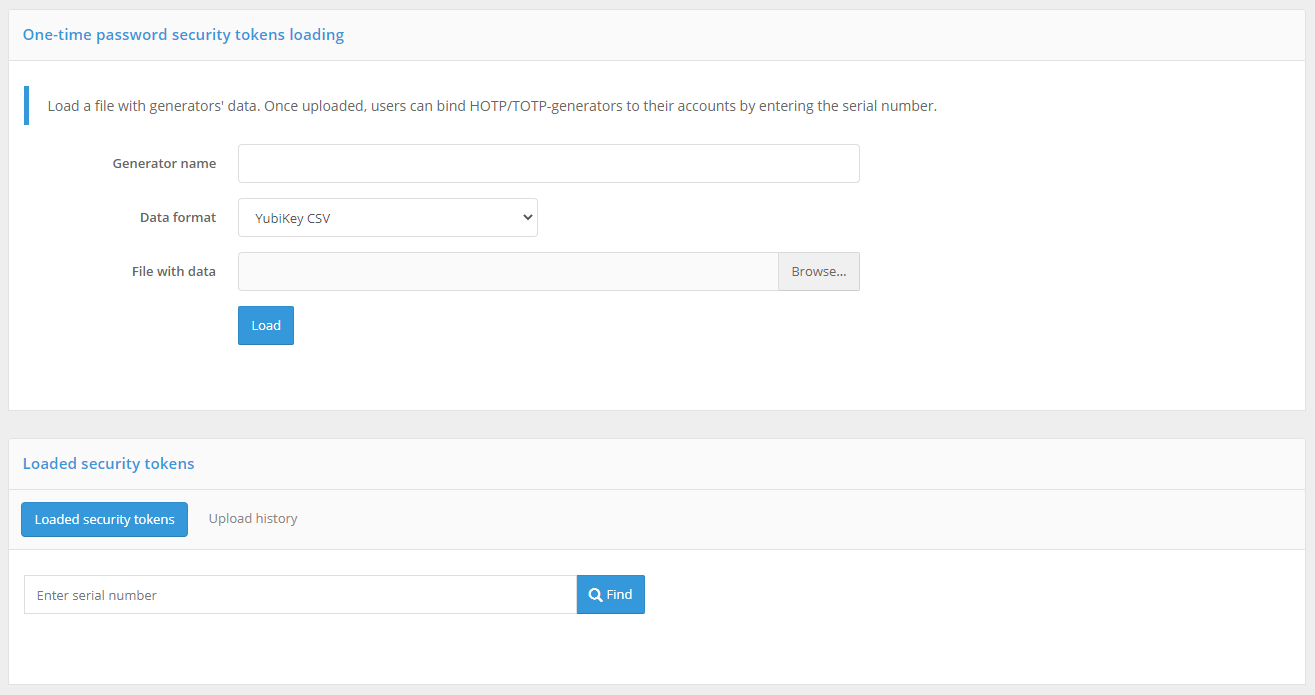
Downloading files with descriptions of code generation devices
To perform a file upload, you must specify a name for the uploaded generators (it can be, for example, the device name), the data format, and the path to the file with device descriptions. When you click the “Download” button, Blitz Identity Provider will report how many device records were loaded or discarded (if their description in the file was incorrect or the device record is already present in the system).
An example of a downloadable Aladdin/SafeNet XML format file for HOTP devices with the SHA-1 algorithm with a minimum set of parameters:
<?xml version="1.0" encoding="utf-8"?>
<Tokens>
  <Token serial="SN123">
    <Applications>
      <Application>
        <Seed>7bba106e428231c4d4e78361375d161c2d59b40b</Seed>
        <MovingFactor>0</MovingFactor>
      </Application>
    </Applications>
  </Token>
</Tokens>
Explanation of the parameter values in the file:
serial- serial number of the device.Seedis the device key in hexadecimal (hex) format.Note
If a software one-time code generator is used to emulate a HOTP device, a Base32 string is usually entered as a secret in the software generator. In this case, the value from Seed must be converted from hex to Base32, and the resulting value must be used in the program generator.
MovingFactor- initial value of the generator (usually 0).
Under ”Devices” you can also search for a device by serial number and see, if and to which account the found device has been bound.
After loading the file you should:
go to the account of the user to whom you want to bind the device (menu “Users”, see User administration);
find the “Time-based password generator (TOTP)” or “Secret-based password generator (HOTP)” section;
select “Another type”;
enter the serial number of the required device and the current one-time confirmation code.
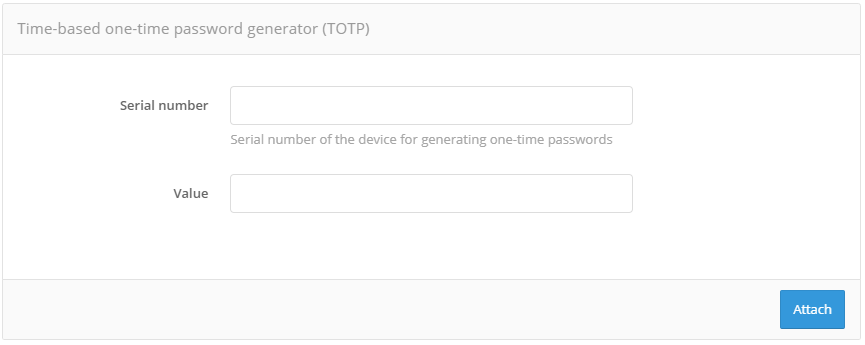
Binding a hardware TOTP generator
Binding a mobile application#
To bind a mobile application you must:
go to the account of the user to whom you want to bind the mobile application (menu “Users”, see User administration);
find the section “Time-based password generator (TOTP)”;
select «GoogleAuthenticator»;
edit the name of the mobile application, if necessary;
using the mobile application, take a picture of the displayed QR code or enter a secret line into the application.
The user can also independently link the mobile application generating TOTP codes in the web application “User profile”.
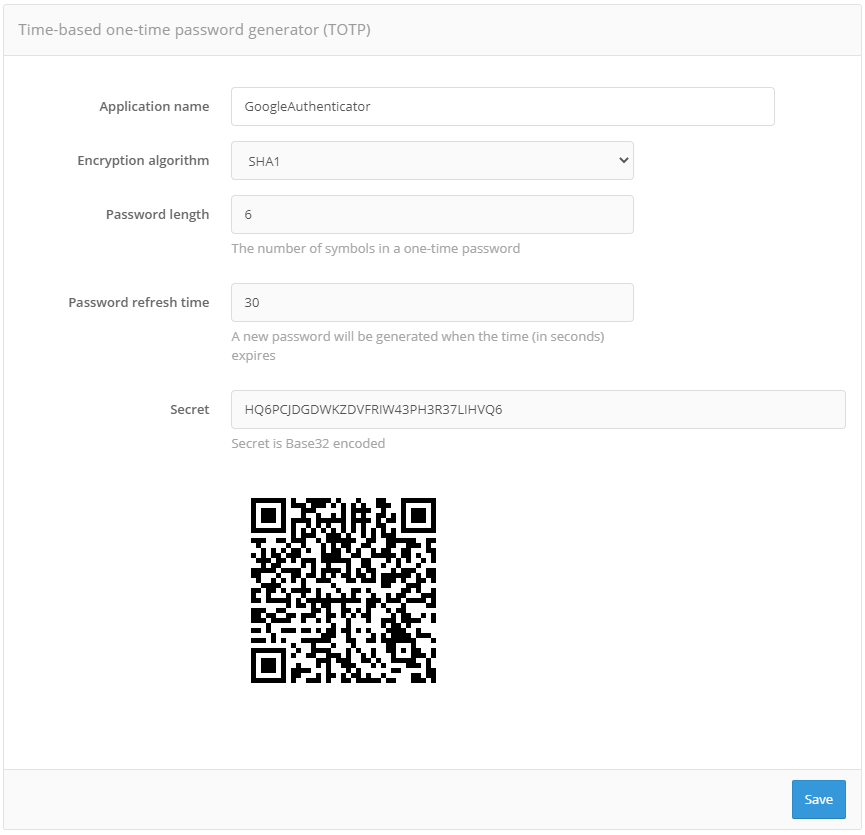
Binding a mobile application that generates TOTP codes
Confirmation codes sent in SMS and push notifications#
You can use push notifications sent to the mobile app or SMS messages for login confirmation (the second authentication factor).
To use the confirmation codes, you must:
configure and enable the authentication method “Confirmation by code”. For the method to work correctly, it is necessary to define:
length of the confirmation code;
validation time;
number of attempts to enter the confirmation code for 1 login;
total number of attempts (number of code sends and code entry attempts, after which this authentication method will be temporarily blocked for the user);
blocking time when attempts are exceeded (in minutes);
configure the sending methods:
send push notification - you should specify an attribute with a cell phone number or other user ID required by the service, for example,
${phone_number};send SMS - specify attribute with user’s cell phone number, for example,
${phone_number};
configure Blitz Identity Provider connection to the SMS gateway and push notification service (see Setting up notifications and sending messages).
Attention
If the user does not have a mobile phone number, he will not be able to use method of login verification by confirmation code sent via SMS.
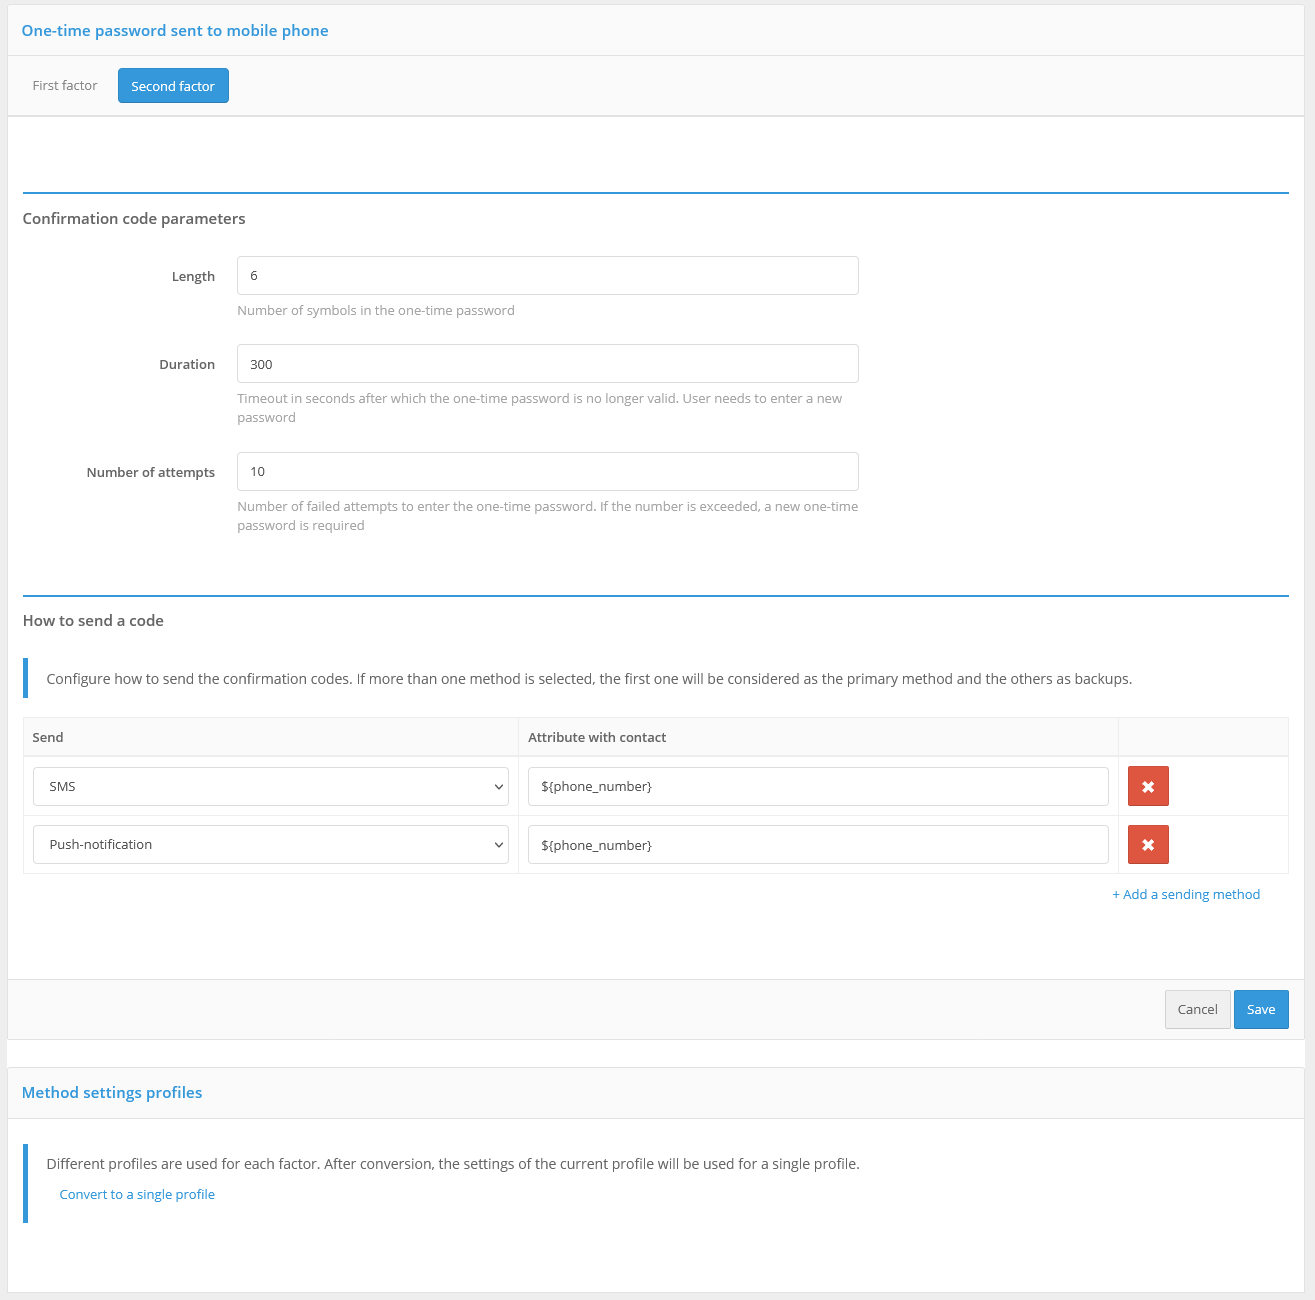
Confirmation codes settings for two-factor authentication
By default, single settings are used for confirmation codes sent for checking the first and the second factor (see Login with confirmation codes). In order to separate the settings, you should follow the link “Method Customization Profiles” in the block “Method Customization Profiles”. Then the settings will be separated and it will be possible to switch between the first and the second factor.
If it is necessary to switch to unified settings, click the “Convert to a single profile” link in the “Method Customization Profiles” block.
Confirmation codes sent by email#
You can use confirmation codes sent by email to confirm the login (the second factor of authentication).
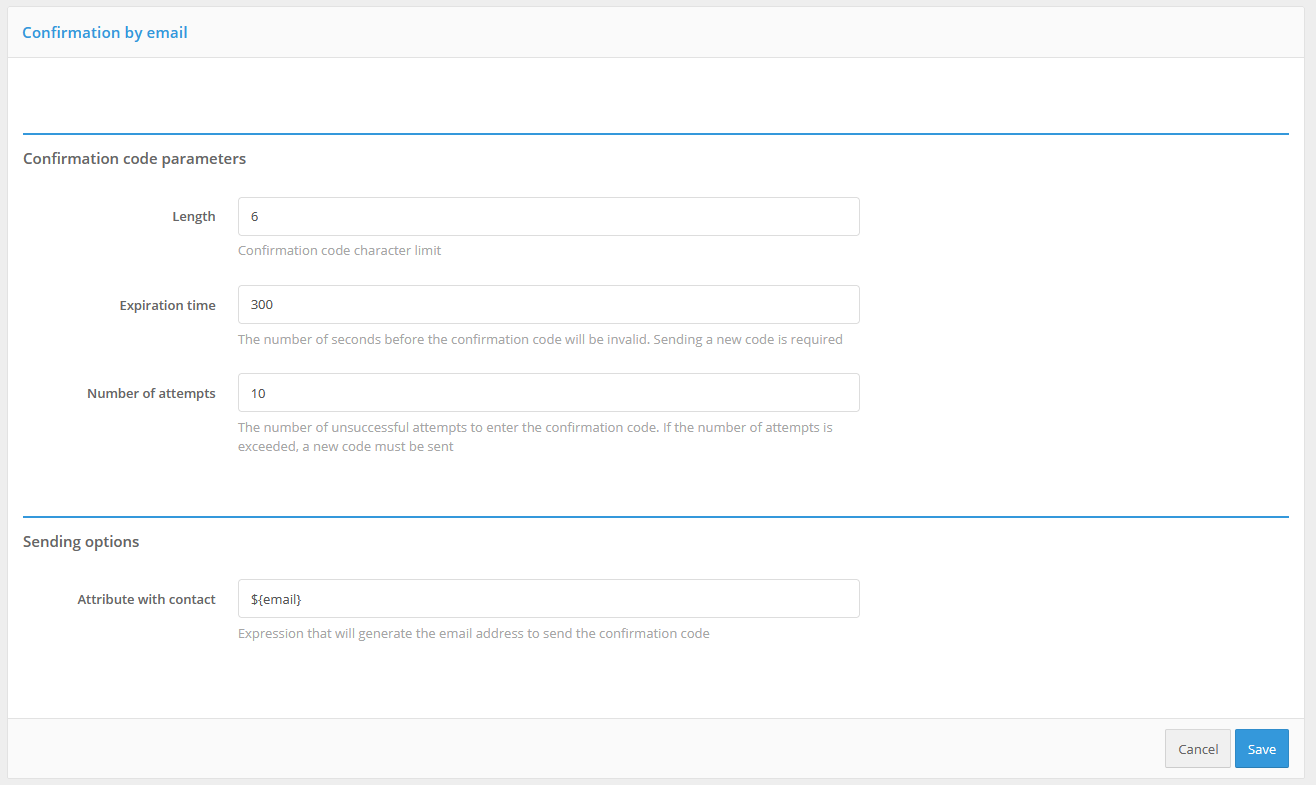
Settings for confirmation codes sent by e-mail
To do this, you must:
configure and enable this authentication method. The method must be defined for it to work correctly:
length of the confirmation code;
validation time;
number of attempts to enter the confirmation code for 1 login;
total number of attempts (number of code sends and code entry attempts, after which this authentication method will be temporarily blocked for the user);
blocking time when attempts are exceeded (in minutes);
configure the sending method: specify the attribute in which the user’s e-mail address is stored, e.g.
${email};
configure the Blitz Identity Provider connection to the SMTP service (see Setting up notifications and sending messages).
Keep in mind, that if the user does not have an email address set, he or she will not be able to use the login confirmation method using the codes sent to the email address.
Login confirmation via Duo Mobile#
You can use the Duo Mobile app (a Cisco company) to confirm the login (the second factor of authentication).
To do this, you need to make adjustments on the Duo Security service side:
register an account on the Duo website;
log in to the administrator panel and go to the “Applications” section;
click on “Protect an Application”, among the applications find “Auth API”. Then click on “Protect this Application” to get your integration key, secret key and hostname.
Once these operations are complete, you need to make settings in the Blitz Identity Provider Management Console.
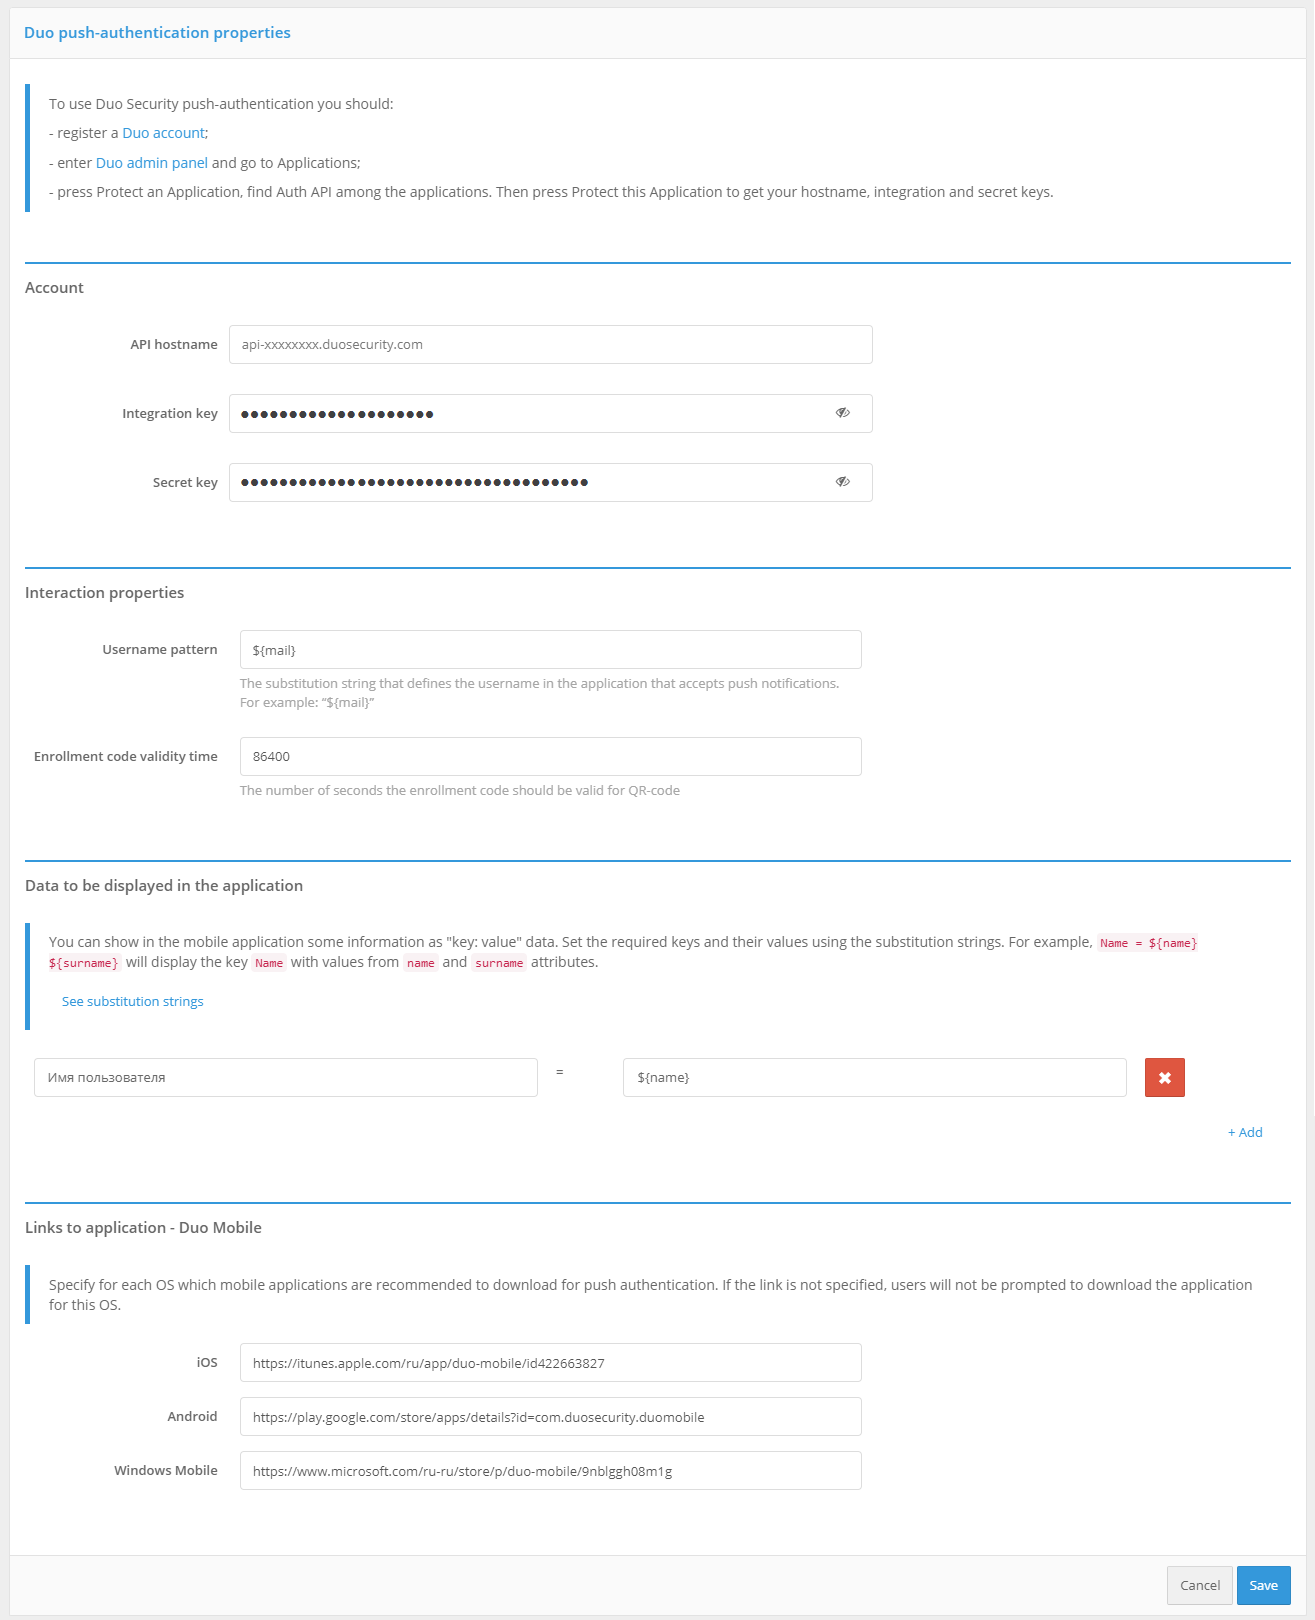
configure the authentication method “Duo push-authentication”. You must specify:
Duo account parameters (host name, integration and secret keys);
interaction properties:
user name pattern (set in the substitution string) - this name will be displayed in Duo Mobile as the account name;
enrollment code validity time (in seconds) - the time the enrollment code will be valid for QR code;
data to be displayed in the application - information displayed to the user in Duo Mobile in the form of “key: value”. Here you can pass a custom attribute value or some fixed value. You can also specify the string
${app}as a value - this will display the name of the application the user is logged into;links to application - Duo Mobile.
enable the “Duo push-authentications” method in the “Authentication” section.
Duo push authentication settings
You can bind the Duo Mobile app to your user account in the following ways:
by the user independently through the web application “Personal cabinet”;
by an administrator through the Admin console.
In the web application “Personal cabinet” the user should go to the section “Security / Login Confirmation” and perform the following steps:
Select the login confirmation method - “Confirmation via mobile application Duo Mobile”.
Install the Duo Mobile app on your smartphone and scan the QR code and press “Confirm”.
After verification, this authentication method will be added to the user.
In the admin console, the administrator must:
Find the user required.
Go to the “Application Duo Mobile (QR Code)” box and click on the “Link Duo Mobile” button.
Ask user to scan the QR-code with the Duo Mobile application.
The pictures show an example of the login page appearance when confirming entry using push-notification in the Duo Mobile application.
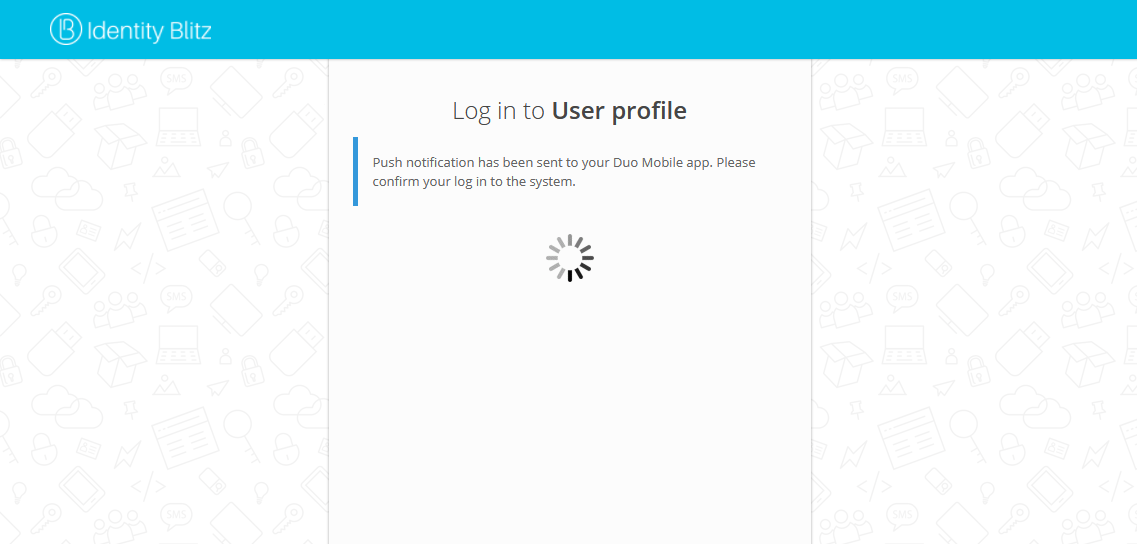
Initiating push authentication

Requesting push authentication on your smartphone#
Re-confirmation when logging in from a known device#
Blitz Identity Provider remembers the devices on which a user has confirmed login during the login process using one of the login confirmation methods supported by Blitz Identity Provider.
You can configure the login procedure to display a screen asking if the user trusts the browser after a successful login confirmation, so that repeated logins from this device and browser do not prompt the user for login confirmation.
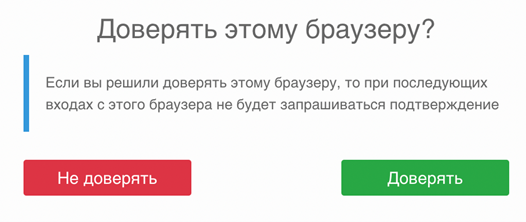
Query whether the user trusts the browser#
If the user logs in again from a trusted browser, the user will not be asked for login confirmation if “Input from a known device” authentication method is enabled in the “Authentication” menu in the “Second factor” block.
Login confirmation with security keys (WebAuthn, Passkey, FIDO2, U2F)#
You can use security keys (WebAuthn, Passkey, FIDO2, U2F) to log in to the Blitz Identity Provider. The WebAuthn specification is used to interact with the security keys. The following key types are supported:
External keys - are hardware devices in the form of USB keys or key fobs connected to PCs, tablets and phones via USB port, Bluetooth or NFC. The keys do not require drivers or plug-ins to be installed on the device - interaction with the keys is performed through the built-in capabilities of browsers.
Built-in keys - Authentication mechanisms built into the device and operating system that support WebAuthn:
Windows Hello - you can sign in using Windows PIN, fingerprint verification or facial recognition;
Touch ID or password on your MacBook;
Touch ID or Face ID on an iOS cell phone or fingerprint verification or facial recognition in Android.
To use security keys, you must set the security key settings (see Configuring security keys) and configure the authentication method in the Management Console.
In the management console it is necessary to set the “Acceptable methods of validation” setting.
Allowed attestation modes - using only
FULLandFULL_NO_ROOTmodes will increase security, but will not allow to use some keys for login, as well as Windows PIN code, because when registering such keys the attestation object comes without chipset or key manufacturer’s signature or using a self-signed key. The use ofSELFmode allows an attacker to implement a man-in-the-middle attack to spoof the key at the time of registration, in case the user’s device is controlled by the attacker.Show method only to users who have bound a security key to the account - If security keys are not configured, you can configure that the security key login confirmation method is not shown to the user.
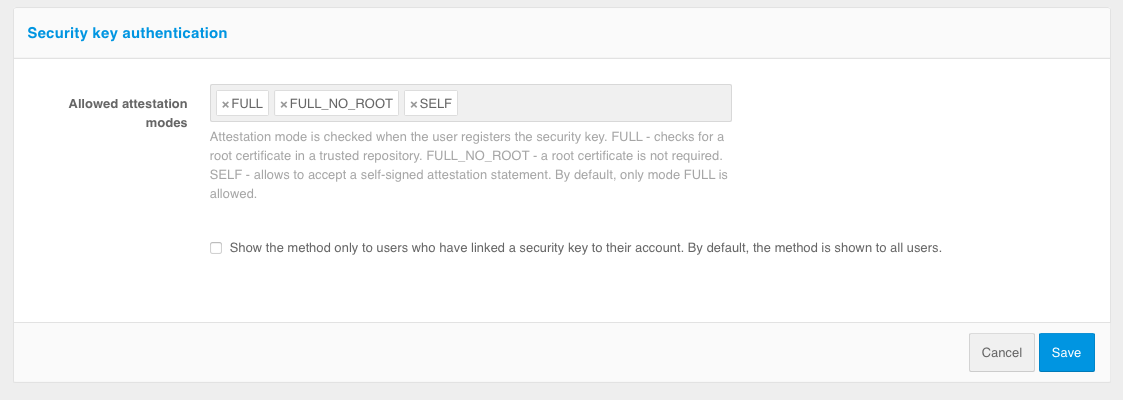
Configuring the use of security keys for login confirmation
Configuring an external authentication method#
Blitz Identity Provider allows developers to add support for their own authentication method at deployment. To do this, you need to develop an application that implements the authentication logic and connect this application to the Blitz Identity Provider. In the Blitz Identity Provider, the authentication method “External authentication method” is configured for this purpose. You can implement an external authentication method to work as both a first and a second authentication factor.
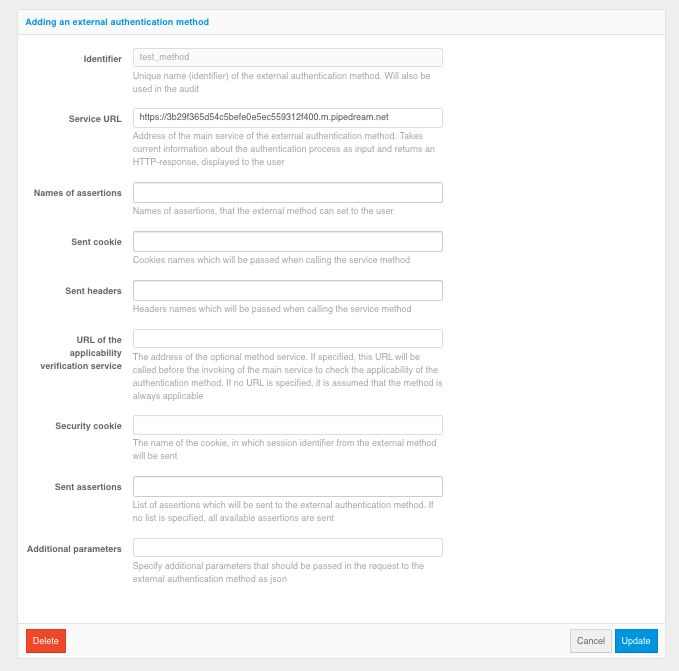
Example of setting up an external method
To configure the use of Blitz Identity Provider with an external authentication method:
Configure a new “external” first or second factor authentication method by clicking the “Add an external authentication method” link. Specify the parameters of this authentication method:
method identifier - a card with the name of the method will be displayed among methods of authentication, the method with the given identifier will be possible to access from the Authentication flows;
URL of the external service;
assertion names - a list of assertions that an external method can set for the user;
passed
cookies- list of names ofcookiesthat will be thrown when an external method is called;sent headers - the list of headers, which will be passed when calling the external method;
Applicability Determination Service URL - address of the optional method service. If specified, this URL will be called before the main service is called to determine the applicability of this authentication method. If the URL is not specified, the method is assumed to be always applicable;
cookiesecurity - the name of thecookiein which the session ID from the external method will be passed.passed assertions - list of assertions to be passed to the external method (if the parameter is not specified, all assertions available in the login session will be passed to the external method);
additional parameters - specified in JSON format. The specified parameters will be passed to the external method. This can be useful to be able to configure the settings of the external authentication method through the Blitz Identity Provider Admin console.
after saving enable method - a checkbox indicating that you should immediately enable the authentication method after saving the settings.
On the external method side, provision must be made to process authentication requests and determine applicability.
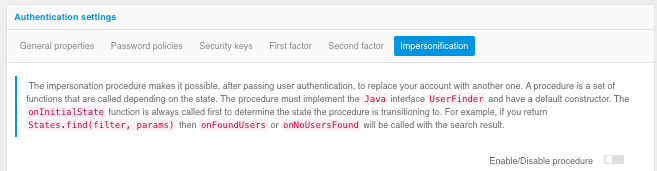
Customizing the Impersonalization Procedure#
Blitz Identity Provider allows you to customize the login process so that after the primary account has been authenticated and identified, the user can be prompted to select one of their secondary accounts for login.
The process of selecting auxiliary accounts is configured on the “Impersonalization” tab. For this purpose, an impersonation procedure is developed in Java. The text of the impersonation procedure can be saved, and after successful compilation, the procedure can be enabled using the “Enable/disable procedure” switch.
Example of customizing the impersonation procedure