OAuth 2.0 and OpenID Connect 1.0#
Configuring the application#
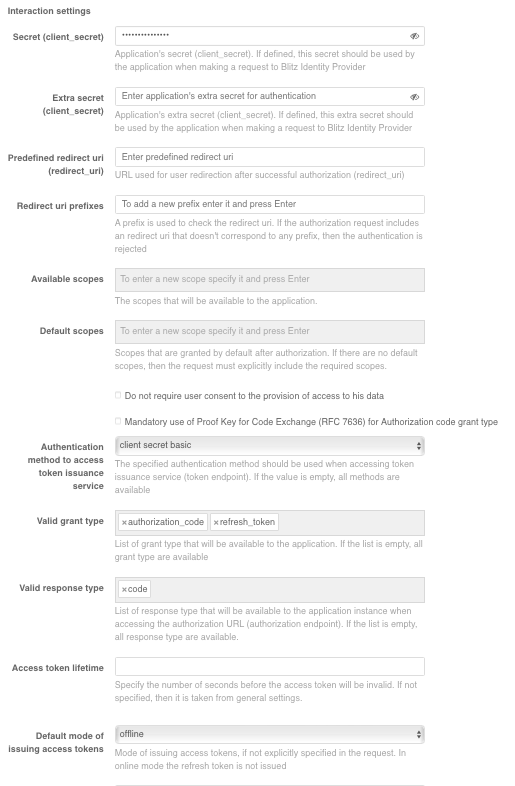
When connecting an application via OAuth 2.0 or OpenID Connect 1.0 (OIDC), you must set the following application interaction settings in Application interaction settings block:
specify the secret key (or use the default generated key) of the connected application (
client_secret) to be used by the connected application when accessing the Blitz Identity Provider (if not specified, the client application must be authenticated otherwise, for example, using a TLS proxy);specify an additional secret key (
client_secret) for the connected application. It is recommended for cases when it is necessary to provide smooth change ofclient_secretfor this application;specify a predefined return link (
redirect_uri) - the URL to which the user will be redirected by default after authorization (redirect_uri);specify valid return link prefixes - the prefix is used to validate return links (
redirect_uri) passed in authentication requests from applications. If a return link is specified in an authentication request and it does not match any of the specified prefixes, authentication will be denied;allowable permissions - the permissions (
scope) that this application is allowed to request;Note
You can configure Blitz Identity Provider to store user access tokens from external identity providers. If the application needs to receive stored access tokens via REST API, select the following system permissions for it:
fed_tkn_any(all external providers) orfed_tkn_${fedPointType}_${fedPointName}(external provider with the${fedPointType}type and${fedPointName}name). These permissions must be preliminarily set in the general OAuth settings on the OAuth tab.default permissions - the permissions (
scope) that will be granted to the application by default after authentication. If not specified, the required permissions must always be explicitly stated in the authentication request;check the option “Do not require the user to agree to provide access to data about him/herself” if necessary. If this option is checked, the consent page will not be displayed when the user logs in for the first time;
check the “Mandatory use of Proof Key for Code Exchange (RFC 7636) for Authorization code grant type” option, if authentication requests must be validated according to RFC 7636;
select, if necessary, the authentication method when accessing the token service. The specified authentication methods must be used when accessing the token service (
token endpoint). If empty, all methods are available;select valid
grant typesif necessary. The parameter specifies the list ofgrant typesthat will be available to the application. If the list is empty, allgrant typesare available;select valid
response typesif necessary. The parameter specifies the list ofresponse typesthat will be available to the application when accessing the authorization URL (authorization endpoint). If the list is empty, allresponse typesare available;specify the lifetime of the access token (in seconds). If the parameter is not specified, it is taken from the general settings in the “OAuth 2.0” section;
specify the default mode of issuing access tokens. Blitz Identity Provider provides two modes of issuing access tokens (
access_token):offline mode - when requesting an access token, a perpetual refresh token (
refresh_token) will also be issued, which can be used to obtain a new access token. It is recommended that an application use this mode if it needs to retrieve up-to-date user data from Blitz Identity Provider outside of the validity time of the user session. For example, if an application is doing a mailing and wants to get an up-to-date email address from Blitz Identity Provider before sending it.online mode - only the access token will be issued. The application is recommended to use this mode if it is sufficient to receive actual user data at the moment of login (during the active user session).
The mode of issuing access tokens may be explicitly specified in the authentication request; if not specified, the default mode is used.
specify the lifetime of the update token (in seconds). If the parameter is not specified, it is taken from the general settings in the “OAuth 2.0” section;
specify the assertions to be added to the identity token (
id_token). If the application communicates with Blitz Identity Provider using the OIDC protocol (OpenID Connect 1.0), you must also specifyopenidas one of the authorizations (scope). Then in exchange for the authorization code, when callingToken Endpoint, not only an access token (access token) and a refresh token (refresh token), but also an identification token (id_token) will be issued. The identity token will include the user identifiersubas well as the additional attributes listed in this setting. It is possible to add both the attributes configured in “Data sources” and additional attributes (see Adding attributes to an identity token for details);select access token format - you can choose
opaqueorJWT. If the parameter is not specified, it is taken from the general settings in the “OAuth 2.0” section.
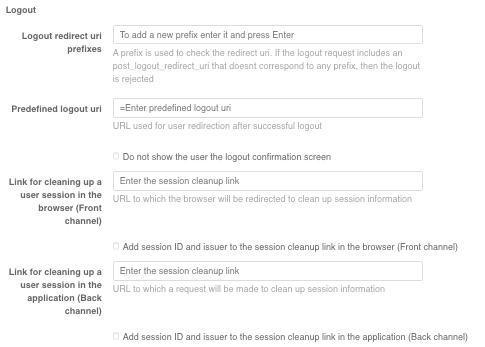
When using the logout function in an application, the following settings must be specified in the “Exiting the application” block:
specify prefixes of return links on exit. You must list the prefixes of valid URLs of user redirect pages after the application initiates a logout. You can specify one or more return link prefixes;
predefined exit return link - the link to which the user will be redirected after logout from the application, if the
post_logout_redirect_urireturn address was not passed in the parameters of the logout call from the application;check the option “Do not show the logout confirmation screen to the user” - if this setting is not checked, the user will be shown a screen requesting logout confirmation;
link to clear user session in browser (
Front channel) - the specified application handler address will be called from browser frame in case of user logout initiation;check the option “Add the session ID and issuer to the session cleanup link in the browser (Front channel)” if necessary - in this case the session identifier (
id) will be passed to the browser application logout handler;link to the user’s session cleanup in the application (
Back channel) - the specified application handler address will be called from the Blitz Identity Provider server if a user logout is initiated;check the option “Add the session ID and issuer to the session cleanup link in the application (Back channel)” if necessary - in this case
logout_tokencontaining user session identifier (sid) will be sent to the application handler address called from Blitz Identity Provider server in case of user logout initiation.
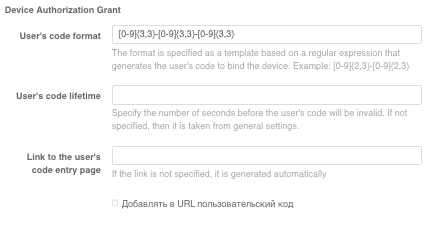
When an application uses the Device Authorization Grant specification (for example, to connect IOT devices, smart TV, chat bots, voice assistant applications) in the Application interaction settings block in the Acceptable response type parameter, add the device code option, and in the Allowed grant type parameter, add the urn:ietf:params:oauth:grant-type:device_code option. Also in the Device Authorization Grant block you should set the following settings:
format of the user’s code, for this you should use regular expressions;
user code lifetime;
link to the custom code entry page;
check the option “Add user code to URLs” if necessary. In this case Blitz Identity Provider will return not only a link to the user code input page (for example,
https://test.ru/device), but also a link with the code as a parameter (for example,https://test.ru/device?uc=676-267-324).
General OAuth 2.0 settings#
The “OAuth 2.0” section of the Management Console is used to specify general OAuth 2.0 settings, as well as to configure a set of permissions (scope).
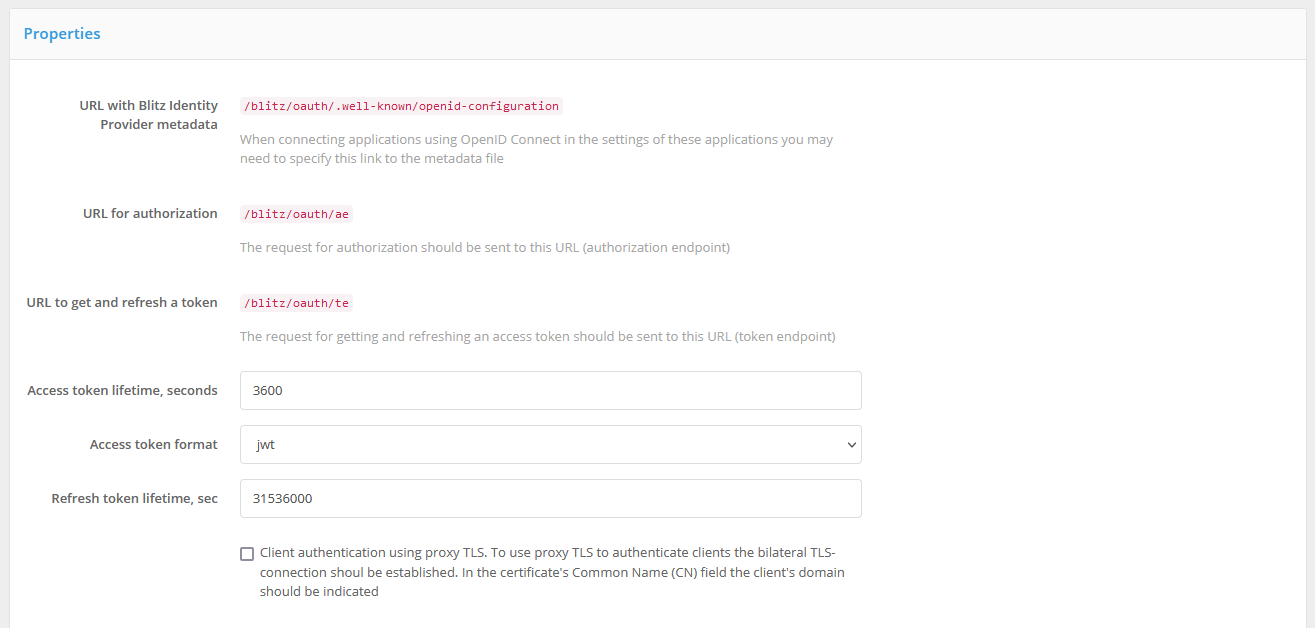
In the “OAuth 2.0” section of the Admin Console, you can view the various Blitz Identity Provider handler URLs associated with OAuth 2.0 and OIDC:
“URL with Blitz Identity Provider metadata” - this link contains dynamically updated Blitz Identity Provider settings (metadata) (specification). Application developers do not need to specify all of the following URLs in their application configuration, but can use a single link to this metadata in the settings;
“URL for authorization” is the address of the OAuth 2.0 Authorization Endpoint handler for requests through the browser for an authorization code;
“URL to get and refresh a token” - the address of the OAuth 2.0 Token Endpoint handler to retrieve security tokens (
access_token,id_token,refresh_token).
If necessary, you can:
change the “Access token lifetime” used by default when issuing tokens for all applications;
specify the “Access token format” used by default when issuing tokens for all applications: string (
opaque) or JWT;change the “Update marker lifetime” used by default when releasing tokens for all applications;
check the “Authentication of client systems using Proxy TLS” option. In this case, applications must be configured to communicate with Blitz Identity Provider via a proxy server and a two-way TSL connection must be established. The “Common Name (CN)” field of the system certificate must contain the system domain of the connected application.
Under “Device Authorization Grant “ you can define the general settings for interaction with applications according to the Device Authorization Grant specification. Here you can specify:
lifetime of the user’s code (in seconds);
is the minimum allowed interval for polling the device binding code status in seconds. If the application polls the Blitz Identity Provider service more often than specified in this parameter, an error will be returned.
If necessary, you can specify different settings related to the Device Authorization Grant specification for each application.

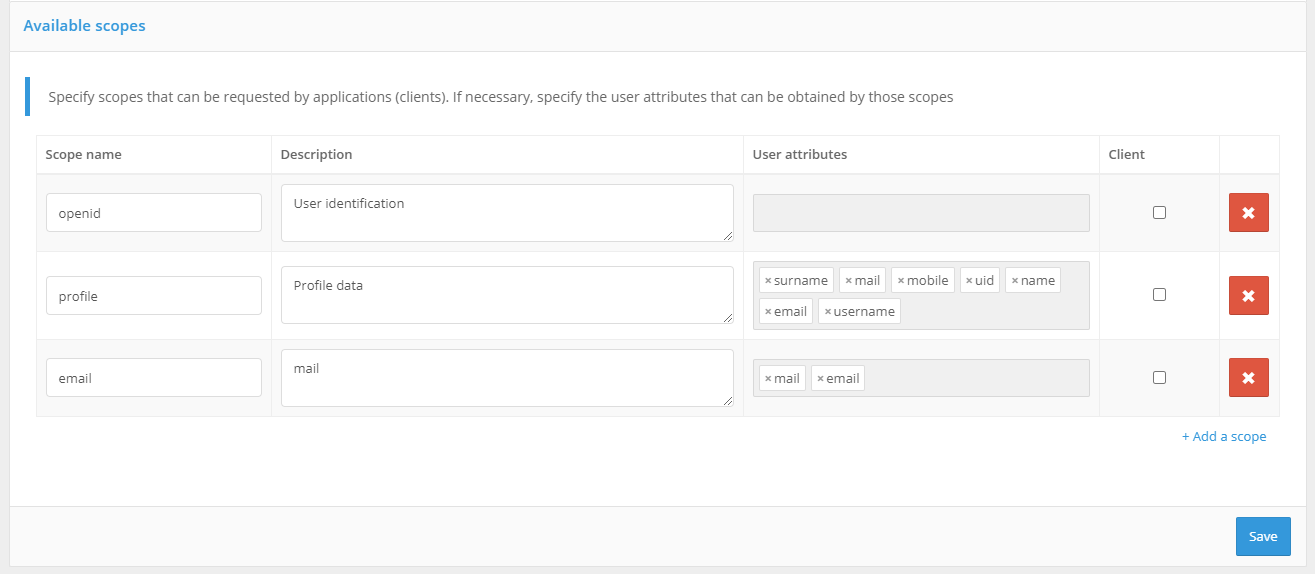
For correct operation of interaction with applications using the OAuth 2.0 protocol, it is necessary to define permissions (scope). To do this, you need to specify:
scope name;
scope description (it will be displayed to the user on the consent page);
attributes of the user that will be provided under this permission (attributes must be defined in the “Data sources “ menu);
whether the scope is system permissions - such permissions are only granted to applications using OAuth 2.0 Client Credentials Flow (not in the context of individual user permissions, but general ones).
Attention
For OpenID Connect 1.0 authentication to work correctly, you must ensure that a permission named openid is defined in this section of the console. You can also specify the attributes to be passed with this permission. In this case, the attributes are retrieved by using an access token issued for the openid permission.
Important
You can configure Blitz Identity Provider to store user access tokens from external identity providers. If applications connected over OAuth 2.0 need to receive stored access tokens via REST API, specify the following system permissions in this console settings block: fed_tkn_any (all external providers) or fed_tkn_${fedPointType}_${fedPointName} (external provider with the ${fedPointType} type and ${fedPointName} name). These permissions must also be specified in the application-specific OAuth settings.
Adding attributes to an identity token#
To be able to define session assertions in the login procedure, the corresponding assertions must also be defined in the configuration file. For this purpose, the blitz.prod.local.idp.login section of the configuration file must have the sessionClaims attribute added with a list of assertions that can be defined in the procedure.
For example, the following entry allows you to define the custom_attr attribute:
"sessionClaims" : [
   "custom_attr"
]
Applications connected using the OpenID Connect 1.0 protocol can receive data in the identity token. The list of attributes to be passed in the identity token must be specified in the Added to identity token (id_token) assertions clause of the protocol settings.
In addition to the stored attributes, assertions can be added to the identity token:
received when the user logs in by electronic signature. This may be data on the electronic signature key certificate, data on the physical/legal person from the certificate;
defined in the authentication flow.
To obtain assertions from the electronic signature key certificate, the blitz.conf configuration file must be edited by adding the following structure to the blitz.prod.local.idp.login.methods.x509 configuration block:
"claims" : [
  {
      "name" : "attr_name",
      "value" : "cert_attr_name"
  }
],
In this structure, attr_name is the name of the attribute to be used in the identification token, and cert_attr_name is the attribute designation in the certificate (examples of available values are given in the table).
Example of data obtained from electronic signature key certificate
Attribute designation in certificate |
Description |
|---|---|
SUBJECT.OGRN |
OGRN of the organization |
SUBJECT.OGRNIP |
OGRNIP of an individual entrepreneur |
SUBJECT.INN |
TIN of the organization |
SUBJECT.E |
Company email of official |
SUBJECT.O |
Organization name |
SUBJECT.ST |
Organization region |
SUBJECT.L |
Organization location |
SUBJECT.STREET |
Street, house, office number of the organization |
SUBJECT.O |
Division of the official |
SUBJECT.T |
Position of the representative |
SUBJECT. |
A value from an attribute with the specified |
An example of the structure added to the configuration file:
"claims" : [
  {
      "name" : "org_OGRN",
      "value" : "SUBJECT.OGRN"
  },
  {
      "name" : "org_INN",
      "value" : "SUBJECT.INN"
  },
  {
      "name" : "org_email",
      "value" : "SUBJECT.E"
  },
  {
      "name" : "org_name",
      "value" : "SUBJECT.O"
  }
],
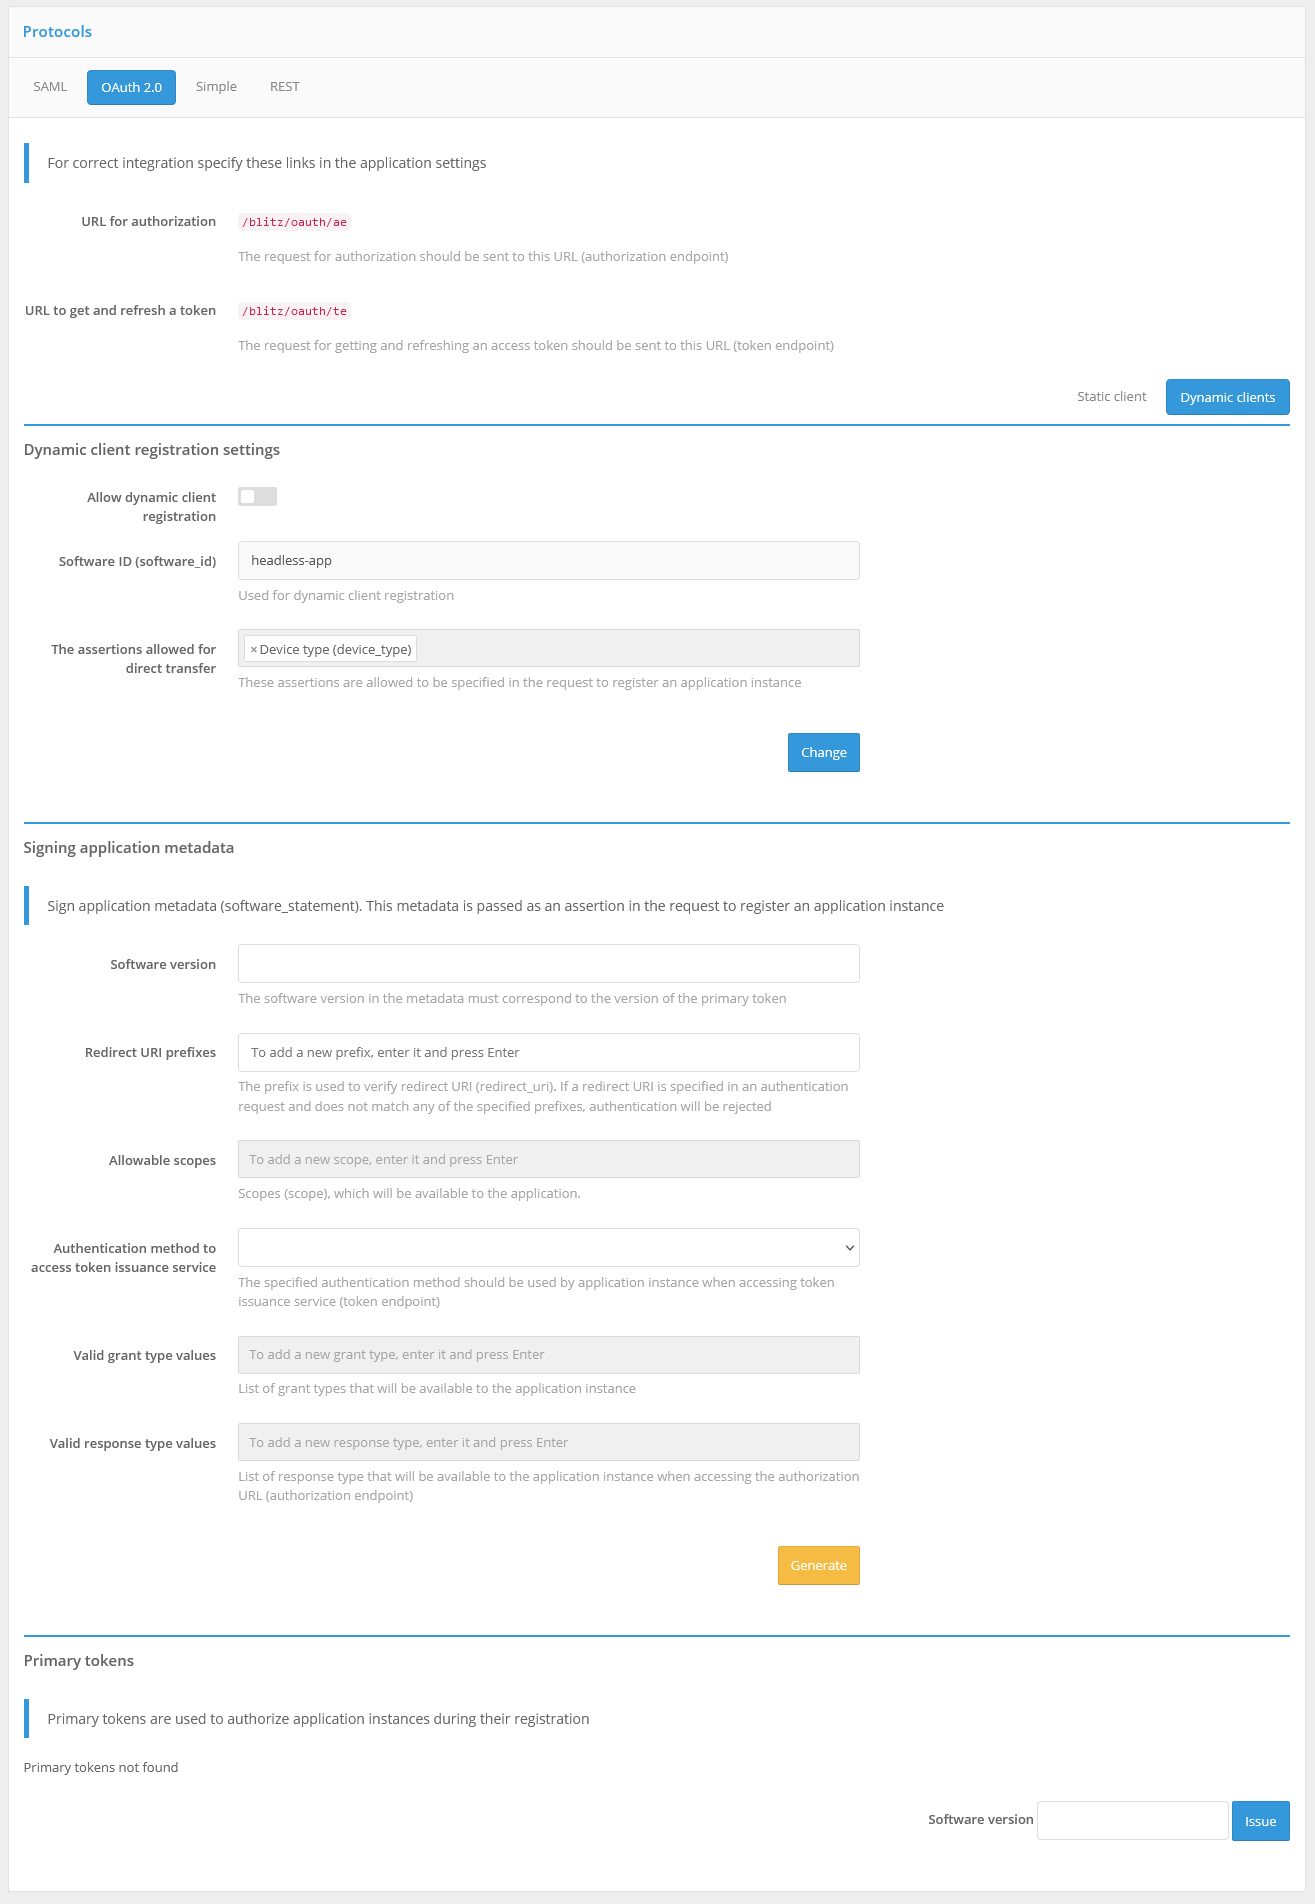
Configuring Dynamic OAuth 2.0 Client Registration#
To enable dynamic client registration, you must take the following steps:
register the application and configure the OAuth 2.0 connection protocol for it according to the documentation (see General OAuth 2.0 settings);
in the OAuth 2.0 settings for this application, click the “Dynamic clients” tab.

Specify the basic settings for dynamic client registration:
allow dynamic client registration;
specify the assertions that may be directly transferable. These assertions may be specified in the application instance registration request. If they are present in the application metadata (
software_statement), the value from the metadata will be prioritized. It is recommended to allow only the device type (device_type) to be passed.
Create primary tokens for the application. Primary tokens are used to authorize application instances when they are registered.
Generate application metadata (software_statement). This metadata is passed as a assertion in the application instance registration request. You can specify as metadata attributes:
application version (mandatory attribute). The application version must match the version of the primary token used by the application;
return link prefixes. The prefix is used to validate return links (
redirect_uri). If a return link is specified in an authentication request and it does not match any of the specified prefixes, authentication will be denied;allowable permissions - the permissions (
scope) that will be available to the application;authentication method when accessing the token service. The specified authentication method must be used by the application instance when accessing the token service (
token endpoint);permissible values of
grant type. A list ofgrant typethat will be available to the application instance;permissible values of
response type. A list ofresponse typethat will be available to the application instance when accessing the authorization URL (authorization endpoint)
Note that the specified metadata attributes must match the OAuth 2.0 parameters defined for the application (“Static client”).
Once the application metadata is signed, it should be passed along with the primary tokens to the developers of the plug-in application.
An example of dynamic client registration settings is shown in the figure below.
