Logging in using operating system session#
The operating system session logon method allows users to avoid additional identification and authentication in Blitz Identity Provider if they have previously logged on to the organization’s network from their PC and have been identified and authenticated in the operating system (logged on to the network domain). Such users will have end-to-end identity access to all applications connected to Blitz Identity Provider.
To log in using an operating system session, an organization must have a Kerberos server deployed (alone or as part of the organization’s domain controller) and configured as described below.
Domain controller (Kerberos server) configuration#
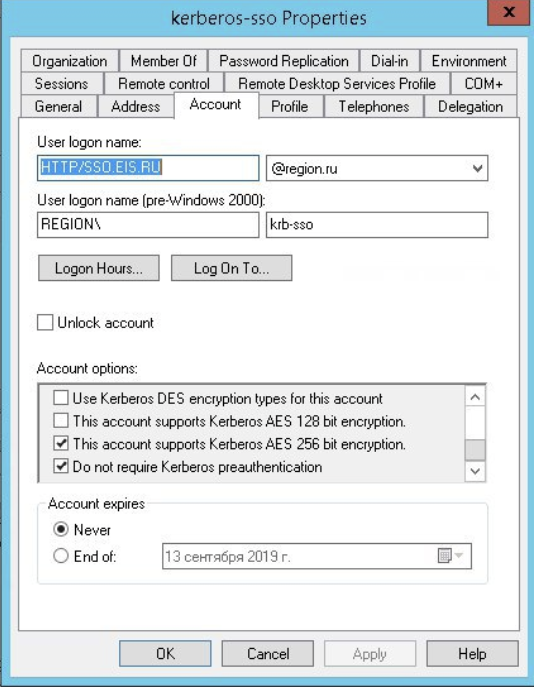
In the domain controller you need to register an account for Blitz Identity Provider server. For the created account, on the Account page in the Account options block of the domain controller snap-in, enable the settings User cannot change password and Password never expires.
Also note the options This account supports Kerberos AES 256 bit encryption and disable pre-authentication Do not require Kerberos pre-authentication.
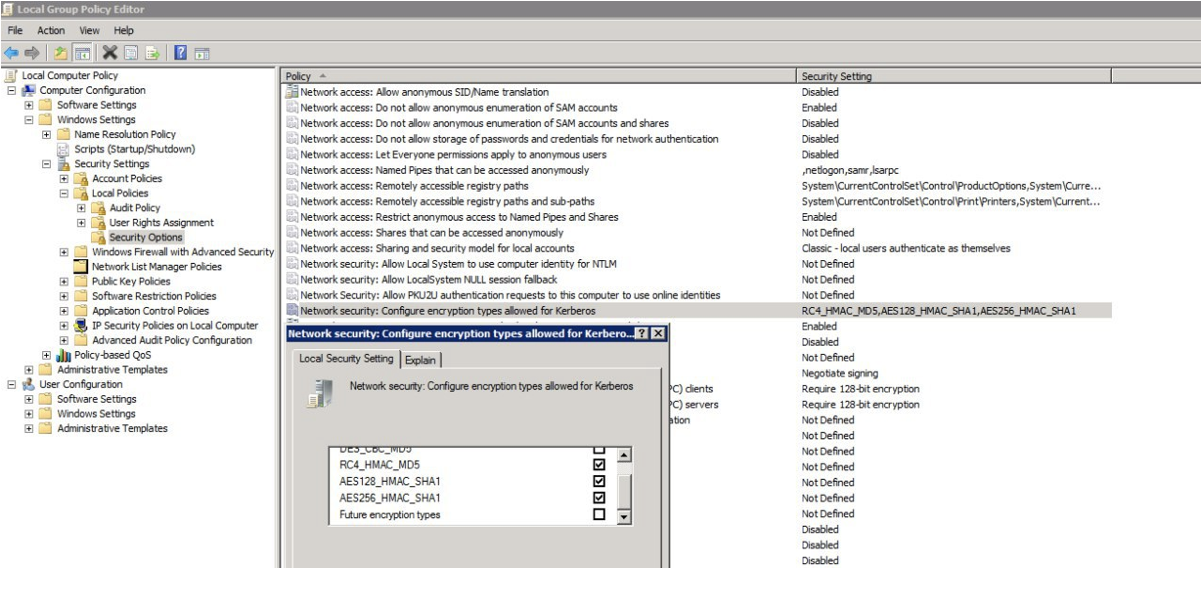
In the Group Policy Management snap-in, configure the Configure encryption types allowed for Kerberos policy by specifying the following possible values: RC4_HMAC_MD5, AES128_HMAC_SHA1, and AES256_HMAC_SHA1.
Example of configuration:
Next, you must create a Service Principal Name (SPN) to identify Blitz Identity Provider server with the Kerberos server. This is accomplished using the following command:
ktpass -princ HTTP/idp.company.ru@DOMAIN.LOC -mapuser DOMAIN\blitzidpsrv -out C:\temp\spnego_spn.keytab -mapOp set -crypto ALL -ptype KRB5_NT_PRINCIPAL /pass SecretPassword
Parameters of the ktpass command:
the
mapuserparameter value is the name of Blitz Identity Provider server account created in the domain, for example,DOMAIN\blitzidpsrv;the value of the
princparameter is the name of the SPN of Blitz Identity Provider server for authentication in the Kerberos environment. This name consists of the host name of Blitz Identity Provider server, the uppercase Kerberos Realm name (usually the same as the domain name), and the transport protocol used (HTTP). An example of an SPN value isHTTP/idp.company.ru@DOMAIN.LOC. It is important that theHTTP/at the beginning of the SPN name be in capital letters, as in the example.parameter
mapOp- if set toadd, the new SPN will be added to the existing ones. If set toset, the SPN will be overwritten.parameter
out- specifies the path to the generated keytab file. For example,C:\temp\spnego_spn.keytab;the
/passparameter is the password value for Blitz Identity Provider server account in the domain.the
cryptoandptypeparameters specify restrictions on the algorithms used and the type of Kerberos service generated. It is recommended to set the parameters as in the above example-crypto ALL -ptype KRB5_NT_PRINCIPAL.
The generated keytab file must be saved. It will be required for further configuration in Blitz Identity Provider admin console.
Settings in Blitz Identity Provider admin console#
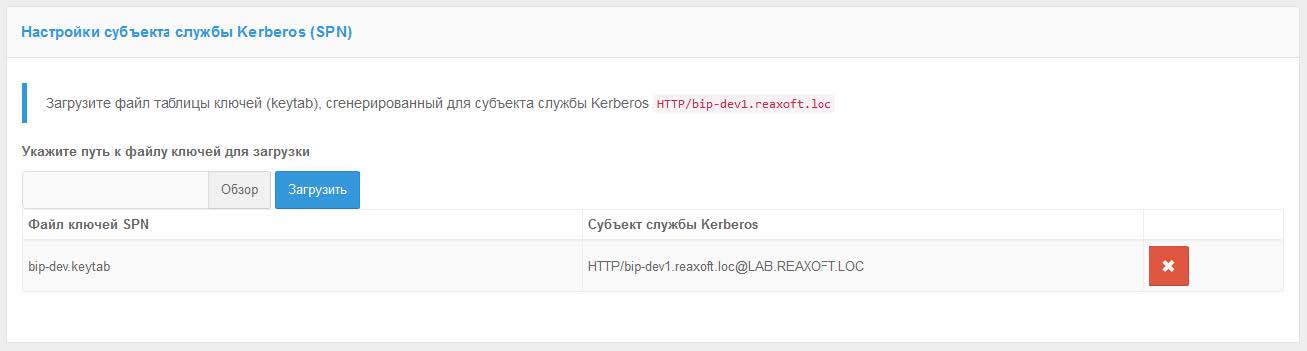
It is necessary to go to the Authentication section in the management console to the settings of the login method Logging in by operating system session. In the opened window, load the previously generated keytab file. The SPN name will be set automatically in accordance with the uploaded file.
Based on the results of the keytab file download, information about the corresponding Kerberos service will be displayed.
If necessary, you can:
delete the loaded keytab file;
load more keytab files if you connected Blitz Identity Provider to more than one domain controllers.
Next, you need to define the matching parameters for the Kerberos token (TGS) and the account in Blitz Identity Provider.
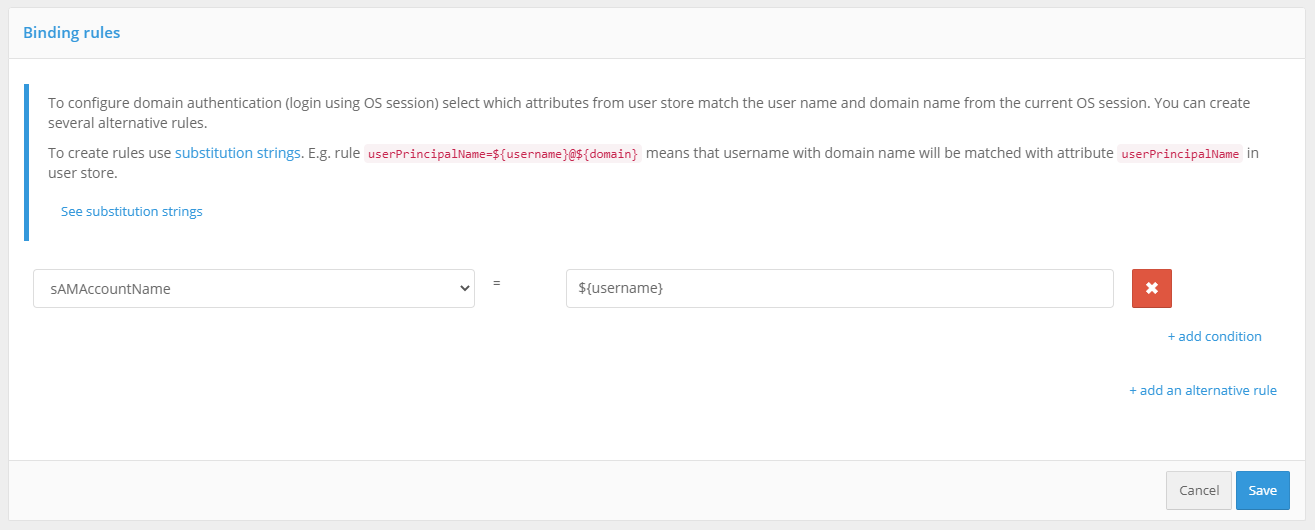
For example, you can specify that the user ID (username) received from the Kerberos token must match the sAMAccountName attribute received from the LDAP directory (Microsoft Active Directory).
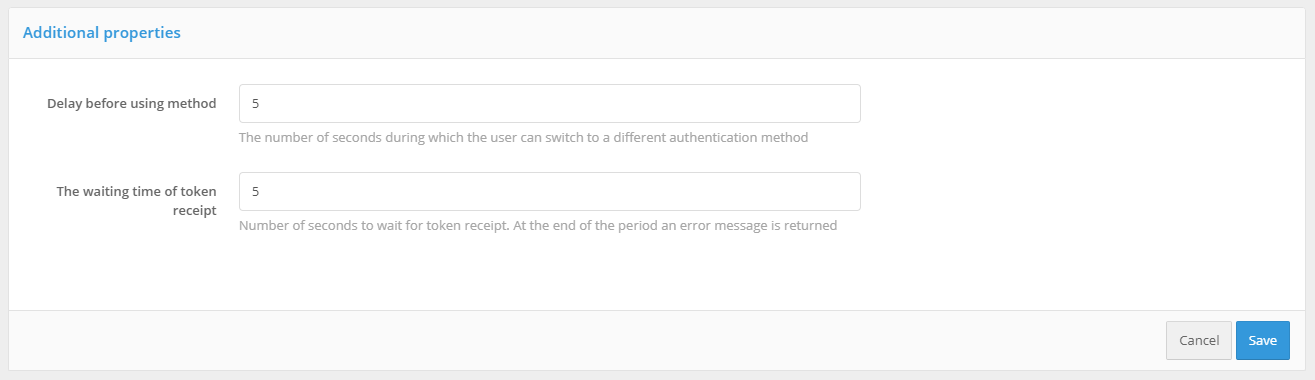
The next step is to set the delay parameters for the login method using an operating system session.
Blitz Identity Provider provides two possible scenarios for using the operating system session:
Basic Scenario. Users log in to the operating system, and thereafter must end-to-end log in to all applications connected to Blitz Identity Provider. Providing users with the ability to log into applications under a different account is not required. In this case, you should set the Delay time before method start to 0 seconds. When the application is accessed, an end-to-end login will be attempted immediately through the operating system session.
Additional scenario. Users are not always able to log on to the operating system domain, or users in some cases need to be able to log on to applications under a different account than the one they used to log on to the domain. In this case, the Delay time before method start should be set so that the user has enough time to be able to cancel automatic login using an operating system session.
Waiting of token receipt should be set sufficient to allow the Kerberos server to respond to Blitz Identity Provider. Usually 5 seconds is sufficient.
As in the case of login by login and password, by default the user search for authentication is performed in all active storages. In the Rules for selecting an attribute repository block you can configure the rules, when executed, the user search will be performed in a certain storage.
Users’ browsers configuration#
Depending on the browser used by the user, it may be required to additionally configure it to support Kerberos authentication.
For Windows browsers, you need to set the following settings:
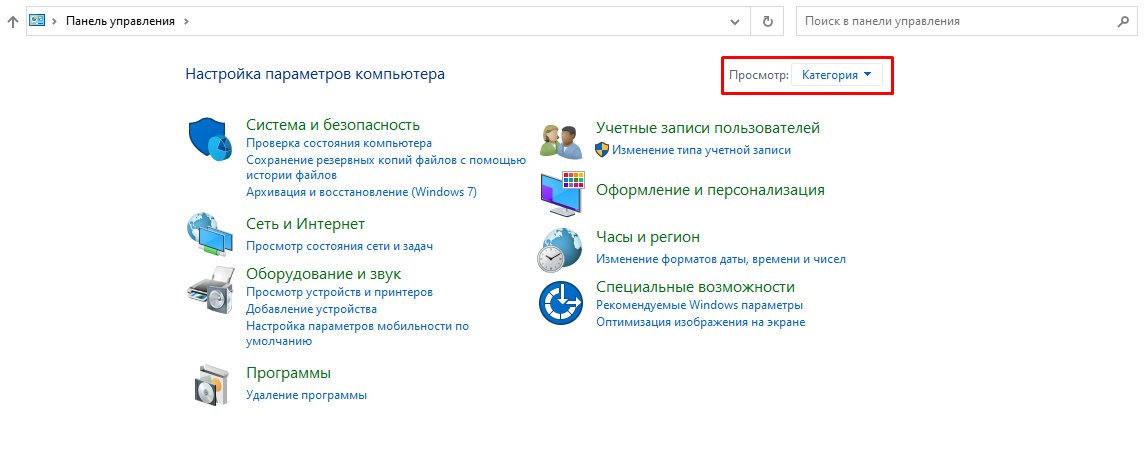
open Start → Control panel, change the viewing option from
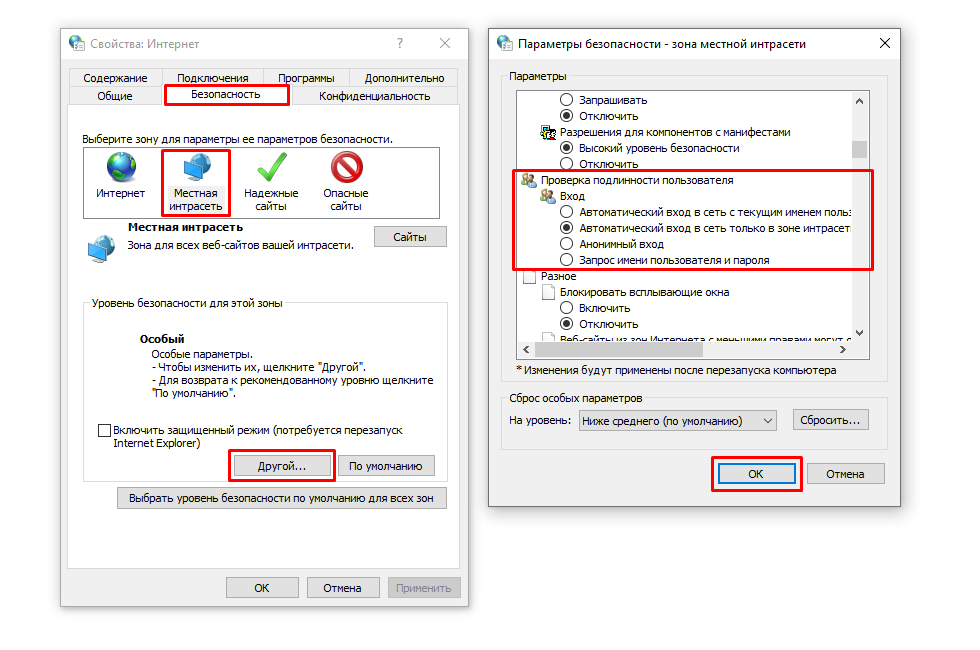
CategorytoSmall icons, select Browser properties in the opened settings;in the new window, select Security → Local intranet and click Websites. In the window that opens, click Additional and add Blitz Identity Provider site to the list of Local intranet sites by clicking Add;
in the Properties: Internet → Security → Local intranet window, click the Other… button. In the window that opens, find the
User authentication→Loginsetting. Set it toAutomatic network login only in the intranet area.

You can choose not to make the above settings for the Windows operating system and, as an alternative, to be able to log in by operating system session in the Google Chrome browser, then you can start the browser with the following startup settings:
Chrome.exe –auth-server-whitelist="idp.domain.ru" –auth-negotiate-delegatewhitelist="idp.domain.ru" –auth-schemes="digest,ntlm,negotiate"
Where as idp.domain.ru you need to specify the URL of Blitz Identity Provider site.
You can also set the following settings in the Windows registry to run the Google Chrome browser without startup options.
Windows Registry Editor Version 5.00

[HKEY_LOCAL_MACHINE\SOFTWARE\Policies\Google]

[HKEY_LOCAL_MACHINE\SOFTWARE\Policies\Google\Chrome]
"AuthNegotiateDelegateWhitelist"="idp.domain.ru"
"AuthSchemes"="basic,digest,ntlm,negotiate"
"AuthServerWhitelist"="idp.domain.ru"
For Mozilla Firefox, you need to set the following settings (for any operating systems):
enter
about:configin the browser address bar and press Enter. In the next window, enternetwork.negoin theFiltersfield. Double-click on thenetwork.negotiate-auth.trusted-urisentry found and set it to the URL of the site with Blitz Identity Provider, for example,idp.domain.ru. When specifying addresses, you can use an asterisk (*) and specify multiple URLs separated by commas, for example:https://*.idp.domain.ru,http://*.idp.domain.ru. Close the pop-up window with the OK button.double-click on the
network.negotiate-auth.delegation-urisentry you found and set it to the URL of the site with Blitz Identity Provider, for example,idp.domain.ru. When specifying addresses, you can use an asterisk (*) and specify multiple URLs separated by commas, for example:https://*.idp.domain.ru,http://*.idp.domain.ru. Close the pop-up window with the OK button.open the
network.auth-sspiparameter, set its value totrue;restart the browser.
For Google Chrome in macOS and Linux, you need to run Google Chrome in a special way:
"/Applications/Google Chrome.app/Contents/MacOS/Google Chrome" --args --auth-server-whitelist="idp.domain.ru" --auth-negotiate-delegate-whitelist="idp.domain.ru"
Where as idp.domain.ru you need to specify the URL of Blitz Identity Provider site.
No separate configuration is required for Apple Safari in macOS.
Blitz Identity Provider application launch settings#
Users may have problems logging in by operating system session if they use Internet Explorer browser and if their account is included in many security groups in the domain, or if the DN of the account is long enough. To avoid this situation, it is necessary to set a special JAVA parameter when launching the blitz-idp authentication service application that defines a large allowable HTTP header size. To do this, edit the /etc/default/blitz-idp file. Add a key to the JAVA_OPTS parameter:
-Dakka.http.parsing.max-header-value-length=16K
Web Server configurations#
Users may have problems logging in by operating system session if they are using the Internet Explorer browser, and if their account is included in many security groups in the domain, or if the DN of the account is long enough. To avoid this situation, you must adjust the web server settings that determine the allowable size of header buffers.
Recommended buffer values for nginx are given below:
proxy_buffer_size 16k;
proxy_buffers 4 16k;
proxy_busy_buffers_size 16k;
client_body_buffer_size 16K;
client_header_buffer_size 16k;
client_max_body_size 8m;
large_client_header_buffers 2 16k;
Debugging operating system session login problems#
If the operating system session login still does not work for users with the settings made, it is recommended to run the following command on the user’s computer at the command line:
klist
If the command successfully returns TGS credentials for the SPN configured for Blitz Identity Provider, then you should check the correctness of the settings on the user’s browser side and in Blitz Identity Provider. If TGS credentials for Blitz Identity Provider are missing, you can request them using the following command (you must specify the correct SPN and company domain name):
klist get HTTP/idp.company.ru@DOMAIN.LOC
If the command does not return the received TGS credentials, then we need to check if the settings on the Kerberos server are correct.