Access to network services via RADIUS#
It is possible to configure the connection of users to network access points (RDP, VPN, Wi-Fi, etc.) using the RADIUS protocol. The connection setup is performed in the sequence described below.
RADIUS Help
Remote Authentication Dial In User Service (RADIUS) RFC 2865 is a protocol used for centralized management of authorization, authentication, and accounting for access to network services and equipment. This protocol is used to communicate between the server and the RADIUS client. After the user requests access to the network service, the corresponding client sends a request to the server, as a result of which the server checks the presence of the user in the database. If the user is found, the server sends the client permission to authenticate him.
The RADIUS server is Blitz Identity Provider, the client is a connected network service. In the current implementation, the server searches for users in all connected repositories. Network services are configured in Blitz Identity Provider as an application.
The server supports the following authentication methods:
the first factor: login and password;
the second factor: confirmation by code from SMS, PUSH, TOTP, HOTP, email, or through the User Profile.
Step 1. Configure the RADIUS Server#
To configure the RADIUS server in Blitz Identity Provider, follow these steps:
In the admin console, go to RADIUS.
Configure the server configuration sequentially.
General settings
This tab specifies the general settings of the RADIUS server.
Status: enabling the server.Network binding address: a list of addresses from which the server processes requests.Tip
To process requests from all available network interfaces, set
0.0.0.0.Network port: The RADIUS port to which requests are received. If the port is not specified, then port1812is used.Maximum number of requests processed: the maximum number of requests processed by the server at the same time (the rest are discarded).Second factor timeout: The time in seconds that is given to the user to pass the second factor.Attention
This time must be agreed with the RADIUS client due to the correct setting of the waiting time for the RADIUS server response.
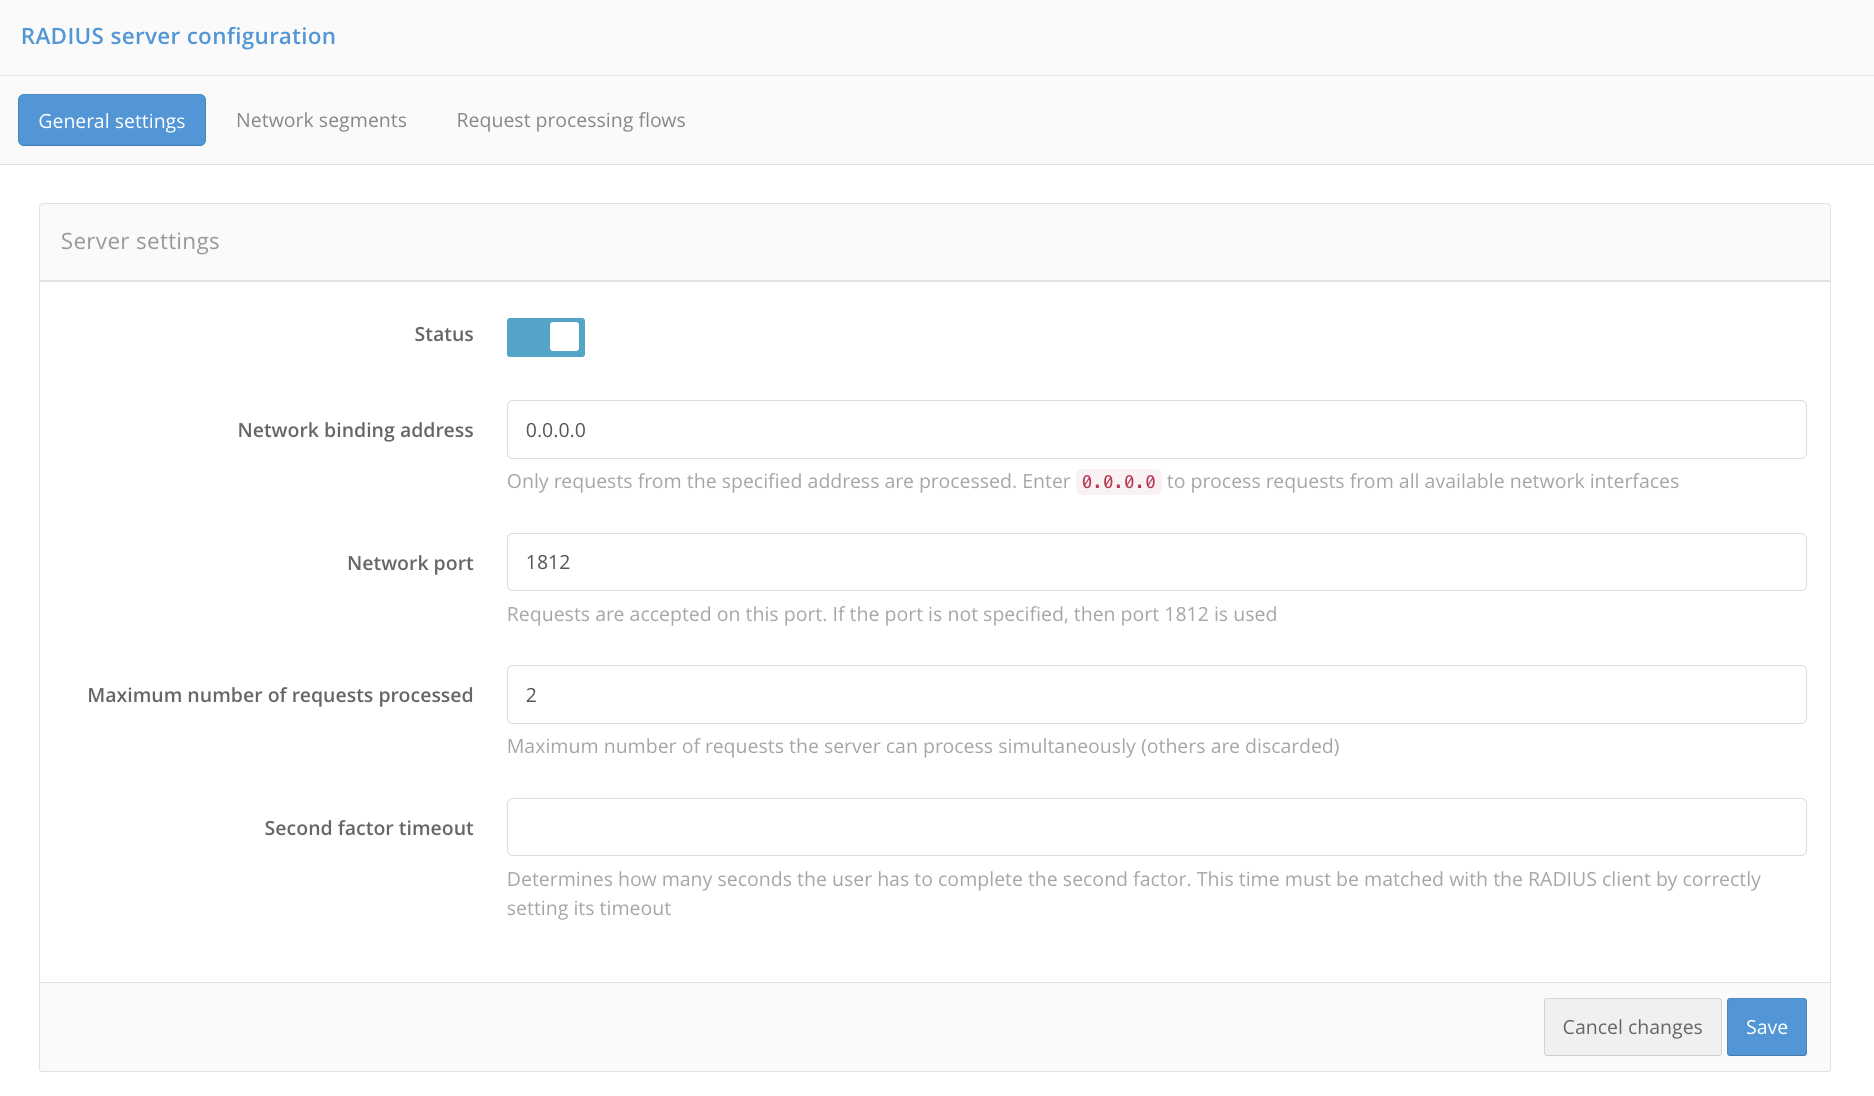
Click Save.
Network segments
The identification of applications is carried out by network segments. Specify the subnet, the shared key, and the default application so that the request from this subnet is associated with this application. If several applications request authentication from the same subnet, they can be identified by the
NasId.Attention
Subnets with a narrower prefix have priority.
Name: Enter a custom name for the network segment.Subnet: Enter the prefix of the subnet from which requests will be associated with the application.Shared key: generate and enter the key that you will need to enter on the side of a network service.Default application: Select the application that the request from this subnet will be associated with. If there are several applications, it will act as the default application.Matching of
NasIdand applications: if it is assumed that several applications will request authentication from the same subnet, set theNasId, by which the RADIUS server will identify them.
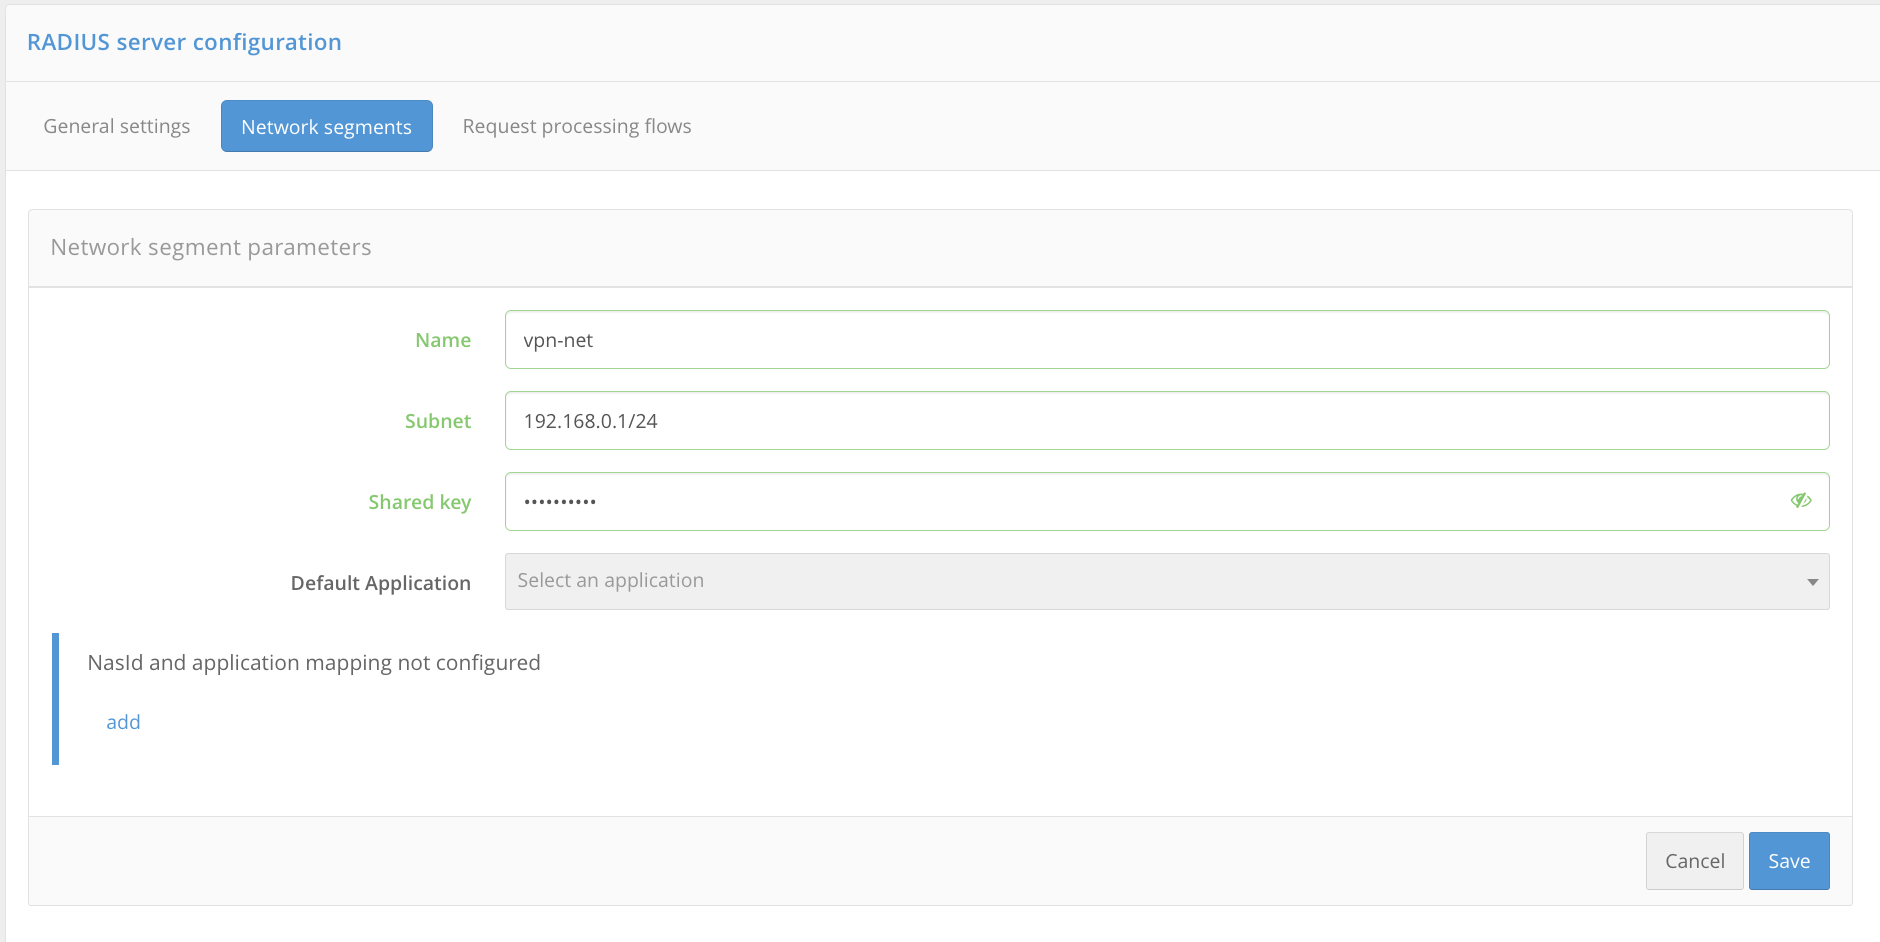
Click Save.
Request processing procedures
This tab contains a list of Java procedures that will process requests from connected applications. The procedures determine the authentication factor and implement other network access policies. In the simplest case, the procedures include the first or second factor. You can create several procedures depending on the security requirements of different network points.
To create a request processing procedure, follow these steps:
Click Create a new request processing flow.
Specify the settings:
Status: enabling the procedure.Flow identifier: Specify the procedure ID.Attention
The Java class describing the request processing procedure should have the same name.
Description: Enter a description of the procedure.
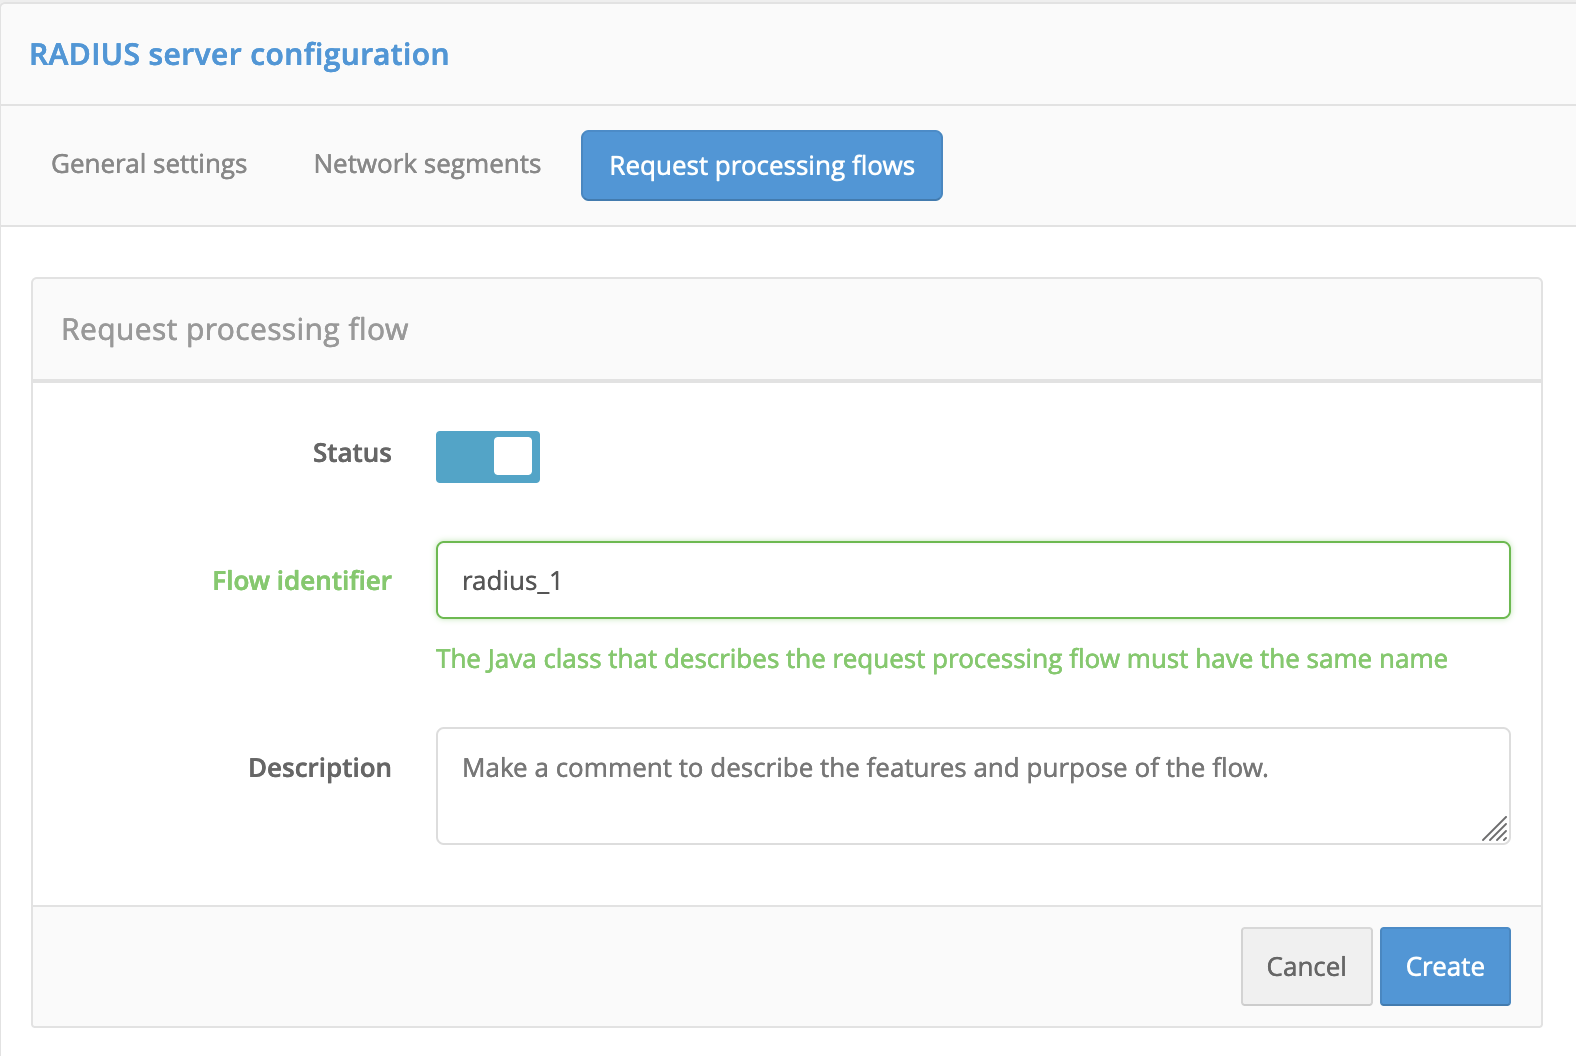
Click Save.
Enter the source code of the procedure:
Control the processing of RADIUS requests, you need to write a class in Java that implements the
RadiusFlowinterface.If the second authentication factor is used, call
RadiusResult.more("method"), wheremethodtakes one of the following values:sms,push,totp,hotp,email,prfc(confirmation in the User Profile).Note
When confirming through the User Profile, a message about the login attempt appears in it, in which the user must click Confirm.
Attention
In order for the factor to work, the User Profile must be opened with the mandatory passage of two authentication factors.
An example of the 2FA procedure via confirmation in your User Profile#package com.identityblitz.idp.radius.flow; public class RadTest2 implements RadiusFlow { public String loginN12(final String login) { return login; } public RadiusResult next(final RadiusContext context) { if (context.factor() == 1) { //return RadiusResult.more("sms"); return RadiusResult.more("prfc"); } return RadiusResult.authenticated(context.subject()); } }
If the first factor is used, deactivate the
if (context.factor() == 1).Example of the 1FA procedure#package com.identityblitz.idp.radius.flow; public class TestRadius implements RadiusFlow { public String loginN12(final String login) { return login; } public RadiusResult next(final RadiusContext context) { return RadiusResult.authenticated(context.subject()); } }
You can invoke the confirmation method selector by using
RadiusResult.challengein the procedure, as well as show an instruction on how to pass the second factor authentication by usingRadiusResult.dialog.private final Logger logger = LoggerFactory.getLogger("com.identityblitz.idp.flow.radius"); public String loginN12(final String login) { return login; } public RadiusResult next(final RadiusContext context) { if (context.factor() == 1) { return RadiusResult.challenge(Challenges.password()); } return RadiusResult.authenticated(context.subject()); } public RadiusResult dialog(final RadiusContext context, final String message, final java.util.Map<String, String> answers, final String answer) { if(message.equals("challengeChoose")) { final String challenge = answers.get(answer); if(challenge != null) return RadiusResult.challenge(Challenges.byName(challenge)); else return RadiusResult.dialog(message, answers); } else { return RadiusResult.rejected("unsupportedMessage"); } } }
To compile, click Save.
Step 2. Configure the application#
To configure the application, follow these steps:
In the admin console, go to Applications. Create an application with basic settings.
Identifier (entityID or client_id),Name,Domain: the domain of the network service.
Click Save.
In the section Protocols of the application on the tab RADIUS set the following settings:
Check the box
The password is checked by the application itselfif Blitz Identity Provider will be used for the second authentication factor.Second factor timeout: The time in seconds that is given to the user to pass the second factor. If the parameter is omitted, the value will be taken from the RADIUS server settings.Attention
This time must be agreed with the RADIUS client due to the correct setting of the waiting time for the RADIUS server response.
Select the procedure for processing requests from the application. In the list
Processing flowdisplays all procedures created by on the RADIUS server.Attention
Carefully configure integration on the network service side. If the
NasIdis not defined in the requests coming from the application, the application is recognized by Blitz Identity Provider as the default application for this network segment, even if they are actually different applications. In this case, the request processing procedure that is set for the default application will be performed, and not the one that is selected.
Click Save.
Step 3. Configuration on the network service side#
To complete the connection, enter the following settings on the network service side:
IP address of the server with
blitz-idp.The shared key specified in the settings network segment corresponding to the application (network service) on the RADIUS server. Using this key, the server will identify the network service and run the access processing procedure selected for it.
NasId(if necessary).The waiting time for a response from the RADIUS server, corresponding to the waiting time set on the server for the second factor.